
Owner's Manual


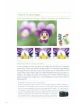
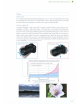
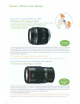

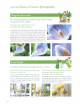


Table Of Contents
- Quick Reference Guide
- Instruction Manual
- Conventions Used in This Manual
- Table of Contents
- Quick Start Guide
- Supplied Accessories
- Parts & Controls
- Getting Started
- Attaching the Strap
- Charging the Battery
- Installing / Removing the Battery
- Installing / Removing a Memory Card
- Using the LCD Monitor
- Power On
- Date & Time Set
- Setting the Language
- Attaching & Detaching a Lens
- Lens Image Stabilizer
- Basic Operation
- Using the Quick Control Shooting Functions
- Menu Operations
- Formatting a Memory Card
- Switching the LCD Monitor Display
- Feature Guide
- Touch Screen Operations
- Basic Shooting & Image Playback
- Fully Automatic Shooting
- Full Auto Techniques
- Disabling Flash
- Creative Auto Shooting
- Shooting Portraits
- Shooting Landscapes
- Shooting Close-Ups
- Shooting Moving Subjects
- Shooting Night Portraits (with a Tripod)
- Shooting Night Scenes (Handheld)
- Shooting Backlit Scenes
- Quick Control
- Shoot by Ambience Selection
- Shoot by Lighting or Scene Type
- Image Playback
- Advanced Shooting Operations
- Program AE
- Setting the Image-Recording Quality
- Changing the ISO Speed
- Optimal Image Characteristics for the Subject
- Changing the AF Operation
- Selecting the AF Point
- Subjects Difficult to Focus
- Continuous Shooting
- Self-Timer
- Using the Built-in Flash
- Convey the Subject’s Movement
- Changing Depth of Field
- Manual Exposure
- Changing the Metering Mode
- Setting Exposure Compensation
- Auto Exposure Bracketing
- Locking the Exposure
- Locking the Flash Exposure
- Auto Correction of Brightness and Contrast
- Noise Reduction Settings
- Lens Peripheral Illumination / Chromatic Aberration Correction
- Customizing Image Characteristics
- Registering Preferred Image Characteristics
- Matching the Light Source
- Adjusting the Color Tone for the Light Source
- Setting the Color Reproduction Range
- Mirror Lockup to Reduce Camera Shake
- Live View Shooting
- Shooting Movies
- Handy Features
- Silencing the Beeper
- Card Reminder
- Setting Image Review Time
- Setting Auto Power-Off Time
- Adjusting LCD Monitor Brightness
- Creating and Selecting a Folder
- File Numbering Methods
- Setting Copyright Information
- Auto Rotate of Vertical Images
- Checking Camera Settings
- Restore Default Settings
- Preventing the LCD Monitor from Turning Off Automatically
- Changing the Shooting Settings Screen Color
- Setting the Flash
- Automatic Sensor Cleaning
- Appending Dust Delete Data
- Manual Sensor Cleaning
- Wireless Flash Photography
- Image Playback
- Searching for Images Quickly
- Magnified View
- Playing Back with the Touch Screen
- Rotating the Image
- Setting Ratings
- Quick Control During Playback
- Playing Movies
- Editing the Movie’s First and Last Scenes
- Slide Show (Auto Playback)
- Viewing the Images on a TV
- Protecting Images
- Erasing Images
- Shooting Information Display
- Post-Processing Images
- Printing Images
- Customizing the Camera
- Reference
- Troubleshooting
- Error Codes
- Specs
- Downloading Images to a Personal Computer
- Quick Reference Guide
- Index
- Do More with Macro
- Great Photography IS Easy
- Flash Classroom
- Scans of CD-ROMs
- Lens Warranty
- Camera Warranty

I
27
I
Fu
ll-time
manual focus
Fine-
tune
the
focus
while m
Af
mode.
Useful
at
ttme<;
like thesel
/lkx:.ro
photography
can
on'Y
focus
on
a
small
area.
The
i
mpression
r1
a
pl-roaraph
~
drorootical}y
bt
making
a
smaH
shift
in
the
focusing
po
i
nt
Use
aurofocus
for
qu
ick
focus
,
and
then
tum
the
focus
n
ng
.
When
you
keep
your
attention
on
the
viewfinder
and
fine-tune
the
focus
,
the
di
fference
1n
the
fin
i
shed
photo
will
be
immediately
apparent.
Terms
What
is
full-time manual focus?
U
se
1~
s
~
JI'Ic
fon
to
ma
ke
pr
ec
i
se
od
1us
tme
n
ts
a
her
focvs1ng
qv1cUy
on
au
tof
ocus
w
thoo
t
swit
ch
.ng
to
ma
nu
al.
Thi
s orin
gs
out
tn
e
fu
ll
oote
ntroi
of
t
i-
e onot
og
rop
her's expre
ss
ve ob
d1!1es
.