
User Manual
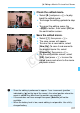
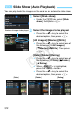
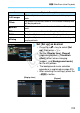
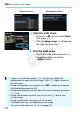
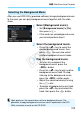
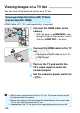
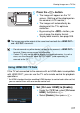
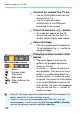
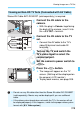
Table Of Contents
- Cover
- Introduction
- Getting Started
- Charging the Battery
- Installing and Removing the Battery
- Installing and Removing the Card
- Using the LCD Monitor
- Turning on the Power
- Setting the Date, Time, and Zone
- Selecting the Interface Language
- Attaching and Detaching a Lens
- Lens Image Stabilizer
- Basic Operation
- Quick Control for Shooting Functions
- Menu Operations
- Using the Touch Screen
- Before You Start
- Displaying the Grid
- Displaying the Electronic Level
- Feature Guide and Help
- Basic Shooting
- Fully Automatic Shooting (Scene Intelligent Auto)
- Full Auto Techniques (Scene Intelligent Auto)
- Disabling Flash
- Creative Auto Shooting
- Special Scene Mode
- Shooting Portraits
- Shooting Landscapes
- Shooting Close-ups
- Shooting Moving Subjects
- Shooting Night Portraits (With a Tripod)
- Shooting Night Scenes (Handheld)
- Shooting Backlit Scenes
- Quick Control
- Shoot by Ambience Selection
- Shoot by Lighting or Scene Type
- Setting the AF and Drive Modes
- Image Settings
- Setting the Image-Recording Quality
- Setting the ISO Speed
- Selecting a Picture Style
- Customizing a Picture Style
- Registering a Picture Style
- Setting the White Balance
- White Balance Correction
- Auto Correction of Brightness and Contrast
- Setting Noise Reduction
- Highlight Tone Priority
- Lens Peripheral Illumination / Chromatic Aberration Correction
- Creating and Selecting a Folder
- File Numbering Methods
- Setting Copyright Information
- Setting the Color Space
- Advanced Operations
- Program AE
- Shutter-Priority AE
- Aperture-Priority AE
- Manual Exposure
- Selecting the Metering Mode
- Setting Exposure Compensation
- Auto Exposure Bracketing (AEB)
- AE Lock
- Bulb Exposures
- HDR (High Dynamic Range) Shooting
- Multiple Exposures
- Mirror Lockup
- Using the Eyepiece Cover
- Using a Remote Switch
- Remote Control Shooting
- Flash Photography
- Shooting with the LCD Monitor (Live View Shooting)
- Shooting Movies
- Image Playback
- Image Playback
- Shooting Information Display
- Searching for Images Quickly
- Magnified View
- Playing Back with the Touch Screen
- Rotating the Image
- Setting Ratings
- Quick Control for Playback
- Enjoying Movies
- Playing Movies
- Editing a Movie’s First and Last Scenes
- Slide Show (Auto Playback)
- Viewing Images on a TV Set
- Protecting Images
- Erasing Images
- Changing Image Playback Settings
- Post-Processing Images
- Sensor Cleaning
- Printing Images
- Customizing the Camera
- Reference
- INFO. Button Functions
- Checking the Battery Information
- Using a Household Power Outlet
- Using Eye-Fi Cards
- Function Availability Table According to Shooting Mode
- Menu Settings
- System Map
- Troubleshooting Guide
- Error Codes
- Specifications
- Handling Precautions: EF-S18-55mm f/3.5-5.6 IS STM, EF-S18-135mm f/3.5-5.6 IS STM
- Viewing the CD-ROM Instruction Manuals / Downloading Images to Your Computer
Viewing Images on a TV Set
318
2
Connect the camera to a TV set.
Use an HDMI cable to connect the
camera to the TV.
X The TV’s input will switch
automatically to the HDMI port
connected to the camera.
3
Press the camera’s <x> button.
X An image will appear on the TV
screen and you can use the TV’s
remote control to play back images.
4
Select an image.
Point the remote control toward the
TV set and press the / button to
select an image.
5
Press the remote control’s Enter
button.
X The menu appears and you can
perform the playback operations
shown on the left.
Press the
/
button to select the
desired option, then press the Enter
button. For a slide show, press the
remote control’s
/
button to select
an option, then press the Enter button.
If you select [Return] and press the
Enter button, the menu will disappear
and you can use the / button to
select an image.
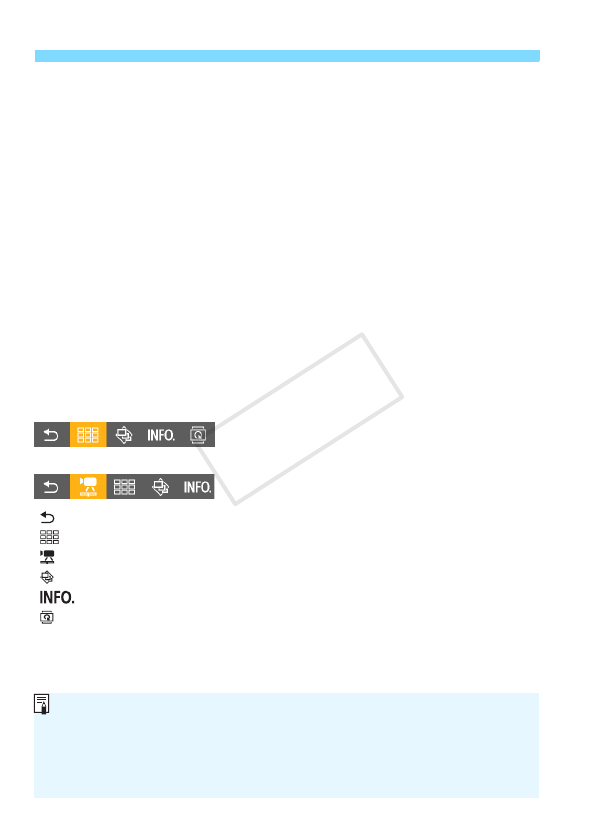
Still photo playback menu
Movie playback menu
: Return
: 9-image index
: Play movie
: Slide show
: Disp. shooting info
: Rotate
Some TV sets require you to first enable the HDMI CEC connection. For
details, refer to the TV set’s instruction manual.
Certain TV sets, even those compatible with HDMI CEC, may not
operate properly. In such a case, set [33: Ctrl over HDMI] to [Disable],
and use the camera to control the playback operation.
COPY