
User manual


7
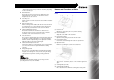
Operation Panel
(1) Job Buttons
Specific jobs are assigned to these buttons. Scanning will start
when any of these buttons are pressed. The scanned images
will be processed as follows for each button:
COPY: Prints scanned images to a specified printer.
FILE: Saves scanned images in a specified folder.
E-MAIL: Sends a new e-mail message with scanned images.
(2) START Button
This button performs the following functions.
- Executes jobs selected with the user defined job buttons or
scroll keys.
- Starts scanning when an application is used and the [Feed-
ing Option] is set to [Panel-Feeding].
- Launches the application configured with the Windows
Events function.
(3) STOP Button
Press this button to stop scan procedures or clear error dis-
plays, such as those for paper jams.
(4) POWER Button
Press this button to turn the scanner ON, and the power indica-
tor will light.
When you press and hold this button (for 2 seconds) while the
scanner is turned ON, the scanner and power indicator will turn
OFF.
The scanner's auto power off setting is enabled by default, and the
scanner will turn off automatically if it is not operated for 4 hours.
For details on how to disable this setting, see Auto Power Off Setting
Feeding Methods
There are two methods of scanning documents using this scanner.
Feeder
Flatbed (Platen Glass)
Precautions for Using the Feeder
When scanning a multipage document in a single scan proce-
dure using the feeder, make sure that all of the pages are identi-
cal in thickness, and quality of paper. Feeding different types of
paper at one time may cause a paper jam.
Scanning documents before the ink is dry will make the rollers
and scanning glass dirty, resulting in smears on the scanned