
User Manual


Table Of Contents
- Before Use
- Basic Guide
- Advanced Guide
- 1 Camera Basics
- 2 Auto Mode / Hybrid Auto Mode
- 3 Other Shooting Modes
- Shooting with Your Favorite Settings (Creative Assist)
- Specific Scenes
- Image Effects (Creative Filters)
- Shooting High-Contrast Scenes (High Dynamic Range)
- Adding Artistic Effects
- Shooting with a Fish-Eye Lens Effect (Fish-Eye Effect)
- Shooting Oil Painting-like Photos (Art bold Effect)
- Shooting Watercolor-like Photos (Water Painting Effect)
- Shots Resembling Miniature Models (Miniature Effect)
- Playback Speed and Estimated Playback Time (for One-Minute Clips)
- Shooting with a Toy Camera Effect (Toy Camera Effect)
- Shooting with a Soft Focus Effect
- Shooting in Monochrome (Grainy B/W)
- Shooting High-Contrast Scenes (High Dynamic Range)
- Shooting Movies in Movie Mode
- 4 P Mode
- Shooting in Program AE ([P] Mode)
- Adjusting Shooting Functions from a Single Screen
- Image Brightness (Exposure)
- Image Colors
- Shooting Range and Focusing
- Flash
- Other Settings
- 5 Tv, Av, M, and C Mode
- 6 Playback Mode
- 7 Wi-Fi Functions
- Available Wi-Fi Features
- Importing Images into a Smartphone
- Sending Images to a Registered Web Service
- Viewing Images Using a Media Player
- Printing Images Wirelessly from a Connected Printer
- Sending Images to Another Camera
- Image Sending Options
- Sending Images Automatically (Image Sync)
- Shooting Remotely
- Editing or Erasing Wi-Fi Settings
- 8 Setting Menu
- Adjusting Basic Camera Functions
- Date-Based Image Storage
- File Numbering
- Formatting Memory Cards
- Changing Video Formats
- Electronic Level Calibration
- Using Eco Mode
- Power-Saving Adjustment
- Screen Brightness
- World Clock
- Date and Time
- Display Language
- Silencing Camera Operations
- Hiding Hints and Tips
- Changing Touch Screen Settings
- Cleaning the Image Sensor
- Checking Certification Logos
- Adjusting Other Settings
- Restoring Defaults
- Adjusting Basic Camera Functions
- 9 Accessories
- System Map
- Optional Accessories
- Using Optional Accessories
- Using the Software
- Printing Images
- 10 Appendix
- Troubleshooting
- On-screen Messages
- On-screen Information
- Functions and Menu Tables
- Handling Precautions
- Specifications
- Type
- Image Sensor
- Recording System
- Image Processing during Shooting
- Autofocus
- Exposure Control
- Shutter
- Flash
- Drive, Self-timer System
- Still Photo Shooting
- Movie Shooting Settings
- LCD Monitor
- Playback
- Post-processing of Images
- Direct Printing
- Custom Functions
- Interface
- Wi-Fi
- Network Functions
- Power Supplies
- Dimensions and Weight
- Operation Environment
- Number of Shots per Memory Card
- Recording Time per Memory Card
- Internal Flash Range Guide
- Battery Pack LP-E17
- Battery Charger LC-E17/LC-E17E
- Type
- Index
- Wi-Fi (Wireless LAN) Precautions
44
Advanced Guide
Basic Guide
1
Camera Basics
2
Auto Mode /
Hybrid Auto Mode
3
Other Shooting Modes
Tv, Av, and M Mode
6
Playback Mode
7
Wi-Fi Functions
8
Set-Up Menu
9
Accessories
10
Appendix
Index
4
P Mode
5
Tv, Av, M, and C Modes
Before Use
Using the Menu
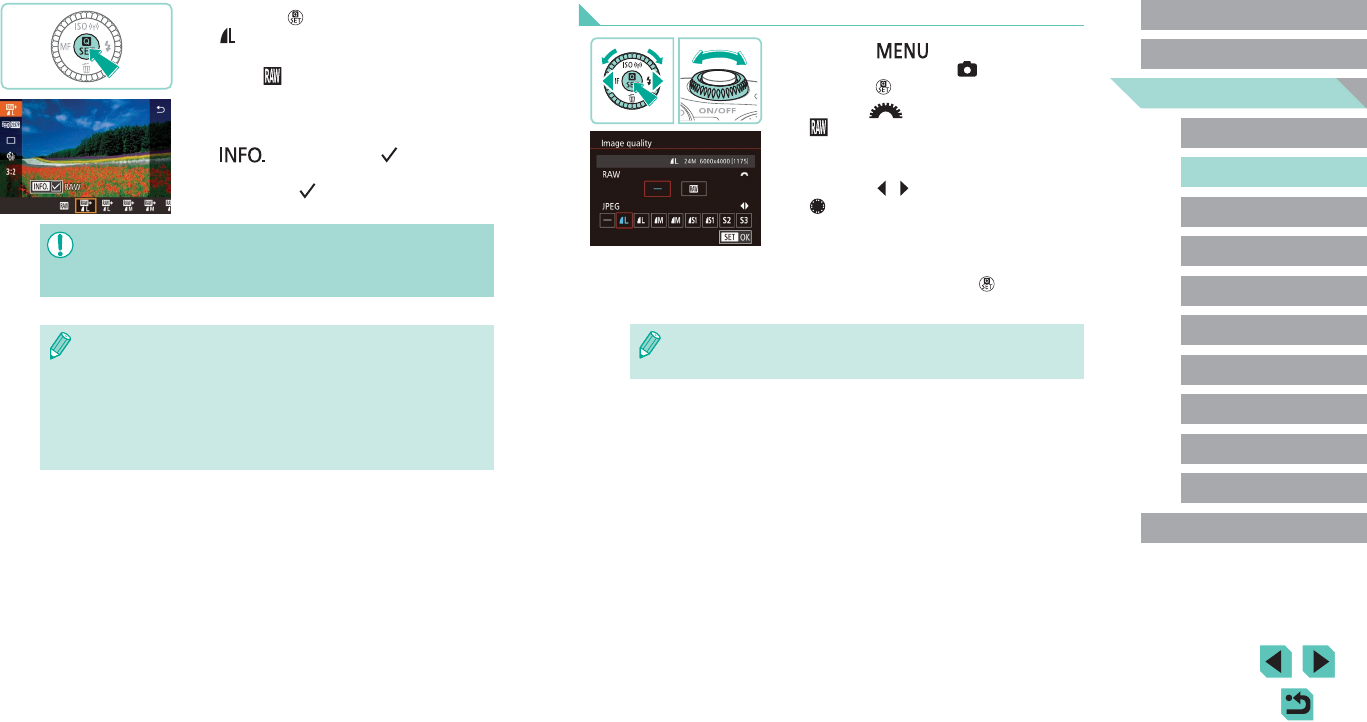
● Press the [ ] button, choose
[Image quality] on the [ 1] tab, and then
press the [ ] button (
=
32).
● Turn the [
] dial to choose
[ ] in [RAW]. This will save a RAW le
alongside the JPEG le. Select [–], and
the camera will only save the JPEG le.
● Press the [
][ ] buttons or turn the
[ ] dial to change [JPEG], selecting
your preferred save resolution and
compression ratio. Select [–], and the
camera will only save the RAW le.
● When nished, press the [
] button to
return to the menu screen.
● You cannot set both the [RAW] and [JPEG] image setting to [–] at
the same time.
● Press the [ ] button, and then choose
[ ] in the menu (
=
31).
● If you want to save only the RAW image,
select [
].
● To save both a JPEG and a RAW image,
select your desired image quality in
the setting screen and then press the
[
] button to add a [ ] to [RAW].
To go back to the original save method,
remove the [ ] from [RAW].
● When transferring RAW images (or RAW and JPEG images
recorded together) to a computer, always use the dedicated
software “EOS Utility” (
=
158).
● For details on resolution and the number of shots that will t on a
card, see “Number of Shots per Memory Card” (
=
195).
● The le extension for JPEG images is .JPG, and the extension for
RAW images is .CR2. JPEG and RAW images recorded together
will have the same image number in their lenames.
● Consult “Software” (
=
158) to learn more about the Digital
Photo Professional and EOS Utility software.