PUB.
Introduction Important Usage Instructions WARNING! TO REDUCE THE RISK OF FIRE OR ELECTRIC SHOCK, DO NOT EXPOSE THIS PRODUCT TO RAIN OR MOISTURE. WARNING! TO REDUCE THE RISK OF ELECTRIC SHOCK AND TO REDUCE ANNOYING INTERFERENCE, USE THE RECOMMENDED ACCESSORIES ONLY. 2 COPYRIGHT WARNING: Unauthorized recording of copyrighted materials may infringe on the rights of copyright owners and be contrary to copyright laws. HD Camcorder, XA10 A systems This device complies with Part 15 of the FCC Rules.
IMPORTANT SAFETY INSTRUCTIONS In these safety instructions the word “product” refers to the Canon HD Camcorder XA10 A and all its accessories. 1 2 3 4 5 6 7 8 9 10 11 12 13 14 15 16 17 18 19 20 21 22 23 24 25 26 27 Read these instructions. Keep these instructions. Heed all warnings. Follow all instructions. Do not use this apparatus near water. Clean only with dry cloth.
28 29 30 4 31 32 33 Objects and Liquid Entry — Never push objects of any kind into this product through openings as they may touch dangerous voltage points or short out parts that could result in a fire or electric shock. Be careful not to spill liquid of any kind onto the product. Servicing — Do not attempt to service this product yourself as opening or removing covers may expose you to dangerous voltage or other hazards. Refer all servicing to qualified service personnel.
Highlights of the XA10 The Canon XA10 HD Camcorder is a high-performance camcorder whose compact size makes it ideal in a variety of situations. The following are just some of the many functions featured in the camcorder. HD Recording HD CMOS PRO and DIGIC DV III processor The camcorder is equipped with a 1/3-inch CMOS sensor that captures video at an effective pixel count of approximately 2.07 megapixels (1920x1080). The video is then processed by the state-of-the-art DIGIC DV III image processor.
Touch AE Added and improved functionality By simply touching the screen, you can make dark areas in the picture appear brighter (0 65). This operation is simple yet allows you to shoot with the desired exposure. Other functions include two types of video scopes (0 84), conversion to standard definition (0 139) and Story Creator mode (0 105), which allows you to create engrossing video stories.
Enjoying your Recordings on Other Devices AVCHD-compatible HDTVs and digital recorders with a card slot compatible with the type of memory card used*. Connect the camcorder to an HDTV (0 127) Play video directly from your recorded memory card Eye-Fi Use an Eye-Fi card (0 142) to wirelessly upload recordings to your computer or a video sharing Web site. Save or upload to the Web. Use the supplied PIXELA’s software (0 135, 139).
Table of contents 1 Introduction 11 About this Manual 11 Conventions Used in this Manual 11 Supplied Accessories and CD-ROMs 13 Names of Parts 15 8 2 Preparations 22 Charging the Battery Pack 22 Preparing the Camcorder 24 Attaching the Microphone Holder Unit 24 Attaching the Handle Unit 24 Attaching the Lens Hood 25 Using the Viewfinder 25 Adjusting the Position and Brightness of the LCD Screen 26 Wireless Controller 28 Using a Tripod 29 Basic Operation of the Camcorder 30 Using the Touch Screen 30 Opera
Video Scopes 84 Displaying the Waveform Monitor during [A Programmed AE] Recording Program 84 Displaying the Waveform Monitor during [y Manual Exposure] Recording Program 84 Displaying the Edge Monitor 84 Video Snapshot 85 Pre-Recording 86 Onscreen Displays and Data Code 87 Faders 88 Infrared Recording 89 Activating Infrared Mode 89 4 Customization 90 Custom Button and Dial 90 Assignable Buttons 91 Changing the Assigned Function 91 Using an Assignable Button 91 Saving and Loading Menu Settings 92 Saving Me
9 Saving/Sharing Recordings 132 10 Copying Recordings to a Memory Card 132 Copying Scenes from the Date Index Screen 132 Copying Scenes from a Story by Rating 133 Copying a Single Photo 133 Copying Photos from the Index Screen 133 Saving Recordings on a Computer 135 Saving Movies (Windows only) 135 Saving Photos (Windows/Mac OS) 135 Copying Recordings to an External Video Recorder 137 In High Definition 137 In Standard Definition 137 Uploading Movies to Video Sharing Web Sites 139 Converting Scenes into S
1 Introduction About this Manual Introduction About this Manual Thank you for purchasing the Canon XA10. Please read this manual carefully before you use the camcorder and retain it for future reference. Should your camcorder fail to operate correctly, refer to Troubleshooting (0 159). Conventions Used in this Manual • IMPORTANT: Precautions related to the camcorder’s operation. • NOTES: Additional topics that complement the basic operating procedures.
About this Manual indicates that a function is available in the operating mode indicated and indicates that the function is not available. For a detailed explanation refer to Operating Modes (0 31). Brackets [ ] are used to refer to control buttons and menu options you will touch on the screen and to other onscreen messages and displays. 12 Self Timer Self Timer Operating modes: 1 Open the [Self Timer] screen. [FUNC.] [MENU] 8 [Self Timer] 2 Touch [A On n] and then touch [a].
Supplied Accessories and CD-ROMs Supplied Accessories and CD-ROMs The following accessories are supplied with the camcorder: 13 CA-570 Compact Power Adapter (incl. power cord) BP-808 Battery Pack Microphone holder unit (incl. screws) Handle unit (incl. screws) WL-D89 Wireless Controller (incl.
Supplied Accessories and CD-ROMs 14 The following CD-ROMs and software are supplied with the camcorder: • PIXELA’s Transfer Utility CD-ROM* - Use Transfer Utility for saving and transferring movies and music files you can use as background music. • Music Data/Image Mix Data CD-ROM (referred in the manual as “Camcorder Supplemental Disc”). Contains the following components. - Music data - Music files that can be used as background music during playback.
Names of Parts Names of Parts Left side view 1 2 3 45 6 7 15 19 18 17 8 9 16 15 10 14 13 12 1 2 3 4 Handle unit front screw (0 24) RESET button (0 162) 2 (camera/play) button (0 31) DISP. (onscreen display) button (0 87)/BATT.
Names of Parts Right side view 1 16 10 9 2 8 7 1 2 3 4 5 6 XLR terminals for CH1 and CH2 (0 75) Built-in microphone (0 78) MIC terminal (0 73) Grip belt (0 27) USB terminal (0 124, 126, 137) 4 3 6 7 8 9 10 HDMI OUT terminal (0 124, 125) REMOTE terminal (0 82) Built-in speaker (0 94) ACCESS indicator (0 41) Zoom lever (0 56) 5
Names of Parts Front view 6 5 17 4 3 2 1 2 3 4 5 6 Tally lamp (0 153) Instant AF sensor (0 174) Infrared light (0 89) Microphone cable clamp (0 24) Microphone holder unit (0 24) Microphone lock screw (0 24) 1
Names of Parts Back view 18 1 2 3 11 10 9 8 7 6 5 4 1 2 3 4 5 6 7 Viewfinder (0 25) START/STOP button (0 41) Strap mount (0 27) DC IN terminal (0 22) Dioptric adjustment lever (0 25) CUSTOM (customizable) dial (0 90) CUSTOM (customizable) button (0 90) 8 9 LCD touch screen (0 26, 30) POWERED IS button (0 60)/ Assignable button 2 (0 91) 10 AF/MF button (0 51)/ WEB button (0 139)/ Assignable button 1 (0 91) 11 Remote sensor (0 29)
Names of Parts Top view 1 2 3 4 19 7 1 Accessory shoe 2 3 4 5 6 7 START/STOP button (0 41) START/STOP lock ( ) lever (0 47) Mode switch (0 31) Eye cup POWER button Handle zoom rocker (0 56) 6 5 Cold shoe for attaching accessories such as the optional VL-10Li II Battery Video Light.
Names of Parts Bottom view 20 1 3 1 2 3 Serial number BATTERY RELEASE switch (0 23) Tripod socket (0 29) 2
Names of Parts Wireless Controller WL-D89 7 1 2 3 8 4 5 9 10 6 1 2 START/STOP button (0 41) b (index selection) button (0 97) 3 4 5 6 7 8 9 10 MENU button (0 33, 146) DISP. (onscreen display) button (0 87) SET button B (stop) button (0 93) PHOTO button (0 41) Zoom buttons (0 56) Navigation buttons ( Z/O/y/A ) A/C (play/pause) button (0 93) Press and hold for more than 2 seconds to switch between shooting and playback mode.
Charging the Battery Pack 2 Preparations Preparations Charging the Battery Pack 22 The camcorder can be powered with a battery pack or directly using the compact power adapter. The first time you use a battery pack, fully charge it and then use the camcorder until the battery pack is completely exhausted. Doing so will ensure that the remaining recording time will be displayed accurately.
Charging the Battery Pack To remove the battery pack 1 Slide U in the direction of the arrow and hold it pressed down. 2 Slide the battery pack and then pull it out. 23 BATTERY RELEASE switch IMPORTANT • Turn off the camcorder before connecting or disconnecting the compact power adapter. After pressing x to turn off the camcorder, important data is updated in the memory. Be sure to wait until the green ON/OFF (CHG) indicator goes out.
Preparing the Camcorder Preparing the Camcorder This section covers the basic preparations for the camcorder such as attaching the handle unit and lens hood, and adjusting the viewfinder and LCD screen. When attaching the lens hood, grip belt and straps, be careful not to drop the camcorder. 24 Attaching the Microphone Holder Unit Use the supplied screws to attach the microphone holder unit to the handle unit.
Preparing the Camcorder Attaching the Lens Hood Attach the lens hood to protect the lens and reduce the amount of stray light that may hit the lens. Remove the lens cap before attaching the lens hood. Place the lens hood on the front of the lens so that the groove on the lens hood is aligned with the bottom of the lens (햲), and then turn the lens hood clockwise (햳). 25 • Be careful not to deform the lens hood. • Make sure that the lens hood is aligned with the thread.
Preparing the Camcorder NOTES • Make sure you keep the eye cup attached when using the camcorder. • For details about how to take care of the viewfinder, refer to Handling Precautions (0 171), Cleaning (0 174). 26 Adjusting the Position and Brightness of the LCD Screen Rotating the LCD Panel Open the LCD panel 90 degrees. • You can rotate the panel 90 degrees downward. • You can rotate the panel 180 degrees toward the lens.
Preparing the Camcorder LCD Backlight When recording in bright places it may be difficult to use the LCD screen. Turn on the LCD backlight to make it brighter. With the camcorder on, hold h pressed down for more than 2 seconds. • Repeat this action to switch the LCD backlight between off (normal) and on (bright). NOTES • Using the bright setting will shorten the effective usage time of the battery pack.
Preparing the Camcorder Attaching an optional wrist strap Attach the wrist strap to the strap mount on the grip belt, adjust the length and fasten. • You can also attach the wrist strap to the strap mount on the grip belt to use both for extra convenience and protection. 28 Attaching an optional shoulder strap Pass the ends of the shoulder strap through the strap mount on the grip belt and adjust the length of the strap.
Preparing the Camcorder To use the wireless controller Point the wireless controller at the camcorder’s remote sensor when you press the buttons. • You can rotate the LCD panel 180 degrees to use the wireless controller from the front of the camcorder. • When you operate the wireless controller, the camcorder's tally lamp will illuminate. 29 NOTES • When the camcorder cannot be operated with the wireless controller, or when it can only be operated at very close range, replace the battery.
Basic Operation of the Camcorder Basic Operation of the Camcorder Using the Touch Screen 30 The control buttons and menu items that appear on the touch screen change dynamically depending on the operating mode and the task you are performing. With the intuitive touch screen interface you have all the controls at your fingertips. You can also use the supplied stylus pen for a more precise operation. Touch Press firmly on an element displayed on the touch screen.
Basic Operation of the Camcorder Operating Modes Recording In recording mode, the camcorder’s operating mode is determined by the position of the mode switch. Operating mode Mode switch Operation Let the camcorder take care of all the settings while you concentrate on recording (0 42). This operating mode is suitable if you just prefer not to bother with detailed camcorder settings. Enjoy full access to menus, settings and advanced functions (0 46).
Basic Operation of the Camcorder Using the Menus Many of the camcorder’s functions can be adjusted from the FUNC. panel and the setup menus. For details about the available menu options and settings, refer to the appendix Menu Options Lists (0 144). FUNC. Panel 32 Operating modes: The FUNC. panel shows a convenient overview of frequently used shooting functions. Touch [FUNC.] to access the FUNC. panel and then touch the function you want to set or adjust.
Basic Operation of the Camcorder Setup Menus Operating modes: * * In mode setup menus cannot be accessed and most menu settings will be reset to default values. 1 or mode only: Touch [FUNC.] 2 Touch [MENU] to open the setup menus. • You can also press u on the wireless controller. 3 Touch the tab of the desired menu. 4 Drag your finger up and down to bring the setting you want to change into the orange selection bar. • Menu items not available appear grayed out.
First Time Settings First Time Settings Setting the Date and Time You will need to set the date and time of the camcorder before you can start using it. The [Date/Time] screen will appear automatically when the camcorder’s clock is not set. 34 1 Press x to turn on the camcorder. • The [Date/Time] screen appears and the year will be selected. 2 Touch a field you want to change (year, month, day, hours or minutes). 3 Touch [Z] or [O] to change the field as necessary.
First Time Settings Changing the Time Zone Change the time zone to match your location. The default setting is New York. Operating modes: 1 Open the [Time Zone/DST] screen. [FUNC.] [MENU] 6 [Time Zone/DST] • Touching [FUNC.] is necessary only when performing the procedure in a recording mode. 2 Touch [S] to set the home time zone, or [V] to set the time zone of your destination when you are traveling. 3 Touch [Z] or [O] to set the desired time zone.
Using a Memory Card Using a Memory Card Memory Cards Compatible for Use with the Camcorder 36 You can use the following types of commercially available Secure Digital (SD) cards with this camcorder. As of October 2010, the movie recording function has been tested using SD/SDHC/SDXC memory cards made by Panasonic, Toshiba and SanDisk. Memory card type: SD memory card, SD Speed Class*: Capacity: 128 MB or larger**.
Using a Memory Card Eye-Fi Cards This product is not guaranteed to support Eye-Fi card functions (including wireless transfer). In case of an issue with an Eye-Fi card, please check with the card manufacturer. Also note that an approval is required to use Eye-Fi cards in many countries or regions. Without approval, use of the card is not permitted. If it is unclear whether the card has been approved for use in the area, please check with the card manufacturer.
Using a Memory Card Selecting the Memory for the Recordings You can select to record your movies and photos in the built-in memory or on a memory card. The default memory for recording both is the built-in memory. Operating modes: POINTS TO CHECK 38 • Be sure you understand the information provided in Eye-Fi Cards (0 37) before using an Eye-Fi card. 1 Open the [Rec Media for Movies] or [Rec Media for Photos] screen. [FUNC.
Using a Memory Card NOTES • You cannot use relay recording from the built-in memory to memory card Y. When using a single memory card, be sure to insert it into memory card slot X. • There will be a momentary stop in the scene at the point where the camcorder switches from one memory to another. • Any of the following actions will deactivate the relay recording function: - Turning off the camcorder. - Opening the double memory card slot cover. - Changing the position of the mode switch.
Using a Memory Card Initializing the Memory Initialize memory cards when you use them with this camcorder for the first time. You can also initialize a memory card or the built-in memory to permanently delete all the recordings it contains. At the time of purchase, the built-in memory comes pre-initialized and contains music files for use as background music and images for use with the image mix function (image mix frames). Operating modes: 40 1 Power the camcorder using the compact power adapter.
3 Recording Recording Movies and Photos Recording Recording Movies and Photos By default, movies and photos are recorded in the built-in memory. You can select the memory that will be used to record movies and photos (0 38). For details on recording audio, refer to Recording Audio (0 73). Please read the IMPORTANT section (0 47) before using an Eye-Fi card. POINTS TO CHECK • Before you begin recording, make a test recording first to check that the camcorder is operating correctly.
Recording Movies and Photos Recording in AUTO Mode When you use mode to shoot video and take photos, the camcorder will automatically adjust various settings for you. Operating modes: 1 Set the mode switch to 42 . 2 Turn on the camcorder. To record video Press g to begin recording. • Press g again to pause the recording. • The ACCESS indicator will flash from time to time while the scene is being recorded. • During recording, N will appear on the screen. Additionally, the tally lamp will illuminate.
Recording Movies and Photos Rating Scenes You can turn on the scene rating option in recording mode with the 8 [Rate Scenes (Recording)] setting. Immediately after recording a scene, you will have the option to rate it by touching one of the rating buttons; you can also touch [ ] or [a] to leave the scene unrated. Later you can play back scenes and perform other scene operations by rating. You can rate scenes while the camcorder is in described above in or mode.
Recording Movies and Photos Smart AUTO icons Background (color of the icon) → Bright1 (grey) Subject ↓ Blue skies1 (light blue) Vivid colors1 (green/red) Sunsets1 (orange) People (stationary) 44 ( ) ( ) ( ) ( ) ( ) ( ) — People (moving) Subjects other than people, such as landscapes ( Close objects ( ) ( / 2 / 2 ) ( Background (color of the icon) → ) ( / 2 / 2 ) ( — ) / 2 / 2 — ) Dark (dark blue) Subject ↓ Spotlight Night scene People (stationary) — —
Recording Movies and Photos NOTES • The START/STOP button on the handle has a lock lever to prevent accidental operation. Set the lock lever to R in cases such as when you do not want a recording inadvertently paused or do not plan to use this START/STOP button. Return the lever to its previous position to enable use of the START/STOP button again.
Recording Movies and Photos Recording in y (Manual) Mode When the mode switch is set to y (Manual mode), you can enjoy full access to the menus and manually adjust the exposure, focus, white balance and many more of the camcorder’s settings to your preference. Even in mode, though, the camcorder can help you with the settings. For example, by using Special Scene recording programs (0 69). Operating modes: 46 1 Set the mode switch to y. 2 Turn on the camcorder. 3 Record movies and photos.
Recording Movies and Photos IMPORTANT • Observe the following precautions while the ACCESS indicator is on or flashing. Failing to do so may result in permanent data loss or damage to the memory. - Do not open the double memory card slot cover. - Do not disconnect the power source or turn off the camcorder. - Do not change the camcorder’s operating mode. • Be sure to save your recordings regularly (0 132), especially after making important recordings.
Quick Start Function Quick Start Function When you close the LCD panel with the camcorder on, the camcorder enters the standby mode. In standby mode the camcorder consumes only about 1/3 the power used when recording, saving energy when you are using a battery pack. Additionally, when you open the LCD panel or pull out the viewfinder, the camcorder is ready to start recording in approximately 1 second*, allowing you to record the subject right away.
Selecting the Video Quality (Recording Mode) Selecting the Video Quality (Recording Mode) The camcorder offers 5 recording modes. Changing the recording mode will change the recording time available on the memory. Select MXP or FXP mode for better movie quality; select LP mode for longer recording times. The following table gives approximate recording times. Operating modes: 1 Open the [Recording Mode] screen. [FUNC.] [MENU] 8 49 [Recording Mode] 2 Touch the desired recording mode and then touch [a].
Selecting the Frame Rate Selecting the Frame Rate You can change the frame rate (the number of frames recorded per second) to change the look of your movies. Operating modes: 1 Open the [Frame Rate] screen. 50 [FUNC.] [MENU] 8 [Frame Rate] 2 Touch the desired frame rate and then touch [a]. Options [C 60i (Standard)] 60 fields per second, interlaced. Standard frame rate of NTSC analog TV signals. [o PF30] Shooting at 30 frames per second, progressive*.
Focus Adjustment Focus Adjustment You can adjust the focus manually and use the peaking function to assist you or you can let the camcorder focus for you by using autofocus. With autofocus, you can set the autofocus speed. The camcorder also features two more focusing functions, face detection and Touch & Track. Operating modes: 51 POINTS TO CHECK • Adjust the zoom before you start the procedure. Manual Focus Use the focus ring to focus manually.
Focus Adjustment Focus Preset When focusing manually, you can set a preset position for the focus in advance so that you can later return to that preset focus position instantly. 1 Open the focus controls. [FUNC.] [X Focus] 52 2 Touch [MF]. 3 Turn the focus ring to the desired focus position. 4 Touch [ ] to set the preset focus position. 5 After adjusting the focus, touch [ ] to return to the preset focus position. • Touch [ ] again to cancel the current preset focus position.
Focus Adjustment Options ( Default value) [R Instant AF] Sets the autofocus to Instant AF. The focus is adjusted at the highest speed. This mode is useful even when recording in very bright or low-light surroundings. This mode uses both the TTL system and external sensor for focusing. [ Medium AF] Sets the autofocus to Medium AF. The camcorder focuses more smoothly on the subject than when using the [R Instant AF] setting. This mode uses both the TTL system and external sensor for focusing.
Focus Adjustment 1 Open the [Face Detection & Tracking] screen. [FUNC.] [MENU] 7 [Face Detection & Tracking] 2 Touch [A On o] and then touch [a]. To select the main subject 54 If there is more than one person in the picture, the camcorder will automatically select one person it determines is the main subject. The main subject is indicated by a white face detection frame and the camcorder will optimize the settings for that person. Other faces will have gray frames.
Focus Adjustment Touch & Track When recording a group of people using face detection, the camcorder will automatically detect one person as the main subject. You can use Touch & Track to tell the camcorder to track and optimize settings for a different person. You can also use Touch & Track to always keep in focus other moving subjects, such as pets or moving vehicles. Operating modes: 1 Make sure face detection (0 53) and autofocus (0 52) are activated. • Face detection is always activated in mode.
Zooming Zooming Operating modes: 56 There are four ways you can zoom in and out: using the zoom lever on the camcorder, using the zoom rocker on the handle, using the zoom buttons on the wireless controller or using the zoom controls on the touch screen. In addition to the 10x optical zoom, in mode, you can turn on the digital zoom* (40x or 200x) with the 7 [Digital Zoom] setting. This camcorder also features a digital tele-converter, which allows you to enlarge the image on the screen digitally.
Zooming Approximate zoom speeds* (zoom lever) [Zoom Lever Zoom Speed] setting [I] (variable) [ ] (constant) [Zoom Speed Level] setting Selected constant speed [L Slow] [K Normal] [J Fast] – 4 sec. to 4 min. 45 sec. 3 sec. to 3 min. 2 sec.** to 1 min. 1 (slowest) 4 min. 45 sec. 3 min. 1 min. 16 (fastest) 4 sec. 3 sec. 2 sec.** * Measured from full wide-angle to full telephoto.
Zooming Using the Touch Screen’s Zoom Controls 1 Display the zoom controls on the touch screen. [FUNC.] [ZOOM] • The zoom controls appear on the left side of the screen. 2 Touch the zoom controls to operate the zoom. 58 • Touch anywhere within the Q area to zoom out or anywhere within the P area to zoom in. Touch closer to the center for a slow zoom; touch closer to the e/d icons for faster zooms. 3 Touch [a] to hide the zoom controls.
Zooming Digital Tele-Converter Using the digital tele-converter, you can digitally increase the focal length of the camcorder by a factor of approx. 2 and record the enlarged image at full HD resolution. Operating modes: 1 Open the [Digital Zoom] screen. [FUNC.] [MENU] 7 [Digital Zoom] 2 Touch [ Digital Tele-conv.] and then touch [a]. 3 Open the zoom controls. [FUNC.] 4 Touch [ [ZOOM] ] (digital tele-converter) and then touch [a].
Advanced Image Stabilization Advanced Image Stabilization The image stabilizer reduces camcorder blur (blur due to the camcorder moving) so you can get nice, stable shots. Select the image stabilization mode according to the shooting conditions. Operating modes: 1 Open the image stabilizer screen. 60 [FUNC.] [Image Stabilizer] 2 Touch the desired IS mode and then touch [a].
Automatic Gain Control (AGC) Limit Automatic Gain Control (AGC) Limit When recording in dark surroundings, the camcorder will automatically increase the gain to try to get a brighter picture. However, using higher gain values may result in more noticeable video noise. You can select the AGC limit to curb the amount of noise by setting the maximum gain value to be used. The smaller the AGC limit, the picture will be darker but will have less the noise.
Automatic Exposure Recording Programs Automatic Exposure Recording Programs With the automatic exposure (AE) recording programs, the camcorder will adjust the shutter speed and/or aperture value to obtain the optimal exposure. When using the AE recording programs, you can change functions like the white balance and image effects. Operating modes: 62 1 Open the screen of the desired recording program. [FUNC.] [Rec. Programs] [B Shutter-Pri. AE] or [C Aperture-Pri.
Automatic Exposure Recording Programs NOTES • [B Shutter-Pri. AE]: - On screen only the denominator is displayed – [B 250] indicates a shutter speed of 1/250 second, etc. - When recording in dark surroundings, you can obtain a brighter picture by using slow shutter speeds; however, image quality may not be as good and autofocus may not work well. - The image may flicker when recording with fast shutter speeds.
Exposure Adjustment Exposure Adjustment At times, backlit subjects may appear too dark (underexposed) or subjects under very strong lights may appear too bright or glaring (overexposed). In such cases, adjusting the exposure will correct this. This camcorder features a dedicated recording program, [y Manual Exposure], for adjusting the exposure manually. However, you can also adjust the exposure when using other recording programs.
Exposure Adjustment Using the Zebra Pattern You can use the zebra pattern to identify areas that might be overexposed, so you can correct the exposure appropriately. The camcorder offers two levels of zebra pattern: With 100% only areas that will lose detail in the highlight areas will be identified, while 70% will identify also areas that are dangerously close to losing detail. 1 From the exposure adjustment screen, touch [5] to select the zebra level. 2 Touch [70%] or [100%] and then touch [f].
Exposure Adjustment 1 Open the exposure adjustment screen. [FUNC.] [e Exposure] 2 Touch a subject that appears inside the e frame. 66 • The Touch AE mark (P) will flash and the exposure will be adjusted automatically so the area you touched will be correctly exposed. You have the option to further adjust the exposure manually as necessary. Depending on the subject, you may want to use the [Highlights] setting as described below.
White Balance White Balance The white balance function helps you to accurately reproduce colors under different lighting conditions. Operating modes: POINTS TO CHECK • Select a recording program other than the Special Scene recording programs. 1 Open the white balance screen. [FUNC.] [m White Balance] 2 Touch the desired option and then touch [a].
White Balance NOTES 68 • When you select a custom white balance: - Set 7 [Digital Zoom] to [B Off]. - Reset the white balance when you change locations or the lighting or other conditions change. - Depending on the light source, g may keep flashing. The result will still be better than with [Y Automatic].
Special Scene Recording Programs Special Scene Recording Programs Recording in a very bright ski resort or capturing the full colors of a sunset or a fireworks display becomes as easy as selecting a Special Scene recording program. Operating modes: 1 Open the recording programs screen. [FUNC.] [Rec. Programs] [F Portrait] 2 Touch the desired recording program and then touch [a].
Special Scene Recording Programs [LSpotlight] [MFireworks] To record spotlit scenes. To record fireworks. 70 NOTES • [F Portrait]/[G Sports]/[I Snow]/[J Beach]: The picture may not appear smooth during playback. • [F Portrait]: The blur effect of the background increases the more you zoom in (P). • [I Snow]/[J Beach]: The subject may become overexposed on cloudy days or in shaded places. Check the image on the screen. • [p Low Light]: - Moving subjects may leave a trailing afterimage.
Image Effects Image Effects You can adjust the color depth, brightness, contrast, and sharpness of the image. Operating modes: POINTS TO CHECK • Select a recording program other than the Special Scene recording programs. • Image effects are not available in infrared mode. 1 Open the image effects screen. [FUNC.] [Image Effects] 2 Touch [ON] and then touch [Color Depth], [Sharpness], [Contrast] or [Brightness]. • Select [OFF] to turn off the image effects.
Self Timer Self Timer Operating modes: 1 Open the [Self Timer] screen. [FUNC.] 72 [MENU] 8 [Self Timer] 2 Touch [A On n] and then touch [a]. • n will appear on the screen. • Repeat, selecting [B Off], to turn off the self timer. Movies: In record pause mode, press g. The camcorder starts recording after a 10-second countdown*. The countdown appears on the screen. Photos: In record pause mode, touch [PHOTO]. The camcorder will record the photo after a 10-second countdown*.
Recording Audio Recording Audio You can record audio using the built-in microphone, optional external microphone (XLR or MIC terminal) or line input (XLR terminal). For external microphones or audio sources connected to an XLR terminal, you can select the audio input independently for channel 1 and channel 2.
Recording Audio 1 Attach the receiver to the camcorder’s grip belt. 2 Connect the receiver to the camcorder’s MIC terminal. 3 If necessary, activate the audio mix function (0 80) and adjust the audio mix balance. 4 Attach the microphone (transmitter) to the subject. • For details about using the WM-V1, refer to the instruction manual supplied with the microphone. 74 To use commercially available microphones 1 Connect the external microphone to the MIC terminal. 2 Open the [MIC Terminal Input] screen.
Recording Audio Setting the XLR Terminal 1 Set the audio input switch to EXT. • Changing the position of the audio input switch affects both channel 1 and channel 2 simultaneously. XLR terminal switches Audio input switch 2 Set the XLR terminal switch of the desired channel to LINE or MIC. • To supply a microphone with phantom power, set the switch to MIC+48V instead. Make sure to connect the microphone first, before turning the phantom power on.
Audio Recording Level Audio Recording Level When using the built-in microphone or a microphone connected to the MIC terminal, you can adjust the audio recording level using the FUNC. panel. For a microphone or audio source connected to an XLR terminal, adjust the audio recording level using the corresponding channel's audio level dial. Operating modes: 76 Using the Built-in Microphone or Microphone Connected to the MIC Terminal 1 Open the manual audio recording level adjustment screen. [FUNC.] [c Mic.
Audio Recording Level Using a Microphone or Audio Source Connected to an XLR Terminal When a microphone or audio source is connected to an XLR terminal and the audio input switch is set to EXT, the audio level indicator will appear on the screen. Turn the corresponding audio level dial to adjust the audio recording level as necessary.
Built-In Microphone Directionality Built-In Microphone Directionality You can change the directionality of the built-in microphone to have more control over how sound is recorded. Operating modes: 1 Open the [Built-in Mic Directionality] screen. 78 [FUNC.] [MENU] 7 [Built-in Mic Directionality] 2 Touch the desired option and then touch [a]. Options ( Default value) [ Monaural] Mono recording that emphasizes sound coming from the front of the camcorder.
Audio Equalizer Audio Equalizer You can use the audio equalizer to adjust sound levels by specifically targeting the high- or lowfrequency range. The audio equalizer settings are only available when recording sound using the builtin microphone. Operating modes: 1 Open the [Built-in Mic Freq. Response] screen. [FUNC.] [MENU] 7 [Built-in Mic Freq. Response] 2 Touch the desired option and then touch [a].
Audio Mix Audio Mix When recording, you can mix audio from the built-in microphone with external audio from the MIC terminal and adjust the mix balance for original sound effects. The external audio input can be from the optional WM-V1 Wireless Microphone, a commercially available external microphone or from an external audio player (analog Line In). Operating modes: 80 1 Connect the external source to the MIC terminal. 2 Open the [MIC Terminal Input] screen. [FUNC.
Using Headphones Using Headphones Use headphones for playback or to check the audio level while recording. The headphones are connected to the AV OUT/X terminal, which is used for both the headphones and the audio/video output. Before connecting the headphones, follow the procedure below to change the function of the terminal from AV output to X (headphones) output. Operating modes: * * Headphones can be used also in mode but the function of the terminal cannot be changed in this mode.
Using a Zoom Remote Controller Using a Zoom Remote Controller You can attach the optional ZR-2000 or ZR-1000 Zoom Remote Controller to the camcorder to use certain functions while viewing the picture on an external monitor without touching the camcorder. This is particularly useful while the camcorder is mounted on a tripod and you want to ensure maximum stability of a shot. Operating modes: 82 Connect the optional ZR-2000 or ZR-1000 Zoom Remote Controller to the REMOTE terminal on the camcorder.
Color Bars/Audio Reference Signal Color Bars/Audio Reference Signal You can have the camcorder output and record color bars and a 1 kHz audio reference signal. Operating modes: 1 Open the [Color Bars & Test Tone] screen. [FUNC.] [MENU] 8 [Color Bars & Test Tone] 2 Touch the desired option* and then touch [a]. * When you select [ Color Bars & Tone], you can adjust the audio reference signal. Touch [f] and continue with the procedure below.
Video Scopes Video Scopes The camcorder can display a simplified waveform monitor. It can also display an edge monitor* to help you focus. The video scopes appear only on the LCD screen. They do not appear in the viewfinder or on an external monitor. * The edge monitor looks at the focus of the entire picture and displays the results as a waveform. Operating modes: 84 Displaying the Waveform Monitor during [A Programmed AE] Recording Program 1 Make sure the recording program is [A Programmed AE]. [FUNC.
Video Snapshot Video Snapshot Record a series of short scenes. Then, play back your video snapshot scenes set to your favorite music (0 118). The default length of a video snapshot scene is 4 seconds but you can change it to 2 or 8 seconds, or to the length recommended for the selected story scene (category) in Story Creator, with the 8 [Video Snapshot Length] setting. Operating modes: 1 Open the video snapshot screen. [FUNC.
Pre-Recording Pre-Recording The camcorder will start recording 3 seconds before you press g, ensuring you do not miss important shooting opportunities. This is especially useful when it is difficult to predict when to start recording. Operating modes: 86 1 Open the pre-recording screen. [FUNC.] [d Pre REC] 2 Touch [A On] and then touch [a]. • d will appear on the screen. • Repeat, selecting [B Off], to turn off pre-recording. 3 Press g.
Onscreen Displays and Data Code Onscreen Displays and Data Code You can turn most onscreen displays on or off. Operating modes: Repeatedly press h to turn the onscreen displays on/off in the following sequence: , mode: • All displays on • Most displays off1 , mode2: • Only data code on • All displays on 1 Pressing h will turn off most of the icons and displays that appear automatically but will not remove control buttons ([FUNC.], [PHOTO], etc.
Faders Faders The camcorder offers two professional looking transition effects to fade-in or fade-out scenes. You have the option to activate the fader only one time or every time you start or stop recording. Operating modes: 1 Open the fader selection screen. 88 [FUNC.] [O Faders] 2 Touch the desired fader and then touch [a]. • You can preview the transition effect on the screen. • The icon of the selected fader appears in green.
Infrared Recording Infrared Recording This camcorder features the ability to shoot movies in dark surroundings using the camcorder's infrared light and other sources of infrared light. Also, you can select whether the lighter areas of the picture appear in green or white. Operating modes: 89 Activating Infrared Mode Follow the procedure below to set the camcorder to infrared (IR) mode and to set the color of highlights in the picture. 1 Move the INFRARED switch to ON. • appears on the screen.
Custom Button and Dial 4 Customization Customization Custom Button and Dial You can assign to f and CUSTOM dial one of several frequently used functions. You can then adjust the selected function using f and CUSTOM dial, without having to access the menu. 90 Operating modes: 1 Open the [Custom Key/Dial] screen. [FUNC.] [MENU] 6 [Custom Key/Dial] 2 Touch the desired option and then touch [a]. Options [o Tv/Av] ( Default value) When you set the recording program to [B Shutter-Pri.
Assignable Buttons Assignable Buttons The camcorder conveniently features 2 buttons to which you can assign various functions. By assigning often used functions, you can quickly access them with a single press of a button. Operating modes: 91 Changing the Assigned Function 1 Open the selection screen for the desired assignable button. [FUNC.] [MENU] 6 [Assign Button 1] or [Assign Button 2] 2 Select the desired option and then touch [a].
Saving and Loading Menu Settings Saving and Loading Menu Settings After you adjust the cinema-look filters and other settings in the FUNC. panel and setup menus, you can save those settings on a memory card. Operating modes: 92 Saving Menu Settings to a Memory Card Menu settings must be saved to memory card Y. If the memory card already has menu settings on it, they will be overwritten. 1 Insert a memory card into memory card slot Y. 2 Open the [Backup Menu Settings 7] screen. [FUNC.
5 Playback Playing Back Video Playback Playing Back Video Operating modes: 1 Press S. • You can also press and hold B on the wireless controller for more than 2 seconds to switch between shooting and playback mode. 2 Open the date index screen, if it is not displayed. [b] [1 Date] 3 Look for the scene you want to play back. • Move the zoom lever toward Q to show 15 scenes per page; move it toward P to show 6 scenes per page. AMemory being read. BRecording date.
Playing Back Video 4 Touch the desired scene to play it back. • Playback will start from the scene selected and continue until the end of the last scene in the index screen. • Touch the screen to display the playback controls. During playback, the playback controls will disappear automatically after a few seconds without operation. In playback pause, touch the screen again to hide the playback controls. 94 During playback: AJump to the beginning of the scene. Double-tap to jump to the previous scene.
Playing Back Video During playback pause: 95 AResume playback. BSlow playback* backward/forward. CCapture the displayed frame as a photo (0 104). DDecoration (0 110). * Touch several times to increase the playback speed 1/8 → 1/4 the normal speed. During slow playback, touch anywhere on the screen to return to playback pause. IMPORTANT • Observe the following precautions while the ACCESS indicator is on or flashing. Failing to do so may result in permanent data loss.
Playing Back Video 3D Flip View Touch [ ] in the date index screen to switch to 3D Flip View. This convenient way of displaying scenes grouped by recording date in a 3D layout can be useful to flip through a large number of recordings. 96 ARecording date. BDrag your finger left to go to the next date with recordings. CDrag your finger up and down to browse through the scenes recorded in the displayed date. DDrag your finger right to go to the previous date with recordings.
The Index Selection Screen: Selecting the Content to Play Back The Index Selection Screen: Selecting the Content to Play Back From the index selection screen you can select the content you want to play back (original scenes by date or by story, or photos, for example). You can also select the memory from which you want to play back your recordings. Operating modes: In any index screen, touch [b].
Deleting Scenes and Stories Deleting Scenes and Stories You can delete those scenes and stories that you are not interested in keeping. Deleting scenes allows you also to free up space on the memory. Operating modes: 98 Deleting a Single Scene 1 Play back the scene you wish to delete. 2 Touch the screen to display the playback controls. 3 Open the screen to delete the scene. [C] [Edit] [Delete] 4 Touch [Yes]. • The scene is deleted. 5 Touch [OK].
Deleting Scenes and Stories Deleting a Single Scene from a Story 1 Open the list of scenes of the story that contains the scene you want to delete. [b] [ Gallery] Bring the desired story to the front [Scene List] 2 In the [Scene List] screen, drag your finger up/down to select the scene you want to delete. 3 Touch the orange box on the right to open the [Edit Scene] screen. 4 Touch [d] and then touch [Yes]. • The selected scene is deleted. 5 Touch [OK] and then touch [f].
Deleting Scenes and Stories Deleting Stories Deleting a story permanently deletes all the scenes it contains. The two preexisting stories, [Unsorted] and [Video Snapshot], cannot be deleted. 1 Open the gallery. [b] 100 [ Gallery] 2 Select the story you want to delete. • Drag your finger right/left to bring the desired story to the front. 3 Open the [Delete Story] screen. [Story Details] [Edit Story] [Delete Story] 4 Touch [Yes]. • Touch [Stop] to interrupt the operation while it is in progress.
Dividing Scenes Dividing Scenes You can divide scenes in order to leave out the best parts and later cut out the rest. Operating modes: 1 Play back the scene you want to divide. 2 Pause the playback at the point where you want to divide the scene. 3 Open the scene division screen. [Edit] [Divide] 4 Bring the scene to a precise point, if necessary. • Playback controls will appear on the screen (0 94).
Selecting the Playback Starting Point Selecting the Playback Starting Point If you have a very long scene, you may want to start playing back the scene from a certain point. You can use the movie timeline to break the scene to segments at fixed time intervals ranging from 6 seconds to 6 minutes. Operating modes: 102 1 Open the date index screen. 2 Open the scene’s [Timeline] screen. [c] Desired scene • The [Timeline] screen appears. The large thumbnail will show the first frame of the scene.
Capturing Video Snapshot Scenes and Photos from a Movie Capturing Video Snapshot Scenes and Photos from a Movie You can capture video snapshot scenes, single photos or a series of continuous photos from a previously recorded scene. For example, you may want to print photos from video recorded at a party or create a small video clip using video snapshot scenes from the highlights of an event.
Capturing Video Snapshot Scenes and Photos from a Movie Capturing Photos You can capture a single photo or a series of photos. The size of the captured photos will be 1920x1080 and it cannot be changed. Please read the IMPORTANT section (0 104) before using an Eye-Fi card. To select the photo capture settings 104 1 Open the [Photo Capture from Video] screen. [MENU] 8 [Photo Capture from Video] 2 Touch [A Single Photo] or [B Photo Sequence] and then touch [a].
6 Using Story Creator to Create Video Stories Video Stories and Cinema Style Video Stories and Cinema Style Using Story Creator to Create Video Stories Story Creator is a helpful function that offers suggestions for typical scenes in a number of situations. With Story Creator, creating a video story with a structured yet interested storyline is as easy as selecting one of the story themes, such as [Travel], [Kids & Pets] or [Blog], and following the suggested categories to record video.
Using Story Creator to Create Video Stories Recording a Scene within a Story Press g to record movies within the selected story scene (category). • Use the displayed recommended length as a reference when recording scenes. • Scenes will be recorded under the story and category currently selected. • You can also record video snapshot scenes (0 85). 106 AReturn to the list of story scenes (categories). BRecommended length of scenes in this category. CCurrently selected story scene (category).
Using Story Creator to Create Video Stories Recording Additional Scenes within an Existing Story 1 Start Story Creator mode. [FUNC.] [ Story Creator] • Alternatively, you can set an assignable button to [ Story Creator] (0 91). 2 Select the story to which you want to add new scenes. • The list of story scenes will appear. The orange frame on the right will show how many scenes you have recorded in each story scene (category).
CINEMA Mode and Cinema-Look Filters CINEMA Mode and Cinema-Look Filters In mode, the camcorder will adjust the frame rate and several other picture-related settings to give your recordings a cinematic look. In this mode you can also use a variety of professional cinemalook filters to create unique movies with a distinctive appearance. Operating modes: 108 1 Set the mode switch to . 2 Select the desired cinema-look filter.
CINEMA Mode and Cinema-Look Filters Options ( Default value) The camcorder offers 9 cinema-look filters. Select the desired filter while previewing the effect on the screen.
Adding Decorations Adding Decorations 110 Using the decoration function, you can add various graphical elements to the picture, such as stamps, watermarks, the date/time, and even your own freehand drawings. Freehand drawings can help emphasize a portion of the picture to attract viewers' attention. The supplied stylus pen will be especially useful for adding decorations. You can decorate scenes as they are being recorded, during playback or just before converting them to standard definition.
Adding Decorations 111 ACanvas - The area where you will draw and see your decorations in action. BToolbar. C[ Pens and Stamps] Select the type of pen or stamp and its color. You can also save a canvas or load a previously saved canvas. D[ Animated Stamps] Select animated stamps to add to your decoration. E[ Captions] Add the date, date and time, story title or story theme category as a caption that will be included in the recording.
Adding Decorations To load a previously saved canvas In the decoration screen: 1 Touch [ ] and then touch [fLoad]. 2 Touch [Yes]. • The freehand drawings and stamps saved in the memory will be loaded. 3 Touch [f]. 112 To use [Animated Stamps] 1 Touch [ ]. • The [Animated Stamps] screen will appear. 2 Touch one of the control buttons. 3 Touch anywhere on the canvas to place the selected animated stamp. You can also drag the animated stamp to a different location. To use [Captions] 1 Touch [ ].
Adding Decorations Mixing Your Own Images with Live Video You can use images you make on your computer for the image mix (Chroma Key) function. Make sure that the image you want to use has a blue or green area, which will be replaced by the live video using Chroma Key mixing. Refer to About the image files for the Image Mix function (0 185) for details about the types of image files that can be used and where to transfer them.
Adding Decorations Decorating Scenes during Playback Operating modes: 1 Play back the scene you want to decorate. 114 2 Touch the screen to display the playback controls. 3 Touch [ ] to open the decoration screen. 4 Decorate the scene using the tools from the toolbar as explained in the previous section. • In playback mode, the decorations will not be saved with the original recording. NOTES • Initializing a memory will erase any [Pens and Stamps] drawing canvas and image files you may have saved.
Playing Back Stories from the Gallery Playing Back Stories from the Gallery You can play back recordings made using Story Creator to play them back as a single compelling video story following the storyline order. Regular scenes and video snapshot scenes recorded without using Story Creator, will appear in the gallery under the [Unsorted] or [Video Snapshot] stories. When playing back stories from the gallery, you can choose to play back only scenes with a certain rating.
Playing Back Stories from the Gallery IMPORTANT • Observe the following precautions while the ACCESS indicator is on or flashing. Failing to do so may result in permanent data loss. - Do not open the double memory card slot cover. - Do not disconnect the power source or turn off the camcorder. - Do not change the camcorder’s operating mode.
Rating Scenes Rating Scenes You can rate story scenes immediately after recording them (0 43) or during playback. You can then select multiple scenes with the same rating, for example, in order to play back or copy only your favorite scenes. Operating modes: 117 Rating Scenes from the List of Scenes 1 Open the list of scenes of the story that contains the scenes you want to rate.
Playback with Background Music Playback with Background Music Play back movies (or a photo slideshow) with background music. You can use one of the supplied music tracks or connect an external audio player to use your favorite songs as background music. Operating modes: 118 Using One of the Supplied Music Tracks as Background Music The supplied Camcorder Supplemental Disc contains 3 music tracks you can use as background music. The music files come pre-installed in the built-in memory.
Playback with Background Music To adjust the background music balance during playback 1 During playback, touch the screen to display the playback controls. 2 Touch [ ], drag your finger along the [Music Balance] bar to adjust the background music balance as desired and touch [f]. To delete a music track In the [Select Music] screen, touch [Z] or [O] to select the track you want to delete. Touch [d] and then touch [Yes]. • The selected music track is deleted.
Playback with Background Music IMPORTANT • If you use copyrighted songs and music tracks in your video creations, remember that music under copyright may not be used without permission from the copyright holder, except for cases permitted under applicable laws, such as for personal use. Make sure to follow applicable laws when using music files. 120 NOTES • Initializing a memory card will permanently erase any music files you may have transferred to the card.
Copying and Moving Scenes Within/Between Stories Copying and Moving Scenes Within/Between Stories You can copy and move scenes in the gallery within the same story scene (category), between story scenes in the same story, and between stories recorded in the same memory. Operating modes: 1 Open the list of scenes of the story that contains the scene you want to copy or move.
Selecting a Story’s Thumbnail Image Selecting a Story’s Thumbnail Image Initially, the image used as the story’s thumbnail is the first frame of the first scene in the story. You can set your favorite scene as the thumbnail that will represent the story in the gallery. Operating modes: 1 Open the gallery. 122 [b] [ Gallery] 2 Select the story whose thumbnail you want to change. • Drag your finger right/left to bring the desired story to the front. 3 Open the [Story Thumbnail] screen.
Changing a Story’s Title Changing a Story’s Title When you first create a story, the current date will be used as the story’s title but you can change the title later on. The title can be up to 14 characters long (available characters are limited). The title of the two preexisting stories, [Unsorted] and [Video Snapshot] cannot be changed. Operating modes: 1 Open the gallery. [b] [ 123 Gallery] 2 Select the story whose title you want to change.
Terminals on the Camcorder 7 External Connections External Connections Terminals on the Camcorder 1 COMPONENT OUT Terminal* 124 Access: Open the LCD panel and terminal cover. The component video terminal is for video only. When you use connection B, do not forget the audio connections using the AV OUT/X terminal. 2 AV OUT/X Terminal Access: Open the LCD panel and terminal cover. Sound from the built-in speaker will be muted while the STV-250N Stereo Video Cable is connected to the camcorder.
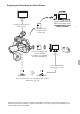
Connection Diagrams Connection Diagrams In the following connection diagrams, the left side shows the terminals on the camcorder and the right side shows (for reference only) an example of terminals on a connected device. Connection A HDMI Type: Digital Quality: High definition Output only Connect to a high-definition TV (HDTV) with an HDMI input terminal.
Connection Diagrams Connection C Composite Video Type: Analog Quality: Standard definition Output only Connect to a standard TV or a VCR with audio/video input terminals.
Playback on a TV Screen Playback on a TV Screen Connect the camcorder to a TV to view and check your recordings. Playback on an HDTV using one of the high-definition connections will ensure the best playback quality. Operating modes: 1 Turn off the camcorder and the TV. 2 Connect the camcorder to the TV. 127 • Refer to Connection Diagrams (0 125) and select the most appropriate connection for your TV. 3 Turn on the connected TV.
Viewing Photos 8 Photos Photos Viewing Photos Operating modes: 128 1 Press S. 2 Open the [Photos] index screen, if it is not displayed. [b] [Photos] 3 Look for the photo you want to play back. • Move the zoom lever toward Q to show 15 photos per page; move it toward P to show 6 photos per page. AMemory being read. BDrag your finger left for the next index page.* CDrag your finger right for the previous index page.* DOpen the index selection screen (0 97).
Viewing Photos 4 Touch the photo you wish to view. • The photo is displayed in single photo view. • Drag your finger left/right to browse through the photos one by one. To return to the index screen from single photo view 1 Touch the screen to display the playback controls. 2 Touch [Q]. Photo Jump Function When you have recorded a large number of photos, you can jump easily through the photos using the scroll bar. 1 Touch the screen to display the playback controls. 2 Touch [g].
Deleting Photos Deleting Photos You can delete those photos that you are not interested in keeping. Operating modes: 130 Deleting a Single Photo 1 In single photo view, select the photo you want to delete. 2 Touch the screen to display the playback controls. 3 Open the screen to delete photos. [Edit] [Delete] 4 Touch [d Proceed] and then touch [Yes]. • The photo is deleted. 5 Drag your finger left/right to select another photo to delete or touch [a].
Slideshow Slideshow You can play a slideshow of all the photos and even set it to music. Operating modes: 1 Open the [Photos] index screen. [b] [Photos] 2 Select the background music to use during the photo slideshow. • Music tracks: Steps 2 - 3 (0 118). External audio: Steps 2 - 4 (0 119). Slideshow set to a music track 3 Touch the photo that will open the slideshow to display it in single photo view.
Copying Recordings to a Memory Card 9 Saving/Sharing Recordings Saving/Sharing Recordings Copying Recordings to a Memory Card 132 To copy your recordings, you must select recordings in the built-in memory or on memory card X. In either case, the recordings will be copied to memory card Y. Scenes and photos will be copied from the index screen or from a story in the gallery on the source memory to the same index screen or story on memory card Y.
Copying Recordings to a Memory Card Copying Scenes from a Story by Rating 1 Open the gallery and bring the desired story to the front. [b] [ Gallery] Desired story • Check that you have selected the f tab (built-in memory) or 4 tab (memory card X). 2 Open the [Play by Rating] screen. [Story Details] [Play by Rating] 3 Touch the desired rating and then touch [f] twice. 4 Open the screen to copy scenes. [Story Details] [Edit Story] [Copy (f97)] or [Copy (497)] 5 Touch [Yes].
Copying Recordings to a Memory Card To select individual photos 1 Touch on the individual photos you want to copy. • A checkmark O will appear on the photos you touch. The total number of selected photos will appear next to the o icon. • Touch a selected photo to remove the checkmark. To remove all checkmarks at once, touch [Remove All] [Yes]. 134 2 After selecting all the desired photos, touch [OK]. Options [Select] Select individual photos to copy. [All Photos] Copy all the photos.
Saving Recordings on a Computer Saving Recordings on a Computer Movies recorded with this camcorder are saved in the built-in memory or on a memory card. Because space is limited, make sure to save your recordings on a computer on a regular basis. Saving Movies (Windows only) With the supplied software Transfer Utility you can save to your computer the scenes you have recorded. Installation Install the software before you connect the camcorder to the computer for the first time.
Saving Recordings on a Computer 4 Computer: The camcorder will appear as a new device (or drive), for example, [Canon XA10]. Use the program of your choice or the standard application built into your computer’s operating system to transfer or copy your photos to the computer. 136 • Windows 7/Vista: Your photos can be found under [Canon XA10] > [Removable Storage] > [DCIM] > [xxxCANON], where “xxx” is a folder number between 101 and 998. • Windows XP: Your photos can be found under [Canon XA10].
Copying Recordings to an External Video Recorder Copying Recordings to an External Video Recorder Operating modes: In High Definition Connect the camcorder to Blu-ray Disc recorders and other AVCHD-compatible digital video recorders using the supplied USB cable to make perfect copies of your movies in high definition. If the external digital video recorder has an SD memory card slot*, you can use the memory card to copy your movies without connecting the camcorder.
Copying Recordings to an External Video Recorder Recording 1 External recorder: Load a blank cassette or disc and set the recorder to record pause mode. 2 Turn on the camcorder and set it to mode. • We recommend powering the camcorder using the compact power adapter. • Verify that 6 [AV/Headphones] is set to [H AV]. 138 3 Camcorder: Locate the scene or story you wish to copy and pause the playback shortly just before the desired scene. 4 Camcorder: Resume playback.
Uploading Movies to Video Sharing Web Sites Uploading Movies to Video Sharing Web Sites With the supplied software Transfer Utility, you can upload your scenes to your favorite video sharing Web site. To do so, you must first convert them into standard-definition scenes in the camcorder. If you are using an Eye-Fi card, you can upload the standard-definition scenes wirelessly, directly from the camcorder. Refer to Eye-Fi’s homepage for the latest information on compatible Web sites.
Uploading Movies to Video Sharing Web Sites To select individual scenes (step 4) 1 Touch on the individual scenes you want to convert. • A checkmark O will appear on the scenes you touch. The total number of selected scenes will appear next to the o icon. • Touch a selected scene to remove the checkmark. To remove all checkmarks at once, touch [Remove All] [Yes]. 140 2 After selecting all the desired scenes, touch [OK].
Uploading Movies to Video Sharing Web Sites Connecting to the Computer and Uploading your Videos 1 Connect the camcorder to the computer using the supplied USB cable. • Connection D. Refer to Connection Diagrams (0 126). 2 Computer: Transfer Utility will start up automatically. • Click [Web Upload] to upload your SD movies to the Web. For details about using the software, click [Help] to open the Software Guide (PDF file).
Uploading Movies to Video Sharing Web Sites Converting Only Part of a Scene or Story 1 Play back the scene or story that you want to partially convert. • Check that you have selected a scene recorded in the built-in memory or on memory card X. 2 Pause the playback where you want the converted SD movie to begin. 3 Press Z and continue the conversion to standard definition from step 5 in the previous procedure (0 139).
Uploading Movies to Video Sharing Web Sites NOTES • Depending on the amount of data to be uploaded and the network’s wireless connection conditions, it can take some time to upload video files. If the wireless connection is too weak, the wireless upload may fail and the video files will be registered as incomplete uploads. • About power saving: - Wireless communication drains the power of the battery pack faster than usual. We recommend powering the camcorder using the compact power adapter.
Appendix: Menu Options Lists 10 Additional Information Additional Information Appendix: Menu Options Lists 144 Menu items not available appear grayed out. For details about how to select an item, refer to Using the Menus (0 32). For details about each function, see the reference page. Menu options without a reference page are explained after the tables. Underlined menu options indicate default values. FUNC. Panel FUNC.
Appendix: Menu Options Lists Control Button [ Decoration] 1 Setting options/Function [ [ Pens and Stamps], [ Captions]3 Animated Stamps], AUTO y CINEMA 0 z z z 110 [ ] (image mix): Toggle on or off, [C] (pause live video) – z – [ ] (minimize toolbar) z z z Story themes, [New Story] z z z 105 [Z Video Snapshot] [A On], [B Off] – z z 85 [d Pre REC]1 [A On], [B Off] – z z 86 – z z 46 [ Story Creator] [ Review Recording]1 1 2 3 – Option not available in mode.
Appendix: Menu Options Lists [Edit Story] from the [Story Details] screen Control Button Playback Pause 0 z – – 123 [Copy] – z – 121 [Move] – z – 121 [Divide] – – z 101 [Rating] – ], ] (others) 117 [Edit 146 Title]2 [Edit Scene] from the [Scene List] screen [ [ 1 2 ], [ ], [ ] (unrated), [ Operation not available for recordings on memory card Y (7 tab). Operation not available for the two preexisting stories, [Unsorted] and [Video Snapshot].
Appendix: Menu Options Lists y CINEMA 0 z z 88 z z – [Camcorder Shake Indicator] [A On], [B Off] z z – [IR Light] [A On], [B Off] z z 89 [IR Rec Color] [ z z 89 – Menu item 1 Setting options [Fader Setting] [ [Onscreen Markers] [B Off], [e Level (White)], [f Level (Gray)], [g Grid (White)], [h Grid (Gray)] 1 Black Screen], [ White], [ White Screen] Green] [Wind Screen] [O Automatic], [B Off Z] z z [Microphone Attenuator]1 [O Automatic], [A On V] z z – [MIC Termina
Appendix: Menu Options Lists [Conversion Lens]: When you attach to the camcorder the optional TL-H58 Tele-converter or 148 WD-H58W Wide-converter, set the appropriate conversion lens setting. The camcorder will then optimize the image stabilization and adjust the minimum object distance. The minimum object distance throughout the entire zoom range will be 130 cm (4 ft. 3 in.) for the TL-H58 and 40 cm (1 ft. 3 in.) for the WD-H58W.
Appendix: Menu Options Lists [TV Type]: When you connect the camcorder to a TV using the supplied STV-250N Stereo Video Cable, select the setting according to the type of TV in order to display the picture in full and in the correct aspect ratio. [F Normal TV]: TV sets with 4:3 aspect ratio. [G Wide TV]: TV sets with 16:9 aspect ratio. • When the TV type is set to [F Normal TV], during the playback of video originally recorded with an aspect ratio of 16:9, the picture will not be displayed fullscreen.
Appendix: Menu Options Lists [Rate Scenes (Recording)]: When set to [A On], the scene rating scene will appear after every scene you record. [Scan Reverse Rec]: Inverts the recorded image horizontally, vertically or horizontally and vertically. 150 [Memory Info]: Displays a screen where you can verify how much of the built-in memory or the memory card is currently in use (l total recording time and k total number of photos) and how much space remains available for recording.
Appendix: Menu Options Lists Menu item [Volume] Setting options [Speaker]: y CINEMA 1 2 0 – – z z 94 z z z z 81 h, r q [Headphones]: d, e c [Notification Sounds] [N High Volume], [M Low Volume], [B Off] z z z z – [Audio Output CH] [ [ z z z – – [Wireless Remote Control] [A On], [B Off L] z z z z – [Tally Lamp] [A On], [B Off] z z – – – [POWERED IS Button] [x Press and Hold], [y Toggle On/Off] z z – – 60 [Custom Key/Dial] [o Tv/Av], [ Manual Exposure]
Appendix: Menu Options Lists Menu item Setting options [Date/Time] [Date/Time]: – [Date Format]: [Y.M.D], [M.D,Y], [D.M.
Appendix: Menu Options Lists [Audio Output CH]: Selects the channels from which audio will be output. [ CH1/CH2]: Audio from CH1 is output from the left audio channel and audio from CH2 is output from the right audio channel. [ CH1/CH1]: Audio from CH1 is output from both the left and right audio channels. [ CH2/CH2]: Audio from CH2 is output from both the left and right audio channels. [ All/All]: Audio from CH1 and CH2 is mixed and output from both the left and right audio channels.
Appendix: Menu Options Lists [Control for HDMI]: Activates the HDMI-CEC (Consumer Electronics Control) function. When you 154 connect the camcorder to an HDTV compatible with HDMI-CEC using an optional HDMI cable, you can control the camcorder’s playback using the remote control of the TV. • If set to [A On], when the camcorder is connected to a compatible HDTV using an optional HDMI cable, the video input on the TV will automatically be set to the camcorder’s video input.
Appendix: Onscreen Icons and Displays Appendix: Onscreen Icons and Displays Recording Movies (using Story Creator) 6 1 2 3 4 5 6 7 8 1 2 3 9 10 11 4 12 5 13 14 Control button [FUNC.]: Open the FUNC.
Appendix: Onscreen Icons and Displays , Recording Movies y Manual mode CINEMA mode 47 48 22 23 24 7 25 8 2627 156 1 15 16 17 18 19 20 21 9 28 11 29 30 31 32 33 5 49 1 43 44 17 18 45 46 34 35 36 37 38 39 4041 42 15 Recording program (0 62, 69), Infrared mode (0 89), Infrared light (0 89) 16 Exposure compensation (0 65) 17 AGC limit (0 61); Gain (during the [y Manual Exposure] recording program) (0 64) 18 Instant AF/ Medium AF/ N Normal AF (0 146), MF Manual focus (0 51) 19 Face detection (0 53) 2
Appendix: Onscreen Icons and Displays Playing Movies (during playback) 11 7 51 52 9 23 53 54 157 50 55 56 14 54 Audio output channel (0 153) 55 Data code (0 87, 148) 56 Volume and background music balance controls (0 94, 119) 50 Playback control buttons (0 94) 51 External audio input (0 119) 52 Eye-Fi wireless communication (0 142) 53 Scene number Viewing Photos 57 58 9 59 60 61 55 62 63 57 Control button [MENU]: Open the setup menus (0 146) 58 Control button [Edit]: Open the Edit panel (0 146) 59
Appendix: Onscreen Icons and Displays 7 Memory operation N Record, M Record pause, A Playback, C Playback pause, I Fast playback, J Fast reverse playback, G Slow playback, H Slow reverse playback, E Frame advance, F Frame reverse. 9 Remaining battery time 158 • The icon shows a rough estimate of the remaining 100% 75% 50% 25% 0% charge as a percentage of the full charge of the battery pack. The remaining recording/playback time of the battery pack is displayed, in minutes, next to the icon.
Troubleshooting Troubleshooting If you have a problem with your camcorder, refer to this section. Sometimes what you think is a malfunction of the camcorder may have the simplest of solutions - please read the “CHECK THIS FIRST” box before going on to the more detailed problems and solutions. Consult your dealer or a Canon Service Center if the problem persists.
Troubleshooting Recording Pressing g will not start recording. - You cannot record while the camcorder is writing previous recordings onto the memory (while the ACCESS indicator is on or flashing). Wait until the camcorder has finished. - The memory is full or it already contains the maximum number of scenes (3,999 scenes). Delete some recordings (0 98, 130) or initialize the memory (0 40) to free some space. 160 The point where g was pressed does not match the beginning/end of the recording.
Troubleshooting When playing back scenes/slideshow with background music, the music track is not played back correctly. - This can occur when you transfer the music files to a memory card after repeatedly recording and deleting scenes (fragmented memory). Save your recordings (0 135) and initialize the memory card (0 40). Then, transfer the music files first and only then transfer the video files.
Troubleshooting 162 The red ON/OFF (CHG) indicator flashes very slowly ( one flash at 2-second intervals). - The temperature of the battery pack is outside its operating range (approximately 0 – 40 °C (32 – 104 °F)). Remove the battery pack, warm it or let it cool down, as necessary, and try charging it again. - Charge the battery pack in temperatures between approximately 0 °C and 40 °C (32 °F and 104 °F). - The battery pack is damaged. Use a different battery pack.
Troubleshooting Sound is distorted or is recorded at lower levels. - When recording near loud sounds (such as fireworks, shows or concerts), sound may become distorted or it may not be recorded at the actual levels. Adjust the audio recording level manually (0 76). There are brief stops in the sound recorded with the optional WM-V1 Wireless Microphone. - This may occur if the LOCK switch on the Eye-Fi card was set to prevent writing, causing wireless communication to occur while recording.
Troubleshooting Connections with External Devices Video noise appears on the TV screen. - When using the camcorder in a room where a TV is located, keep a distance between the compact power adapter and the power or antenna cables of the TV. 164 Playback looks fine on the camcorder but there is no image on the TV screen. - The video input on the TV is not set to the video terminal to which you connected the camcorder. Select the correct video input.
Troubleshooting Buffer overflow. Recording was stopped. - The data transfer rate was too high for the memory card in use and the recording was stopped. Replace the memory card with one rated SD Speed Class 2, 4, 6 or 10. - After repeatedly recording, deleting and editing scenes (fragmented memory), it will take longer to write data on the memory and recording may stop. Save your recordings (0 135) and initialize the memory (0 40). Built-in memory error - The built-in memory could not be read.
Troubleshooting 166 Cannot play back - You cannot play back scenes that were recorded or edited using another device and then written back to the built-in memory. - If a memory card was recorded on with another device and then the LOCK switch was set to prevent writing, gallery information cannot be accessed correctly so playback is not possible from the gallery screen. Play back scenes from the date index screen or change the position of the LOCK switch on the memory card.
Troubleshooting Cannot save the canvas - Cannot save your [Pens and Stamps] drawings on the memory. Save your recordings (0 135) and initialize the memory (0 40). Cannot use IR mode during Cinema mode. Change the camcorder's mode to y or - Infrared recording is not available in mode. Change the camcorder to or mode. . Change the battery pack - Battery pack is exhausted. Replace or charge the battery pack. Check the memory card - Cannot access the memory card.
Troubleshooting File name error - The folder and file numbers have reached their maximum value. Set 8 [Photo Numbering] to [Reset] and delete all the photos on the memory card (0 130) or initialize it (0 40). Initialize only using the camcorder - There is a problem with the file system that prevents accessing the selected memory. Initialize the memory with this camcorder (0 40). 168 LCD Screen has been dimmed - Hold h pressed for 2 seconds to restore the LCD screen to its previous brightness setting.
Troubleshooting Number of stories already at maximum - The gallery already contains the maximum number of stories (98 user-created stories in any one given memory). Delete some stories (0 100) or change the recording memory for movies (0 38). Scene recorded using another device. Cannot divide the scene. - Scenes that were not recorded with this camcorder cannot be divided with this camcorder. Scene recorded using another device. Cannot play back the scene.
Troubleshooting Too many photos. Disconnect the USB cable. - Disconnect the USB cable. Try using a memory card reader or decrease the number of photos on the memory card to fewer than 2,500 photos (Windows), or 1,000 photos (Mac OS). - If a dialog box appeared on the computer screen, close it. Disconnect the USB cable, and restore the connection after a short while.
Handling Precautions Handling Precautions Camcorder Be sure to observe the following precautions to ensure maximum performance. • Save your recordings periodically. Make sure to transfer your recordings to an external device such as a computer or digital video recorder (0 132) and save them on a regular basis. This will protect your important recordings in case of damage and create more free space on the memory. Canon shall not be liable for any data loss. • Do not carry the camcorder by the LCD panel.
Handling Precautions Battery Pack DANGER! 172 Treat the battery pack with care. • Keep it away from fire (or it might explode). • Do not expose the battery pack to temperature higher than 60 °C (140 °F). Do not leave it near a heater or inside a car in hot weather. • Do not try to disassemble or modify it. • Do not drop it or subject it to shocks. • Do not get it wet. • Dirty terminals may cause a poor contact between the battery pack and the camcorder. Wipe the terminals with a soft cloth.
Handling Precautions • Secure Digital (SD) memory cards have a physical switch to prevent writing on the card so as to avoid the accidental erasure of the card’s content. To write-protect the memory card set the switch to the LOCK position. Built-in Rechargeable Lithium Battery LOCK switch The camcorder has a built-in rechargeable lithium battery to keep the date/time and other settings.
Maintenance/Others Maintenance/Others Cleaning Camcorder Body 174 • Use a soft, dry cloth to clean the camcorder body. Never use chemically treated cloths or volatile solvents such as paint thinner. Lens, Viewfinder and Instant AF Sensor • If the lens surface or Instant AF sensor is dirty, autofocus may not work properly. • Remove any dust or dirt particles using a non-aerosol type blower brush. • Use a clean, soft lens-cleaning cloth to gently wipe the lens or viewfinder. Never use tissue paper.
Maintenance/Others Using the Camcorder Abroad Power Sources You can use the compact power adapter to operate the camcorder and to charge battery packs in any country with power supply between 100 and 240 V AC, 50/60 Hz. Consult a Canon Service Center for information on plug adapters for overseas use. Playback on a TV Screen You can only play back your recordings on TVs compatible with the NTSC system.
Accessories Accessories (Availability differs from area to area) The following optional accessories are compatible with this camcorder. Select accessories are described in more detail in the following pages.
Accessories Optional Accessories Call or visit your local retailer/dealer for genuine Canon video accessories. You can also obtain genuine accessories for your Canon camcorder by calling: 1-800-828-4040, Canon U.S.A. Information Center. Use of genuine Canon accessories is recommended. This product is designed to achieve excellent performance when used with genuine Canon accessories. Canon shall not be liable for any damage to this product and/or accidents such as fire, etc.
Accessories Using the built-in memory Battery pack 178 BP-808 BP-809 BP-819 BP-827 Recording (maximum) Recording (typical)* LCD Viewfinder LCD Viewfinder LCD MXP 105 min. 110 min. 60 min. 65 min. 145 min. FXP 105 min. 110 min. 60 min. 65 min. 150 min. XP+ 105 min. 115 min. 65 min. 65 min. 150 min. SP 110 min. 115 min. 65 min. 70 min. 155 min. LP 110 min. 115 min. 65 min. 70 min. 155 min. MXP 210 min. 225 min. 135 min. 140 min. 300 min. FXP 210 min. 225 min.
Accessories TL-H58 Tele-converter This Tele-converter lens increases the focal length of the camcorder lens by a factor of 1.5. • The image stabilizer is not as effective when the Tele-converter is attached. • The minimum focusing distance at full telephoto with the Teleconverter is 1.3 m (4.3 ft.). WD-H58W Wide-converter This Wide-converter lens decreases the focal length by a factor of 0.7, giving you a wide perspective for indoor shots or panoramic views.
Accessories This mark identifies genuine Canon video accessories. When you use Canon video equipment, we recommend Canon-brand accessories or products bearing the same mark.
Product Codes Product Codes Provided Accessories CA-570 Compact Power Adapter BP-808 Battery Pack WL-D89 Wireless Controller STV-250N Stereo Video Cable 8468A002AA 2740B002AA D83-0790-000 3067A002AA (D82-0590-002) Optional Accessories BP-809 Battery Pack BP-819 Battery Pack BP-827 Battery Pack CG-800 Battery Charger TL-H58 Tele-converter WD-H58W Wide-converter Protect Filter 58 mm ND4L Filter 58 mm ND8L Filter 58 mm VL-10Li II Battery Video Light WM-V1 Wireless Microphone ZR-1000 Zoom Remote Controller Z
Specifications Specifications XA10 182 — Values given are approximate figures. System • Recording System Movies: AVCHD Video compression: MPEG-4 AVC/H.264; Audio compression: Dolby Digital 2ch Photos: DCF (Design rule for Camera File system), compatible with Exif* Ver. 2.2 Image compression: JPEG * This camcorder supports Exif 2.2 (also called “Exif Print”). Exif Print is a standard for enhancing the communication between camcorders and printers.
Specifications • White Balance Auto white balance, Custom white balance (2 settings), User-defined color temperature or Preset white balance settings: Daylight, Shade, Cloudy, Fluorescent, Fluorescent H, Tungsten • Minimum Illumination 0.1 lx ([Low Light] recording program, Shutter speed at 1/2) 1.
Specifications Power/Others • Power supply (rated) 7.4 V DC (battery pack), 8.4 V DC (compact power adapter) 184 • Power consumption: 3.2 W (SP mode, AF on, LCD normal brightness) 3.0 W (SP mode, AF on, viewfinder) Maximum rated power consumption: 10.5 W • Operating temperature: 0 – 40 °C (32 – 104 °F) • Dimensions [W x H x D] (excluding the grip belt and lens hood): 130 x 177 x 205 mm (5.1 x 7.0 x 8.0 in.) • Weight (camcorder body only): 775 g (1.
Specifications About the music files The specifications of the music files compatible with the camcorder are as follows. Audio encoding: Linear PCM Audio sampling: 48 kHz, 16 bits, 2 channels Minimum length: 1 second File type: WAV The music data is saved in the memory under the following folders. In the built-in memory: \CANON\MY_MUSIC\MUSIC_01.WAV to MUSIC_99.WAV On the memory card: \CANON\PRIVATE\MY_MUSIC\MUSIC_01.WAV to MUSIC_99.
Index 3D Flip View . . . . . . . . . . . . . . . . . . . . . . . . . . . 96 A 186 Abroad, using the camcorder . . . . . . . . . . . 175 AGC (automatic gain control) limit . . . . . . . . . 61 Aperture (f number) . . . . . . . . . . . . . . . . . . . . . 62 Aspect ratio of a connected TV (TV type) . . . . . . . . . . . . . . . . . . . . . . . . . 149 Assignable buttons . . . . . . . . . . . . . . . . . . . . . 91 Audio equalizer . . . . . . . . . . . . . . . . . . . . . . . . 79 Audio mix . . . . . . . .
M M (Manual) mode . . . . . . . . . . . . . . . . . . . . . . .46 Maintenance . . . . . . . . . . . . . . . . . . . . . . . . . .174 Manual exposure . . . . . . . . . . . . . . . . . . . . . . .64 Manual focus . . . . . . . . . . . . . . . . . . . . . . . . . . .51 Markers . . . . . . . . . . . . . . . . . . . . . . . . . . . . . .148 Memory card . . . . . . . . . . . . . . . . . . . . . . .36, 172 Menu settings, saving and loading . . . . . . . . .92 MIC terminal . . . . . . . . . . . . . . . . . . . . . .
W Z Waveform monitor . . . . . . . . . . . . . . . . . . . . . .84 White balance . . . . . . . . . . . . . . . . . . . . . . . . . .67 Wide angle . . . . . . . . . . . . . . . . . . . . . . . . . . . . .56 Wind screen . . . . . . . . . . . . . . . . . . . . . . . . . . .148 Wireless controller . . . . . . . . . . . . . . . . . . . . . .24 Zebra pattern . . . . . . . . . . . . . . . . . . . . . . . . . . 65 Zoom . . . . . . . . . . . . . . . . . . . . . . . . . . . . . . . . 56 Digital zoom . . . . .
USA CANON DIGITAL VIDEO PRODUCTS LIMITED WARRANTY FOR THE UNITED STATES The limited warranty set forth below is given by Canon U.S.A., Inc. ("Canon USA") with respect to Canon Digital Video Products (the "Products")* purchased in the United States. Warranty coverage is subject to the country where the unit was purchased. This limited warranty is only effective upon presentation of your Bill of Sale or other proof of purchase.
CANADA CANON DIGITAL VIDEO PRODUCTS LIMITED WARRANTY 190 The limited warranty set forth below is given by Canon Canada Inc. ("Canon Canada") with respect to Canon Digital Video Products (the "Products") purchased in Canada. This limited warranty is only effective upon presentation of a bill of sale or other proof of purchase for these Products to a Canon Service Facility when repairs are required.
USA CANON U.S.A., INC. NEW JERSEY OFFICE 100 Jamesburg Road, Jamesburg, NJ 08831 USA CANON U.S.A., INC. CHICAGO OFFICE 100 Park Blvd., Itasca, IL 60143 USA CANON U.S.A., INC. LOS ANGELES OFFICE 15955 Alton Parkway, Irvine, CA 92618 USA CANON U.S.A., INC. HONOLULU OFFICE 210 Ward Avenue, Suite 200, Honolulu, Hl 96814 USA ❖ If you have any questions, call the Canon U.S.A. Information Center toll-free at 1-800-828-4040 (USA only). CANADA CANON CANADA INC.