AXIS 1650 User’s Manual The Network Print & Scan Server for Canon Printers and Multifunctional Products Including support for Canon Advanced Printing Technology Canon Advanced Raster Printing System as well as Canon BubbleJet Printers AXIS 1650 User’s Manual 1
Safety Notices Section 1 Safety Notices Take some time to read through the safety notices before installing the print server. Please observe all safety markings and instructions when using this product. Important: Electromagnetic Compatibility (EMC) USA Observe “Important:” in the text to avoid operational impairment. Do not proceed until you have fully understood the implications.
Table of Contents Section 2 AXIS 1650 User’s Manual Table of Contents Section 1 Safety Notices . . . . . . . . . . . . . . . . . . . . . . . . . . . . . . . . . . . . 2 Section 2 Table of Contents . . . . . . . . . . . . . . . . . . . . . . . . . . . . . . . . . . 3 Section 3 Preface . . . . . . . . . . . . . . . . . . . . . . . . . . . . . . . . . . . . . . . . . . About this Manual . . . . . . . . . . . . . . . . . . . . . . . . . . . . . About Axis . . . . . . . . . . . . . . . . . . . . . . . .
Table of Contents Invoking a Scan from the Canon Device . . . . . . . . . . . 59 Section 10 The Test Button . . . . . . . . . . . . . . . . . . . . . . . . . . . . . . . . . . 61 Section 11 Upgrading the Firmware . . . . . . . . . . . . . . . . . . . . . . . . . . . 62 Section 12 Enabling Unicast Network Communication . . . . . . . . . . . . . 64 Section 13 Internet Connection Firewall in Windows XP SP2 . . . . . . . . 68 Section 14 Technical Specifications . . . . . . . . . . . . . . . . . . . .
Preface Section 3 Preface Thank you for purchasing the AXIS 1650. This product has been developed to connect your Canon printer anywhere in your network, allowing all network users access to shared printer resources. About this Manual This manual is applicable for the AXIS 1650 print server with firmware version 2.00 or later, providing introductory information as well as detailed instructions on how to set up and manage the print server in various network environments.
Preface If you are connected to the Internet, you can: • • • • 6 Download user documentation and firmware updates Find answers to previously resolved problems in the FAQ database. Search by product, category or phrase Report problems to Axis support staff by logging in to your private support area Visit the Axis support Web: www.axis.
Product Overview Section 4 Product Overview Package Contents Hardware Model Model/ Part Number AXIS 1650 0214-001- 01 0214-001- 02 With firmware version 2.00 or higher AXIX 1650 Japan 0214-005-01 0214-005-02 With firmware version 2.00 or higher Adhesive Holder & Clip ACC AXIS CLIPS K 20119 USB Cable 70 cm, 28 inches USB cable supports USB Low-Speed and Full-Speed. Hi-Speed is not supported. 20208 Power Adapter PS-H Network Print Server Network Cable RJ 45 Shielded CAT5 0.
Product Overview Supported Environments The AXIS 1650 supports printing over TCP/IP from the following clients: Installation and Integration The installation of the AXIS 1650 and its integration into the network is performed using one of these software combinations: • • • • • • • • • Windows 98 Windows Me Windows 2000 Windows XP Windows Server 2003 Netware AXIS IP JumpStarter (for IP setting) and then AXIS CAPT Print Monitor (for printer installation) Canon NetSpot Device Installer (for IP setting)
Product Overview Printer Ports AXIS 1650 User’s Manual • One Low- and Full-Speed USB 1.1 port that also works with USB 2.0. Hi-Speed is not supported. • One high-speed IEEE 1284 compatible parallel port that plugs directly into the printer´s parallel port. AXIS 1650 is featured with two ports for ease of integration with most Canon printers. There is however no support for handling two connected printers simultaneously.
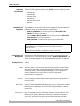
Print Server Installation Section 5 Print Server Installation Follow these steps to install and configure your AXIS 1650: 1. Connect the Hardware, on page 10 2. Set the IP Address, on page 11 3. Windows Installation, on page 17 Connect the Hardware Parallel printer port (LPT1) Test button Network indicator Ethernet connector Power adapter connector USB Printer Port (USB1) Power indicator Backside label of print server The print server’s MAC/Ethernet address is based on its serial number (S/N).
Print Server Installation 7. Optionally, you can mount the print server e.g. on the back of the printer or on a wall, using the supplied clip and holder. Adhesive Holder Fasten to print server by peeling off adhesive tape. Adhesive Clip Fasten to mounting surface by peeling off adhesive tape. Set the IP Address Before setting the IP address, make a note of the print server’s serial number (S/N), located on its backside label. See Backside label of print server, on page 10.
Print Server Installation 1. Install AXIS IP JumpStarter, it is available on the AXIS 1650 CD and on www.axis.com 2. Select a print server from the Serial Number list. All AXIS 1650 appear with the default IP address 192.168.0.90. If you are installing several AXIS 1650, check the Serial Number to locate a specific print server. All AXIS 1650 have the default IP address 192.168.0.90 Change this default IP address to either a static IP address or to a DHCP address. 3.
Print Server Installation Set a Static IP Address using ARP in Windows 98/Me/2000/XP/2003 1. Open a Command Prompt and type: arp -s ping -l 479 Example: arp -s 192.168.3.191 00-40-8c-18-1c-f0 ping -l 479 192.168.3.191 2. If the host returns Reply from 192.168.3.191 ... or a similar message, the IP address has been set successfully. If the host returns Request timed out you need to reboot the print server and perform steps 1-2 above again.
Print Server Installation Set an IP Address with NetSpot Device Installer software NetSpot Device Installer is software from Canon that allows you to assign an IP address and manage Canon devices connected to your network. NetSpot Device Installer software is supplied on CD-ROM with your Canon printer and on www.canon.com Depending on the provided CD-ROM, NetSpot Device Installer may not be included. If this is the case, please download NetSpot Device Installer from www.canon.
Print Server Installation 4. From the Initial Settings dialogue box, select the AXIS 1650 print server from the Product Type drop-down list and click Next. 5. Next, configure the TCP/IP protocol: Select Manual Setting Enter IP Address Enter Gateway Address Enter Subnet Mask The Broadcast Address is filled in automatically 6. After you have finished the configuration, click OK. Note: If you get a message reading “Resetting device”, click OK. 7. Click OK.
Print Server Installation Notes • • • • • • • • 16 You need to know the Ethernet address of your AXIS 1650 to perform the installation. The Ethernet address is based on the serial number of your AXIS 1650. For example, an AXIS 1650 with the serial number of 00408C181CF0, will have the corresponding Ethernet address of 00 40 8C 18 1C F0. The serial number is located on a label on the backside of the print server.
Windows Installation Section 6 Windows Installation Installing Printer Ports using AXIS CAPT Print Monitor AXIS CAPT Print Monitor is a Windows component that has been developed for network printing. AXIS CAPT Print Monitor is the recommended tool for Canon printers, including CAPT, Canon Advanced Raster Printing System and BubbleJet.
Windows Installation 3. Read the License Agreement and click Yes if you accept the terms. 4. Leave this check-box unchecked* and click Next. (If you want to disable broadcast status updates and enable unicast, see Enabling Unicast Network Communication, on page 64.) Windows XP/Server 2003 only: Make sure the Allow this application to process incoming network printer information on the local subnet checkbox is checked.
Windows Installation Windows XP SP2 is installed, if Allow this application to process incoming network printer information on the local subnet is checked. 5. Click Finish to finish the installation. 6. Windows XP/Server 2003: Go to Start | Printers and Faxes and click the Add a Printer icon to start the Add Printer Wizard. (Windows XP Home Edition: Start | Control Panel | Printers and Faxes | Add a Printer). Click Next.
Windows Installation 7. Select Local Printer attached to this computer. Make sure the Automatically detect and install my Plug and Play printer check box is not checked. Click Next. 8. Click the Create a new port radio button and select AXIS CAPT Port. Click Next. Note: AXIS CAPT Port is used for all Canon printers, including CAPT, Canon Advanced Raster Printing System and BubbleJet.
Windows Installation 9. The AXIS CAPT Port pop-up window will appear. Select your AXIS 1650 from the Available network printers list and click OK. If your AXIS 1650 doesn’t appear in the Available network printers list, enter its IP address and click Add. 10. Select Manufacturer and Printer from the driver list. Click Next. 11. Choose whether you want to keep the existing driver or to replace it. If you already have the printer’s driver installed, you will be asked whether to keep it or to replace it.
Windows Installation 14. Print a test page to verify. You have now completed the installation. Print Server Installation using AXIS CAPT Print Monitor in Windows 98 and Me Follow the procedure below to install TCP/IP Ports from a Windows 98/Me workstation: 1. Install the AXIS CAPT Print Monitor on your workstation. The software is available on the AXIS 1650 CD and on www.axis.com 2. Launch the software installation and click Next. 3. Read the License Agreement and click Yes if you accept the terms.
Windows Installation 4. Leave this check-box unchecked and click Next. (If you want to disable broadcast status updates and enable unicast, See Enabling Unicast Network Communication, on page 64 for instructions.) 5. Click Finish to finish the installation. 6. Select Settings | Printers from the Start menu and double-click the Add Printer icon to start the Add Printer Wizard. 7. Select Local Printer, as the AXIS 1650 emulates a local printer port and click Next> 8.
Windows Installation 10. Select the port you wish to use and click OK. • • The ports will appear in the format . is, by default, ‘AXIS’ followed by the last six digits of the print server’s serial number. Example: AXIS560B35. If you wish to install a remote TCP/IP port (and if the TCP/IP port does not appear in the list), select the LPT1 port. Continue with steps 11 and 12 and then follow the Remote Printer Port instructions below. 11.
Windows Installation Print Server Installation using the Standard TCP/IP Port in Windows 2000/XP/2003 Follow the instructions below to use the Windows Standard TCP/IP Port to add a network printer in Windows 2000/ Windows XP/2003. Windows XP/ Server 2003: 1. Go to Start | (Settings) | Printers and Faxes and click the Add a Printer icon to start the Add Printer Wizard. Click Next. Windows 2000: 1. Go to Start | Settings | Printers and click the Add Printer icon to start the Add Printer Wizard. Click Next.
Windows Installation 4. In the Printer Name or IP Address field, enter the IP address of the print server. Example: 192.168.3.191. The Port Name field will be filled in automatically. Click Next. 5. Select Manufacturer and Printer from the lists. Click Next. 6. If you already have the printer’s driver installed, you will be asked whether to keep it or to replace it. Click Next. Supply a name for the printer and choose whether you want to make it your default printer. Click Next. 7.
Windows Installation 8. Next, from your desktop, go to Start | Printers (and Faxes). Highlight the installed printer and right-click, choose Properties, then Ports | Configure Port. 9. In the LPR Settings - Queue Name field, you will see the value "z". In the Queue Name field, type USB1 or LPT1, depending on which printer port you are using. Click OK and then Apply. 10. Print a test page to verify. You have now finished the installation.
Adding Printers in NetWare Section 7 Adding Printers in NetWare This section describes how to continue the installation of the AXIS 1650 in a NetWare environment. iPrint Using iPrint in the NetWare environment, users simply point to a Web page that displays all printers available for installation.
Adding Printers in NetWare To check the state of the Broker, select Roles and Tasks | iPrint | Manage Broker. Its state has to be active as well. Create a Printer In the iManager, click Roles and Tasks | iPrint | Create Printer. The Create Printer dialogue appears. Type a name for the printer to be created (e.g. CanonMF). Keep the default Container name (e.g. axis). Select Print Manager name (e.g. NAKOMA_MANAGER.axis). Select Novell gateway as Gateway type and click Next.
Adding Printers in NetWare Select Default Drivers for Your Platforms For each platform in your network, select the default printer drivers to install (the drivers presented are those registered in the Broker; new drivers can be added from the Manage Broker task). Click Next. You will now receive a confirmation that the request succeeded and that printer CanonMF.axis was created. Click OK.
Adding Printers in NetWare it in the Contents list and click Apply. Check Printer Health AXIS 1650 User’s Manual Select Roles and Tasks | iPrint | Manage Printer | Printer Health Monitor to check the health of the printer.
Adding Printers in NetWare Click Back to return to the Manage Printer main page. Enable iPrint Support In the Manage Printer main page, click the Client Support tab. To enable iPrint support, check Enable iPrint support, click Apply and OK. Make the Newly Created Printer Available (Optional) Using the iPrint Map Designer tool, you can quickly make the newly printer available and accessible simply by clicking on its icon in a floor plan, showing where the printers are located.
Adding Printers in NetWare 5. From the Printer List, select the printer agent you want associated with this printer icon (e.g. CanonMF). The Printer URL and Mouse Over Text will automatically be filled in with the printer agent information. Printer URL is the URL created for the printer when IPP was enabled for the printer (e.g. ipp://171.15.115.112/ipp/CanonMF). You should not need to change the URL. The Mouse over text will by default display the printer agent's name.
Adding Printers in NetWare 5. Select Container (e.g. Axis) and the printer (e.g. CanonMF). 6. Wait for the printer to be installed. 7. Finally, print a test page. Setup using NetWare 6.0 Setting up iPrint in a NetWare 6.0 environment is rather similar to performing the same task in the 6.5 version. Launch the iManager From a workstation, launch your browser and enter the following URL: https:///eMFrame/iManager.html. Note that this URL is case sensitive.
Adding Printers in NetWare Configure Novell LPR Gateway for the Created Printer To configure the gateway, enter Host IP address of the AXIS 1650 (e.g. 171.15.114.137). Instead of the Host IP address you can use the Host name (e.g. CanonMF.tl.com). As Printer name, enter the printer port (e.g. USB1). Click Next.
Adding Printers in NetWare default container to find the newly created printer (e.g. CanonMF), select it in the Contents list and click Next. Check Printer Health Select Printer Health Monitor to check the health of the printer. Click Back to return to the Manage Printer main page.
Adding Printers in NetWare Enable IPP Access In the Manage Printer main page, click the Client Support tab. To enable IPP access, check Enable IPP access, click Apply and OK. Make the Newly Created Printer Available (Optional) Using the iPrint Map Designer tool, you can quickly make the newly printer available and accessible simply by clicking on its icon in a floor plan, showing where the printers are located.
Adding Printers in NetWare Installing the Printer Locally The printer is now accessible all over the network and will be automatically installed on any client when needed. In the HTML-page just created, double-click the new printer icon. A dialogue box will appear, waiting for confirmation: Click OK to start installation and iPrint will report progress during all stages of local installation.
Adding Printers in NetWare Manual Installation of the Printer Locally In case you need to install the printer locally, use Windows’ Add Printer Wizard in the usual manner: 1. Ensure that iPrint Client is installed. 2. Start | Printers and Faxes | Add a printer. 3. Select Network printer and Browse for a printer. 4. Select NDPS printers, select NDPS Controlled Access Printers. 5. Select Container (e.g. Axis) and the printer (e.g. CanonMF). 6. Wait for the printer to be installed. 7.
Print Server Management and Configuration Section 8 Print Server Management and Configuration The management and configuration tools that are supported by the AXIS 1650 allow you to: • • • • Change print server parameters Receive extended information about print jobs Receive printer port status and monitor printers Reset the AXIS 1650 Configuration Overview The method you should use to manage and configure your AXIS 1650 is dictated by your TCP/IP network.
Print Server Management and Configuration Accessing the Web Pages Follow these steps to access the AXIS 1650 embedded Web pages: 1. Enter the print server’s IP address (or host name) in the Location/Address field of your Web browser. Press Enter 2. The Printer Overview page will appear and you will be in ordinary User mode. 3. To enter Admin mode, click Admin. 4. You may be prompted for a password; in a new and unconfigured print server enter the default user name root and leave the password field empty.
Print Server Management and Configuration Services Available from the User Mode The following services are available from the User mode. A click on the question mark will open the print server’s help pages. Click on the Axis logotype t serve811mD0.001 Axis’ home page.
Print Server Management and Configuration Print Jobs Select Print Jobs to view Printer Usage, showing the accumulated usage of the printer connected to your print server. The Printer Usage log is erased each time the print server is restarted. • • • • View Job Log Print Server Uptime Scanner Help AXIS 1650 User’s Manual Printer - shows the printer model. Port - shows the port to which the printer is connected. Status - shows the status of the printer.
Print Server Management and Configuration Services Available from the Admin Mode Click on the Axis logotype to reach Axis’ home page. A click on the question mark will open the print server’s help pages. The following services are available from the Admin mode. This Print Server Print Server Name System Location Serial Number General Settings This page contains a section that allows you to view and modify the general parameter settings of the AXIS 1650.
Print Server Management and Configuration Printer Page By clicking the printer icon on the This Print Server page, a Printer page opens, allowing you to view the status and the supported capabilities of the connected printer. On some printer models, you can also print a test page from the Printer page. Note: It is only possible to print a test page on Canon printers that support printing standard ASCII characters.
Print Server Management and Configuration Network Settings Changing Network Settings Support Troubleshoot and Upgrade Server Report To change the print server’s network settings, select Admin | Network Settings | Detailed View. For additional information, see “Setting Network Protocol Parameters” on page 49. From the Support page you can receive help to resolve any installation or print problems that might occur. If your problems persist, the Support page allows you to produce a Server Report.
Print Server Management and Configuration Setting General Parameters To change the print server’s general parameters, select Admin | General Settings => Change in the Web interface. Note: All print server settings have default values that have been carefully selected by Axis. In most instances, there is no need to change the default values. Observe that all network configuration should involve the Network Administrator.
Print Server Management and Configuration Setting Restrictions To change print server permissions and restrictions, select Admin | General Settings => Change and select the Restrictions tab in the Web interface. TCP Restriction Enabled When set to Yes, users specified in the IP Address List are rejected or accepted (depending on how the TCP Restriction Mode is set), to send print jobs over the print server.
Print Server Management and Configuration using the SLP protocol. Default = Accept SLP Restriction IP Address List Users specified here are rejected or accepted.IP addresses or ranges of IP addresses can be specified as follows: Example IP addresses: 10.13.16.150, 10.13.16.151 Example IP address range: 10.13.16.160-10.13.16.170 Default = Setting Network Protocol Parameters To change the print server’s network settings, select Admin | Network Settings | Detailed View in the Web interface.
Print Server Management and Configuration anticipates that there is a router available that automatically senses and redirects the print server's packets to destinations outside the local network segment. Default value: 0.0.0.0 DHCP Enabled Set to Yes to enable DHCP (Dynamic Host Configuration Protocol). DHCP automatically downloads the IP address to each print server at startup.
Print Server Management and Configuration print server. Default = Scope ID SNTP Server Address SNTP Update Interval Specify the NetBIOS scope to which the print server belongs. The scope ID is a character string value that is appended to the NetBIOS name and used for all NBT communication. The scope ID defines a group of computers that recognizes a registered NetBIOS name and all NetBIOS traffic will be confined within this group. Default value = which specifies the default scope.
Print Server Management and Configuration Print Server Management Using FTP Having assigned an IP address to your AXIS 1650, as described in “Set the IP Address” on page 11, you can change the AXIS 1650 parameter settings using the File Transport Protocol (FTP). Editing the config file Follow the instructions below to edit the config file using FTP: 1. Log in to the AXIS 1650 by typing: ftp or ftp in a Command prompt. 2.
Print Server Management and Configuration Print Server Management Using SNMP You can use SNMP (Simple Network Management Protocol) to monitor and configure the AXIS 1650 remotely. All major functions for print servers are supported. General Information SNMP refers to a set of standards for network management, including a protocol, a database structure specification, and a set of data objects. The AXIS 1650 SNMP implementation runs in TCP/IP networks.
Scanning with AXIS 1650 Section 9 Scanning with AXIS 1650 If your Canon device also functions as a scanner, you can use your AXIS 1650 as a scanner server, too. This section describes how to scan via an AXIS 1650 using AXIS ScanClient. For general information on scanning, see your Canon device manual. The examples here show Windows XP and a Canon MF3110 with MF Toolbox 4.7.
Scanning with AXIS 1650 3. Installation is about to begin. Click [Next]. 4. Read and accept the License Agreement. Click [Next]. 5. Select Destination Location (default location is C:\Program Files\AXIS Communications\AXIS ScanClient). Click [Next]. 6. Select Start Menu Folder (default folder is AXIS ScanClient). Click [Next]. 7. Check the values and click [Install] to start the installation process. 8. After a short while AXIS ScanClient has been installed on your computer.
Scanning with AXIS 1650 Using AXIS ScanClient Connect to the Scanner 1. Start AXIS ScanClient (Start | AXIS ScanClient). The client will search the network for scanning devices. Mark the one you would like to use by clicking on it in the list (you can also select a scanner by entering its IP address). Click [Connect]. 2. If the scanner is busy AXIS ScanClient will show who is using it, otherwise you will be connected, as indicated on the message line.
Scanning with AXIS 1650 1. On your computer, start the receiving program (e.g. Canon MF Toolbox — Scan Function). Click [Save] to open the Save dialog. 2. In the Save dialog, click [Start] to start scanning. 3. When ready, close the Save dialog and the Canon MF Toolbox. 4. Disconnect from the scanner - see page 56, and remove the scanned object from the flatbed.
Scanning with AXIS 1650 4. Right-click the device you would like to use (example: WIA Canon MF3110) and select Get picture using Scanner Wizard. 5. The Scanner and Camera Wizard starts. Click [Next]. 6. Select scanning parameters and start scanning. 7. When scanning is ready, disconnect from the scanner - see page 56 and remove the scanned object from the flatbed. Example 2 Example using Gimp: 1.
Scanning with AXIS 1650 3. Select File | Acquire | TWAIN... 4. Select source (e.g. MF3110). 5. Select scanning parameters and start scanning. 6. When scanning is ready, disconnect from the scanner - see page 56 and remove the scanned object from the flatbed. Invoking a Scan from the Canon Device First time only: Prepare your Computer These five steps are just needed prior to the first scanning invoked from the Canon device to a certain client computer.
Scanning with AXIS 1650 5. Select Events and select the event Canon MF3110 Scan Button. Under Actions, select the option Start this program and select MF ToolBox Ver4.7 in the list. Click [OK]. Now you have prepared your computer to automatically take care of scannings invoked from the Canon device. Start a Scan from the Canon Device Connect to the scanner with AXIS ScanClient - see page 56 and place the object to be scanned on the scanner flatbed. 1.
The Test Button Section 10 Factory Default The Test Button The test button is located on the front right hand side of the print server and is used to perform a Factory Default: 1. Remove the power adapter to switch off the print server. 2. Press and hold down the test button, while you reconnect the power adapter. 3. Continue to hold down the test button until the network indicator remains constantly lit. This should take about 20 seconds. 4.
Upgrading the Firmware Section 11 Upgrading the Firmware The print server’s firmware is stored in its Flash memory. This memory retains its data content even after the power is removed. Flash memory allows data to be erased and re-written, which is why you can install firmware updates in your print server as they become available, without having to replace any parts. New firmware can simply be loaded into the AXIS 1650 over the network.
Upgrading the Firmware 5. Type dir and press Enter. The Axis directory you have created will display a list of all files. 6. Connect to the print server using ftp: Type ftp 10.13.4.105 (this example uses print server IP address 10.13.4.105) 7. Enter the user name, the default user is root (if the default password has been changed then it must also be entered). Press Enter. 8. Change to binary transfer mode: type bin and press Enter. 9. Type hash and press Enter. 10.
Enabling Unicast Network Communication Section 12 Enabling Unicast Network Communication Important: All network configuration must be performed by the network administrator! AXIS CAPT Print Monitor uses broadcast communication, so that status information from the print server can be shared between several users without elevating network traffic. Broadcast communication is used by default in the print server.
Enabling Unicast Network Communication 7. Locate the parameter named USE_IP_PORT_NAME: type YES Make sure this parameter is set to YES. 8. Once the editing is complete, save the file as config 9. In the Command prompt window, upload the configuration file to the AXIS 1650 by typing put config CONFIG 10. To exit FTP, type quit Note: This will also change the Print Server Name parameter so that it is based on the print server’s IP address, with “_” replacing the “.” in the address.
Enabling Unicast Network Communication Install AXIS CAPT Print Monitor 1. Install AXIS CAPT Print Monitor software on your workstation. The software is available on the AXIS 1650 CD and on www.axis.com. Click your way through the program. 2. During the software setup, you will reach the Set the Unicast Communication Mode screen, check the Enable unicast check-box. 3. Click Next and Finish to finish the installation. 4.
Enabling Unicast Network Communication 7. A pop-up window will appear. Enter the IP address of the AXIS 1650. 8. Select Manufacturer and Printer from the driver list. Click Next. 9. Choose whether you want to keep the existing driver or to replace it. If you already have the printer’s driver installed, you will be asked whether to keep it or to replace it. 10. Click Next. Supply a name for the printer and choose whether you want to make it your default printer. Click Next. 11.
Internet Connection Firewall in Windows XP SP2 Section 13 Internet Connection Firewall in Windows XP SP2 If you have upgraded to Windows XP SP2, you need to open UDP port 10260 in the Internet Connection Firewall when using Broadcast communication. For Unicast comunication, the firewall can remain closed. UDP port 10260 is opened automatically in Internet Connection Firewall, if allowed during the installation of AXIS CAPT Print Monitor in Windows XP/2003, see “Windows Installation” on page 17.
Internet Connection Firewall in Windows XP SP2 4. Click Exceptions and highlight AXIS CAPT Port. 5. Click OK. Note: If you accidentally delete the AXIS CAPT Port and want to recreate it, go to Exceptions | Add Port and configure the port.
Technical Specifications Section 14 Supported Devices Technical Specifications AXIS 1650 is developed to network Canon printers and multifunctional products. If your Canon device also functions as a scanner, you can use your AXIS 1650 as a scanner server, too. AXIS 1650 supports Canon Advanced Printing Technology, Canon Advanced Raster Printing System as well as Canon BubbleJet printers. Important: AXIS 1650 does not support devices from other manufacturers than Canon.
Technical Specifications Power Consumption Dimensions Maximum 5.6 W. Power provided by Power Adapter type PS-H: 5.1V DC 2000 mA Height x Width x Depth 1.1in (29 mm), 2.4in (62 mm), 4.6in (117 mm) Weight 0.
Index Index A Adhesive Clip. . . . . . . . . . . . . . . . . . . . . . . . . . . . . . . . . . . . . . . . . . . . . . . . 11 Adhesive Holder . . . . . . . . . . . . . . . . . . . . . . . . . . . . . . . . . . . . . . . . . . . . . 11 Admin mode . . . . . . . . . . . . . . . . . . . . . . . . . . . . . . . . . . . . . . . . . . . . . . . . 40 Assistance . . . . . . . . . . . . . . . . . . . . . . . . . . . . . . . . . . . . . . . . . . . . . . . . . . . 5 AXIS CAPT Print Monitor . . . . . . . . . . . . .
Index H Help . . . . . . . . . . . . . . . . . . . . . . . . . . . . . . . . . . . . . . . . . . . . . . . . . . . . . . . 43 Host Name . . . . . . . . . . . . . . . . . . . . . . . . . . . . . . . . . . . . . . . . . . . . . . 15, 16 I IEEE 1284 parallel port . . . . . . . . . . . . . . . . . . . . . . . . . . . . . . . . . . . . . 9, 70 Installing Printer Ports Windows 2000 . . . . . . . . . . . . . . . . . . . . . . . . . . . . . . . . . . . . . . . . 17, 22 Windows 2000, XP, 2003 . . . . . . . . . . .
Index Network Statistic . . . . . . . . . . . . . . . . . . . . . . . . . . . . . . . . . . . . . . . . . . . . 46 P Parameter List . . . . . . . . . . . . . . . . . . . . . . . . . . . . . . . . . . . . . . . . . . . . . . . 44 password . . . . . . . . . . . . . . . . . . . . . . . . . . . . . . . . . . . . . . . . . . . . . . . . . . . 41 peer-to-peer printing . . . . . . . . . . . . . . . . . . . . . . . . . . . . . . . . . . . . . . . . . 17 Print Jobs . . . . . . . . . . . . . . . . . . . . . . . . .
Index SNMP . . . . . . . . . . . . . . . . . . . . . . . . . . . . . . . . . . . . . . . . . . . . . . . . . . . . . . 53 SNMP access enabled . . . . . . . . . . . . . . . . . . . . . . . . . . . . . . . . . . . . . . . . 47 SNMP Restriction Enabled . . . . . . . . . . . . . . . . . . . . . . . . . . . . . . . . . . . . . 48 SNMP restriction IP address list . . . . . . . . . . . . . . . . . . . . . . . . . . . . . . . . 48 SNMP restriction mode . . . . . . . . . . . . . . . . . . . . . . . . . . . . . . .