Installatiehandleiding Bewaar deze handleiding na het lezen bij de machine, zodat u de NEDERLANDS informatie later snel kuntthis raadplegen. After you finish reading guide, store it in a safe place for future reference.
Hoe deze handleiding is ingedeeld Hoofdstuk 1 Benodigde handelingen om de machine te gebruiken In dit gedeelte worden eerst de benodigde handelingen beschreven, zoals inloggen op de machine en de machine aansluiten op een netwerk. Hoofdstuk 2 De machine voor de eerste keer instellen In dit gedeelte worden algemene voorbeelden gebruikt om de machine in te stellen zodat u de functies van de machine kunt gebruiken.
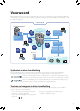
Voorwoord Om bepaalde functies van de machine te gebruiken, dient u van tevoren instellingen op te geven. Raadpleeg “Overzicht van instellingen om de gewenste functies te kunnen gebruiken” op pagina 2 in deze handleiding voor informatie over de benodigde handelingen.
Overzicht van instellingen om de gewenste functies te kunnen gebruiken Dit stroomschema geeft een overzicht van de instellingen die nodig zijn om elke functie van de machine te kunnen gebruiken. Lees het overzicht van de benodigde instellingen door en raadpleeg dan de informatie in deze handleiding of in de e-Handleiding om de instellingen op te geven. * Raadpleeg eerst “Als beheerder inloggen op de machine,” op pag. 8.
ken k *1 U kunt PDF bestanden die zijn opgeslagen op de geheugenmedia of de geavanceerde ruimte van een andere machine op het netwerk alleen afdrukken als u de imageRUNNER ADVANCE C2030i/C2020i gebruikt. Om af te drukken, is de PS Printer Kit of Direct Print Kit (voor PDF/XPS) nodig. (Voor zowel de PS Printer Kit en de Direct Print Kit (voor PDF/XPS) is licentieregistratie nodig.) *2 De standaardinstelling voor weergave van de geheugenmedia is 'Uit'.
Inhoudsopgave Voorwoord. . . . . . . . . . . . . . . . . . . . . . . . . . . . . . . . . . . . . . . . . . . . . . . . . . . . . . . . 1 Symbolen in deze handleiding. . . . . . . . . . . . . . . . . . . . . . . . . . . . . . . . . . . . . . . . . . . . . . . . . . . . . . . . . . . . . . 1 Toetsen en knoppen in deze handleiding. . . . . . . . . . . . . . . . . . . . . . . . . . . . . . . . . . . . . . . . . . . . . . . . . . . .
Faxen verzenden/ontvangen via de faxserver op afstand. . . . . . . . . . . . . . . . . . . . . . . . . . . 35 Benodigde instellingen om faxen verzenden via de faxserver op afstand. . . . . . . . . . . . . . . . . . . . . . . . . . . . . . . . . . . 35 De server instellen . . . . . . . . . . . . . . . . . . . . . . . . . . . . . . . . . . . . . . . . . . . . . . . . . . . . . . . . . . . . . . . . . . . . . . . . . . . . . . . . . . . . 35 Client instellen. . . . . . . . . . . . . .
Handleidingen en gerelateerde software downloaden. . . . . . . . . . . . . . . . . . . . . . . . . . . . . 60 Beheren via het touch panel display . . . . . . . . . . . . . . . . . . . . . . . . . . . . . . . . . . . . . . . . . . . . . . 60 Installatielog/Updatelog via het touch panel display weergeven . . . . . . . . . . . . . . . . . . . . . . . . . . . . . . . . . . . . . . . . . . . 60 Communicatie testen via het touch panel display.
Benodigde handelingen om de machine te gebruiken 1 Als beheerder inloggen op de machine . . . . . . . . . . . . . . . . . . . . . . . . . . . . . . . . 8 Inloggen via het touch panel display. . . . . . . . . . . . . . . . . . . . . . . . . . . . . . . . . . . . . . . . . . . . . . . . . . . . . . . . . . . . . . . . . . . 8 Inloggen via de UI op afstand. . . . . . . . . . . . . . . . . . . . . . . . . . . . . . . . . . . . . . . . . . . . . . . . . . . . . . . . . . . . . . .
Als beheerder inloggen op de machine Benodigde handelingen om de machine te gebruiken 1 3 Voer het Systeembeheerder-ID en de Systeem PIN in → druk op [Inloggen]. [ID systeembeheerder]: 7654321 [Systeem PIN]: 7654321 (het ingevoerde nummer wordt met sterretjes aangegeven) Om de instellingen te kunnen opgeven, dient u als administrator (beheerder) in te loggen op de machine. U kunt op twee manieren inloggen; via het touch panel display van de machine en vanaf een computer via de UI op afstand.
De machine aansluiten op een netwerk Om functies zoals Afdrukken of Faxen via een computer te kunnen gebruiken, moet de machine van tevoren aangesloten worden op een netwerk. Voordat u de netwerkverbinding instelt, moeten de machine en de computer via een netwerkkabel worden aangesloten. Raadpleeg voor meer informatie de e-Handleiding > Netwerk > De machine aansluiten op een computer of netwerk. In dit voorbeeld worden het standaard Systeembeheerder-ID en de standaard Systeem-PIN gebruikt om in te loggen.
4 Druk op [Bevestig wijziging inst. netwerkaansluiting ] 7 Druk op [Aan] voor → [OK]. Benodigde handelingen om de machine te gebruiken 1 5 De interface-instellingen zijn nu ingesteld. Vervolgens stelt u de communicatie-omgeving in voor de machine en de computers op het netwerk. 8 6 10 Druk op [Aan] → [OK]. Druk op [SNMP-instellingen]. Druk op [Ethernet stuurprogramma-instellingen].
10 Geef de volgende instellingen op → druk op [OK]. In dit voorbeeld worden de volgende instellingen opgegeven: : [Aan] : [Alleen lezen] [Communitynaam]: publiek 13 Druk op [Aan] → [OK]. 11 12 14 Druk op [Gebruik spoolfunctie]. 15 Druk op [Aan] → [OK]. Druk op [Aan] bij → [OK]. Benodigde handelingen om de machine te gebruiken 1 Druk op [Instellingen speciale poort].
Netwerk instellen op de machine Benodigde handelingen om de machine te gebruiken 1 Druk op [TCP-/IP-instellingen]. 5 Druk op [IPv4-instellingen]. 6 Druk op [Gebruik IPv4]. Nadat de machine is aangesloten op het netwerk, moeten de instellingen op uw machine worden opgegeven. In dit voorbeeld wordt een netwerk van het type TCP/IP gebruikt. TCP-/IP-instellingen [Gebruik IPv4]: Aan [IP-adresinstellingen]: 192.168.1.21 DNS-instellingen [Instellingen DNS-serveradres]: 192.168.1.
7 Druk op [Aan] → [OK]. 10 Druk op [DNS-instellingen]. 8 Druk op [IP-adresinstellingen]. 11 9 Geef de volgende instellingen op → druk op [OK]. 12 In dit voorbeeld worden de volgende waarden ingevoerd: [IP-adres]: 192.168.1.21 [Subnetmasker]: 255.255.255.0 [Gateway-adres]: 192.1.254.0 Druk op [Adresinstellingen DNS-server]. Benodigde handelingen om de machine te gebruiken 1 Voer het IP-adres in [Primaire DNS-server] in bij → druk op [OK]. In dit voorbeeld wordt ‘192.168.1.22’ ingevoerd.
13 Druk op [Instellingen DNS-host-/domeinnaam]. 18 Druk op [IPv4-instellingen]. 19 Druk op [PING-commando]. Benodigde handelingen om de machine te gebruiken 1 14 Voer een host- en een domeinnaam in bij → druk op [OK]. In dit voorbeeld worden de volgende waarden ingevoerd: [Hostnaam]: hostnaam [Domeinnaam]: organization.company.com 20 15 Voer een IPv4-adres in dat op het netwerk bestaat → druk op [Start]. In dit voorbeeld wordt ‘192.168.1.1’ ingevoerd.
Druk op [Beheerinstellingen]. 1 In dit gedeelte worden de handelingen beschreven die de beheerder moet uitvoeren om de machine te beheren via een computerscherm. De UI op afstand of SMS wordt gebruikt om de machine via een computer te beheren. UI op afstand (Gebruikersinterface): De UI op afstand is software waarmee u via de webbrowser van uw computer toegang hebt tot de machinefuncties.
5 Druk op [Aan] bij → [OK]. Met SMS kunt u via de webbrowser op uw computer MEAPtoepassingen van de machine beheren. MEAP-toepassingen is software die wordt gebruikt om de functionaliteit van de machine aan te passen en uit te breiden. Om SMS te starten, dient uw computer toegang tot de machine te hebben. 1 Benodigde handelingen om de machine te gebruiken Vereiste instellingen voor het gebruik van SMS U kunt de gewenste instellingen voor opgeven.
Druk op [TCP-/IP-instellingen]. De machine met SMS beheren 1 2 3 Start uw webbrowser. Voer ‘http://’ bij [Adres] in. Voer het Systeembeheerder-ID en de Systeem PIN in → klik op [Administrator Login]. [System Manager ID]: 7654321 [System PIN]: 7654321 5 Druk op [Gebruik HTTP]. 4 6 7 8 1 Benodigde handelingen om de machine te gebruiken 4 U bent nu ingelogd op de UI op afstand. Klik op [Service Management Service]. Druk op [Aan] → [OK]. Druk op [Sluiten].
5 Voer het wachtwoord in → druk op [Log In]. In dit voorbeeld wordt ‘MeapSmsLogin’ ingevoerd. Benodigde handelingen om de machine te gebruiken 1 Het standaardwachtwoord is ‘MeapSmsLogin’ (hoofdlettergevoelig). Wij raden u aan om het wachtwoord te wijzigen als u bent ingelogd op SMS. 6 Het scherm SMS verschijnt. Gebruik MEAP-toepassingsbeheer door de MEAPtoepassingen te controleren en te installeren. Raadpleeg de e-Handleiding voor meer informatie over de benodigde handelingen.
De machine voor de eerste keer instellen 2 E-Mail/I-Fax gebruiken. . . . . . . . . . . . . . . . . . . . . . . . . . . . . . . . . . . . . . . . . . . . . . . 20 Vereiste instellingen voor het verzenden van e-mail/I-faxen. . . . . . . . . . . . . . . . . . . . . . . . . . . . . . . . . . . . . . . . . . . 20 E-mail/I-Faxen verzenden. . . . . . . . . . . . . . . . . . . . . . . . . . . . . . . . . . . . . . . . . . . . . . . . . . . . . . . . . . . . . . . . .
E-Mail/I-Fax gebruiken 2 Druk op [Functie-instellingen]. 3 Druk op [Verzenden]. 4 Druk op [E-mail-/I-faxinstellingen]. 5 Druk op [Communicatie-instellingen]. Via e-mail of internetfax (I-fax) kunt u originelen verzenden die u met de machine hebt gescand. In dit voorbeeld wordt de procedure beschreven voor het verzenden van een ontwerpvoorstel in PDF-bestandsindeling. Hieronder staat een overzicht van de benodigde handelingen. 1.
6 Geef de volgende instellingen op → druk op [Volgende]. 9 In dit voorbeeld worden de volgende waarden ingevoerd: [E-mailadres]: john@example.com [SMTP-server]: 192.168.1.2 Geef de volgende instellingen op → druk op [OK]. In dit voorbeeld worden de volgende instellingen opgegeven: : Aan [Gebruikersnaam]: user_name [Wachtwoord]: wachtwoord 7 U kunt de gewenste instellingen opgeven voor en .
De machine voor de eerste keer instellen 2 22 2 Druk op [Adresboek]. 5 Druk op [Registreer nieuwe bestemming]. 3 Druk op [Andere bew.]. 6 Druk op [E-mail]. 4 Druk op [Opslaan/Bewerken]. 7 Voer de nieuwe naam in → druk op [Volgende]. In dit voorbeeld wordt ‘planning dept.’ ingevoerd.
9 10 4 Wijzig indien nodig deze instellingen. In dit voorbeeld wordt ‘mike@example.com’ ingevoerd. Druk op [Sluiten]. 5 Druk op 6 Druk op [Start verzenden]. Voer het e-mailadres in → druk op [OK]. Druk op [OK]. Verzenden van een e-mailbericht . Als het scherm [Stel SMTP-authentificatie in] verschijnt, voert u de gebruikersnaam en het wachtwoord in → druk op [OK]. Als het scherm [Origineelformaat] wordt weergegeven, geeft u het formaat van het origineel op → druk op [OK].
Gescande data naar een bestandserver verzenden 3 Klik op [Eigenschappen] → controleer de naam van de computer. 4 Klik in het menu [Start] met de rechtermuisknop op [Netwerk] → selecteer [Eigenschappen]. In dit voorbeeld wordt de procedure beschreven voor het scannen van een origineel en het verzenden ervan in PDF-bestandsindeling naar een bestandserver (computer). De machine voor de eerste keer instellen 2 1. Vereiste instellingen om data naar een computer te verzenden • Computer instellen 2.
6 Klik op [Eigenschappen]. 8 Selecteer [Internet Protocol versie 4 (TCP/IPv4)] → klik op [Eigenschappen]. 7 Selecteer de volgende items. • [Client voor Microsoft-netwerken] • [Bestands- en printerdeling voor Microsoft-netwerken] • [Internet Protocol versie 4 (TCP/IPv4)] 9 Klik op [Geavanceerd] op het tabblad [Algemeen].
10 Klik op het tabblad [WINS]. 13 Klik in het menu [Start] met de rechtermuisknop op [Computer] → selecteer [Beheren]. De machine voor de eerste keer instellen 2 11 14 Selecteer [NetBIOS via TCP/IP inschakelen] → klik op [OK]. 15 Klik op [Lokale gebruikers en groepen] in [Systeemwerkset] → klik met de rechtermuisknop op de map [Gebruikers] → selecteer [Nieuwe gebruiker] in het pop-upmenu. Geef de volgende instellingen op → klik op [Maken] → [Sluiten].
De gebruiker is nu aangemaakt. Vervolgens maakt u een map aan voor het verzenden van data via de machine. 16 Maak een map aan op een door u gewenste locatie om data in op te slaan. In dit voorbeeld wordt een map met de naam ‘share’ gemaakt. Origineel scannen en verzenden naar de gedeelde map van een computer U kunt data die door de machine zijn gescand verzenden naar de gedeelde map. Nieuwe bestemmingen opslaan Registreer de informatie over de gedeelde map aangemaakt in “Computer instellen,” op pag.
De machine voor de eerste keer instellen 2 4 Druk op [Opslaan/Bewerken]. 5 Druk op [Registreer nieuwe bestemming]. 7 Voer de nieuwe naam in → druk op [Volgende]. 8 Geef de volgende instellingen op → druk op [OK]. In dit voorbeeld wordt ‘Original’ ingevoerd. [Protocol]: Windows (SMB) [Hostnaam]: \\user-1\share [Gebruikersnaam]: user_name [Wachtwoord]: wachtwoord • Bij [Hostnaam] voert u ‘\\\’ in.
2 Druk op [Adresboek]. 6 3 Selecteer ‘Original’ → druk op [OK]. Het gescande origineel wordt naar de gedeelde map verzonden. Druk op [Start verzenden]. i In dit voorbeeld wordt de procedure voor het verzenden van een fax beschreven. Hieronder staat een overzicht van de benodigde handelingen. 1. Benodigde instellingen voor het verzenden van faxen 4 Wijzig indien nodig deze instellingen.
Faxnummer, machinenaam en type lijn registreren 5 Druk op [Stel lijn in]. 6 Selecteer de gewenste lijn. 7 Druk op [Registreer telefoonnummer]. Registreer het faxnummer en de machinenaam weergegeven/afgedrukt op de ontvangende machine. Stel het type lijn in op Toon. 1 2 Druk op . Druk op [Functie-instellingen]. De machine voor de eerste keer instellen 2 3 4 30 Het aantal lijnen dat wordt weergegeven, is afhankelijk van de optionele apparatuur die op de machine is aangesloten.
8 Voer het faxnummer van de afzender in met (numerieke toetsen). 12 Druk op [Selecteer type lijn]. 13 Druk op [Toon] → [OK]. 14 Druk op [Sluiten]. In dit voorbeeld wordt ‘012XXXXXXX’ ingevoerd. Druk op [OK]. 10 Druk op [Registreer apparaatnaam]. De machine voor de eerste keer instellen 9 Het faxnummer is nu geregistreerd. Vervolgens registreert u de machinenaam. 11 2 Voer de nieuwe naam in → druk op [OK]. In dit voorbeeld wordt ‘sales dept.’ ingevoerd.
Naam van de afzender toevoegen aan verzonden documenten 5 Druk op [TX Terminal ID]. Stel de machine zo in dat informatie over de afzender op verzonden documenten wordt weergegeven. 1 2 Druk op . Druk op [Functie-instellingen]. De machine voor de eerste keer instellen 2 6 In dit voorbeeld worden de volgende instellingen opgegeven: [Afdrukpositie]: [Buitenbeeld] [Weergave naam bestemming]: [Aan] [Telefoon # symbool]: [Fax] 3 Druk op [Verzenden].
Faxen verzenden 4 Druk op [Opslaan/Bewerken]. 5 Druk op [Registreer nieuwe bestemming]. 6 Druk op [Fax]. Registreer in het adresboek de bestemming waarnaar de faxen moeten worden verzonden. Nieuwe bestemmingen opslaan Registreer in het adresboek de informatie over de bestemming. In dit voorbeeld wordt informatie over “central sales dept.” in het adresboek geregistreerd. 2 3 Druk op [Fax]. 2 De machine voor de eerste keer instellen 1 Druk op [Adresboek]. Druk op [Andere bew.].
7 Voer de nieuwe naam in → druk op [Volgende]. Verzenden van een fax In dit voorbeeld wordt ‘central sales dept.’ ingevoerd. Een fax verzenden naar de bestemming geregistreerd in “Nieuwe bestemmingen opslaan,” op pag. 33. 1 2 De machine voor de eerste keer instellen 2 8 Plaats uw originelen. Druk op [Adresboek]. Voer het faxnummer van de ontvanger in met (numerieke toetsen). In dit voorbeeld wordt ‘123XXXXXXX’ ingevoerd. 9 10 3 Selecteer [central sales dept.].
Client instellen Met de functie fax op afstand op uw machine kunt u faxen verzenden/ontvangen via een servermachine. In dit voorbeeld wordt de machine (een andere machine uit de serie imageRUNNER ADVANCE) die de fax doorstuurt de “server” genoemd, en de machine (deze machine) waarnaar de fax wordt verzonden of waarop de fax wordt ontvangen, wordt de “client” genoemd. Hieronder staat een overzicht van de benodigde handelingen. Faxen verzenden via de faxserver op afstand 1.
5 Druk op [Instellingen Fax TX op afstand]. Faxen verzenden via de faxserver op afstand Verzend faxen via de faxserver op afstand. 1 2 De machine voor de eerste keer instellen 2 6 Plaats uw originelen. Druk op [Fax]. Druk op [Fax serveradres op afstand] → voer het IP-adres in → druk op [OK]. In dit voorbeeld wordt ‘192.168.1.24’ ingevoerd als het IP-adres van de server. 3 Voer het faxnummer van de ontvanger in met (numerieke toetsen). In dit voorbeeld wordt ‘123XXXXXXX’ ingevoerd.
5 Druk op [Start verzenden]. Faxen met de machine vanaf een computer verzenden In dit voorbeeld wordt de procedure beschreven voor het via de machine verzenden van een document dat op een computer als een fax is gemaakt. Hieronder staat een overzicht van de benodigde handelingen. Benodigde instellingen om faxen te ontvangen via de faxserver op afstand Om een fax op afstand te kunnen ontvangen via de Faxserver op afstand, moet u de instellingen voor de servermachine en de clientmachine opgeven.
2 De machine voor de eerste keer instellen 2 3 Klik op het scherm Menu van de cd-rom op [Installation]. Klik met de rechtermuisknop op de fax die u gebruikt → selecteer [Eigenschappen]. 6 Klik op het tabblad [Apparaatinstellingen] → [Apparaatstatus ophalen]. Om de installatiehandleiding van het faxstuurprogramma door te bladeren, klikt u op [Handleidingen weergeven] voordat u op [Installation] klikt. Volg de instructies op het scherm om de installatie te voltooien.
Selecteer [Afdrukken] in het menu. 5 Klik op [OK]. De fax wordt verzonden. 3 Het dialoogvenster [Afdrukken] wordt getoond. Selecteer de faxnaam die moet worden gebruikt → klik op [Afdrukken]. Document afdrukken via een computer Om af te drukken, moet het printerstuurprogramma op een computer zijn geïnstalleerd. Als u het printerstuurprogramma hebt geïnstalleerd, geeft u de afdrukinstellingen op. 1.
2 De machine voor de eerste keer instellen 2 3 Klik op het scherm Menu van de cd-rom op [Installation]. Klik met de rechtermuisknop op de printer → selecteer [Eigenschappen]. 6 Klik op het tabblad [Apparaatinstellingen] → [Apparaatstatus ophalen]. Om de installatiehandleiding van het printerstuurprogramma door te bladeren, klikt u op [Handleidingen weergeven] voordat u op [Installation] klikt. Volg de instructies op het scherm om de installatie te voltooien.
Open het Word-document dat u wilt afdrukken → klik op [Bestand] → [Afdrukken]. 4 5 2 Selecteer [Kleur] bij [Kleurmodus] op het blad [Kwaliteit] → klik op [OK]. 2 Stel het bereik en het aantal kopieën in → klik op [OK]. Selecteer de printer die u gebruikt bij [Naam]. De machine voor de eerste keer instellen 1 Het document wordt afgedrukt. 3 Klik op [Eigenschappen].
Origineel scannen 2 Klik op het scherm Menu van de cd-rom op [Installation]. In dit voorbeeld wordt de procedure beschreven voor het opgeven van de benodigde instellingen voor scannen en voor scannen van een origineel naar uw computer: Hieronder staat een overzicht van de benodigde handelingen. 1. Benodigde instellingen voor scannen • Scannerstuurprogramma installeren • Online scannen op afstand instellen De machine voor de eerste keer instellen 2 2.
Vanaf uw computer gescande data kunnen nu worden ontvangen. Vervolgens stelt u de scanner in die op uw computer moet worden gebruikt. 3 5 Selecteer de scanner die moet worden gebruikt → klik op [Selecteren]. Klik op (Start) → [Programma’s] → [Color Network ScanGear] → [ScanGear Tool]. 6 Klik op [Afsluiten]. ScanGear Tool wordt afgesloten. Scannen op afstand is nu ingeschakeld. 4 De machine voor de eerste keer instellen 2 ScanGear Tool wordt gestart. Klik op [Ontdekken].
Origineel scannen In het volgende voorbeeld wordt de procedure beschreven voor het plaatsen van een origineel op de glasplaat van de machine, en het gebruik van scannen op afstand via uw computer om de data in een Microsoft Office Word 2007document te plakken: 1 2 6 7 De machine voor de eerste keer instellen Het scherm Color Network ScanGear wordt weergegeven. Klik op het Hoofdtabblad → selecteer [Glasplaat] bij . Start Microsoft Office Word 2007.
Sleep de afbeelding gescand met de Microsoft Mediagalerie en zet deze neer in het gedeelte waaraan u de afbeelding wilt toevoegen. De afbeelding wordt toegevoegd in het gewenste gedeelte. Geavanceerde ruimte op het netwerk gebruiken U kunt originelen die gescand zijn met uw machine opslaan in de Geavanceerde ruimte van een andere machine uit de serie imageRUNNER ADVANCE op het netwerk waartoe uw machine toegang heeft.
Geavanceerde ruimte op het netwerk toegankelijk maken 4 Druk op [Netwerkinstellingen]. 5 Druk op [Instellingen Netwerkplaats]. 6 Druk op [Registreren]. Op de machine met de Geavanceerde ruimte die moet worden gedeeld, geeft u de instellingen op om de Geavanceerde ruimte als een SMB-server toegankelijk te maken en geeft u de instellingen voor de SMB-server op. Voor meer informatie raadpleegt u de instructiehandleiding voor de machine met de Geavanceerde ruimte die moet worden gedeeld.
Geef de volgende instellingen op → druk op [OK]. In dit voorbeeld worden de volgende instellingen opgegeven: [Naam]: images : SMB [Locatie]: \\192.168.1.23\share 8 Druk op [Sluiten]. 9 Druk op [Protocol voor externe verwijzing]. 12 Druk op [Voorkeuren]. 13 Druk op [Weergave-instellingen]. 14 Druk op [Instellingen Weergave opslaglocatie]. De instellingen voor de Netwerkplaats zijn nu ingesteld. Vervolgens geeft u het Protocol voor externe verwijzing op.
15 De machine voor de eerste keer instellen 2 De instellingen voor de Weergave opslaglocatie zijn nu ingesteld. Data opslaan in een Geavanceerde ruimte op het netwerk 4 5 Selecteer de gewenste opslaglocatie. Als er een authentificatiescherm verschijnt, voert u de gebruikersnaam en het wachtwoord in om in te loggen. Druk op [Scannen]. Data die zijn gescand op de machine opslaan in de Geavanceerde ruimte van een andere machine uit de serie imageRUNNER ADVANCE aangesloten op het netwerk.
9 Druk op [Start opslaan]. Het gescande document wordt opgeslagen in de Geavanceerde ruimte van een andere machine uit de serie imageRUNNER ADVANCE aangesloten op het netwerk. Druk op [Sluiten].
De machine voor de eerste keer instellen .&.
Systeemopties/MEAP-toepassingen gebruiken 3 Systeemopties/MEAP-toepassingen installeren . . . . . . . . . . . . . . . . . . . . . . . 52 Installeren door deze machine aan te sluiten op een extern netwerk. . . . . . . . . . . . . . . . . . . . . . . . . . . . . . . . . . 52 Installeren door deze machine niet aan te sluiten op een extern netwerk. . . . . . . . . . . . . . . . . . . . . . . . . . . . . . 52 Registratie van licentie . . . . . . . . . . . . . . . . . .
Systeemopties/ MEAP-toepassingen installeren Met de functie Registreer/Update software kunt u de Systeemopties/MEAP-toepassingen op de machine installeren. U kunt deze functie zowel via het touch panel display als de computer gebruiken (UI op afstand). Installeren door deze machine aan te sluiten op een extern netwerk U kunt de Systeemopties/MEAP-toepassingen installeren door via deze machine toegang te krijgen tot de bezorgingsserver.
Afhankelijk van de Systeemopties/MEAPtoepassingen die u gebruikt, dient u wellicht de licentie te registreren. Systeemopties/MEAPtoepassingen U kunt de functies van de machine verbeteren door verschillende systeemopties en MEAP-toepassingen te installeren. Systeemopties U kunt de volgende systeemopties op deze machine installeren.
Installeren door deze machine niet aan te sluiten op een extern netwerk Systeemopties installeren Volg een van de onderstaande procedures. Als u meerdere systeemopties wilt installeren, is het raadzaam op de UI op afstand te gebruiken. Installeren via het touch panel display Installeren door deze machine aan te sluiten op een extern netwerk Als de machine op een extern netwerk is aangesloten, kunt u de systeemopties en de MEAP-toepassingen installeren door verbinding te maken met de bezorgingsserver. 1.
3 4 Druk op [Toegangsnummer licentie]. 6 Voer het toegangsnummer van de licentie in met vier cijfers per keer. Selecteer de systeemopties en de MEAPtoepassingen → druk op [Installeren]. [Niet starten]: Druk hierop om de MEAP-toepassingen alleen te installeren en niet direct op te starten. Als u [Niet starten] selecteert tijdens het installeren van MEAPtoepassingen, dient u de toepassing te starten voordat u de MEAP-toepassing gebruikt. (Zie “MEAP-toepassingen starten,” op pag. 59.
Installeren via de UI op afstand (bezorgingsserver) 4 Selecteer de systeemopties en de MEAPtoepassingen → klik op [Start Installation]. U kunt de systeemopties of de MEAP-toepassingen via de UI op afstand op de machine installeren. 1 Om de procedures in dit gedeelte uit te voeren, dient u als beheerder in te loggen op de machine. (Zie “Inloggen via de UI op afstand,” op pag. 8.) Klik in de bovenste pagina van de UI op afstand op [Settings/Registration] → [License/Others] → [Register/Update Software].
Installeren door deze machine niet aan te sluiten op een extern netwerk In dit gedeelte wordt beschreven hoe u de systeemopties en MEAP-toepassingen installeert zonder de machine op een extern netwerk aan te sluiten. Om de procedures in dit gedeelte uit te voeren, dient u als beheerder in te loggen op de machine. (Zie “Inloggen via het touch panel display,” op pag. 8.) 1 2 Druk op → [Beheerinstellingen] → [Licentie/ Overige] → [Registreer licentie]. Voer de licentiesleutel in met toetsen).
1 Klik in de bovenste pagina van de UI op afstand op [Settings/Registration] → [License/Others] → [Register/Update Software]. MEAP-toepassingen via de UI op afstand (handmatig) installeren U kunt de MEAP-toepassingen via de UI op afstand op de machine installeren. Om de procedures in dit gedeelte uit te voeren, dient u als beheerder in te loggen op de machine. (Zie “Inloggen via de UI op afstand,” op pag. 8.) 2 Klik op [Manual Installation].
3 Klik op [Browse] → selecteer het licentiebestand en het toepassingsbestand die u wilt installeren → klik op [Next]. MEAP-toepassingen starten In dit gedeelte wordt beschreven hoe u de geïnstalleerde MEAP-toepassing start via het SMS-scherm. 1 Voor meer informatie over SMS raadpleegt u de e-Handleiding > MEAP. In de bovenste pagina van SMS, klikt u op [MEAP Application Management]. Bestandextensies: Licentiebestand: Een bestand met de ‘lic’-extensie.
Handleidingen en gerelateerde software downloaden U kunt via de volgende URL de handleidingen voor de geïnstalleerde systeemopties/MEAPtoepassingen en de bijbehorende software downloaden: http://canon.com/fau/downloads • Zorg ervoor dat u het inbegrepen toegangsnummer van de licentie bij de hand hebt. • Als u geen handleiding kunt vinden die u kunt downloaden, raadpleegt u de functiebeschrijvingen in de e-Handleiding geleverd bij deze machine.
4 Druk op [Geef updatelogs weer]. De installatielogs van de systeemopties en de MEAPtoepassingen worden weergegeven. 3 Druk op [Communicatietest]. 4 Druk op [Ja]. Communicatie testen via het touch panel display De inhoud van de test wordt via de bezorgingsserver gedownload. Als de communicatietest is voltooid, wordt het scherm Test communicatie weergegeven. U kunt controleren of de machine goed communiceert met de bezorgingsserver.
Beheren met de UI op afstand 3 In de keuzelijst voor het bekijken van de logs, selecteert u [Update Logs] → klik op [Switch]. U kunt de installatielogs en de testcommunicatie via de UI op afstand weergeven. Om de procedures in dit gedeelte uit te voeren, dient u als beheerder in te loggen op de machine. (Zie “Benodigde instellingen om UI op afstand te gebruiken,” op pag. 15.
Klik op [Display Logs /Communication Test]→ [Communication Test] Firmware bijwerken In dit gedeelte wordt het bijwerken van firmware beschreven. Firmware bijwerken Met de functie Registreer/Update sofware kunt u de firmware van de machine bijwerken tot de meest recente versie. U kunt deze functie zowel via het touch panel display als via de computer gebruiken (UI op afstand). Wanneer het bevestigingsdialoogvenster wordt weergegeven, klikt u op [Yes].
Bijwerken door deze machine niet aan te sluiten op een extern netwerk 2 Druk op [Update Firmware]. 3 Druk op [Nieuwe Firmware]. U kunt de firmware bijwerken via de data die afzonderlijk van de machine zijn geleverd.
Controleer de weergegeven informatie → druk op [Volgende]. De details van elk item worden hieronder getoond. 6 • Uitgave-informatie: Als voor de nieuwe firmware uitgave-informatie beschikbaar is, wordt deze informatie weergegeven. Geef de instellingen op → druk op [Volgende]. 7 Geef de instellingen op → druk op [OK]. Afleverinstellingen: • [E-mail]: Voer het e-mailadres van de beheerder in. U kunt e-mails ontvangen over de status van de update die via de bezorgingsserver wordt verzonden.
• Als het Aflevertijdstip is ingesteld op [Tijd instellen] De geplande aflevering wordt ingesteld op de gespecificeerde datum/tijd. 4 Controleer de firmware die moet worden geactiveerd → druk op [Ja]. De nieuwe firmware wordt op de machine geactiveerd. Als de toepassing is voltooid, wordt de machine automatisch opnieuw opgestart. Gedownloade firmware toepassen U kunt de gedownloade firmware op de machine activeren.
3 4 Druk op [Verwijder firmware]. Controleer de firmware die moet worden verwijderd → druk op [Ja]. 2 Druk op [Update Firmware]. 3 Druk op [Verwijder geplande aflevering]. De firmware wordt verwijderd. Geplande aflevering verwijderen 4 Controleer de informatie over de geplande aflevering → druk op [Ja]. Systeemopties/MEAP-toepassingen gebruiken 3 De geplande aflevering wordt verwijderd. U kunt de geplande aflevering van de firmware verwijderen.
Bijwerken via de UI op afstand (bezorgingsserver) Maak verbinding met de bezorgingsserver om te controleren of er nieuwe firmware beschikbaar is. U kunt de firmware van de machine via de UI op afstand bijwerken. Om de procedures in dit gedeelte uit te voeren, dient u als beheerder in te loggen op de machine. (Zie “Inloggen via de UI op afstand,” op pag. 8.) Nieuwe firmware controleren/ afleverinstellingen opgeven 4 Als er geen nieuwe firmware beschikbaar is, wordt een foutmelding weergegeven.
• Als het scherm met de overeenkomst wordt weergegeven, leest u de overeenkomst. Als u akkoord gaat, drukt u op [I Accept]. 3 Klik op [Apply Firmware]. • Als het Afleverschema is ingesteld op [Deliver now] en het Toepassingstijdstip is ingesteld op [Auto] De firmware wordt toegepast als de nieuwe firmware is gedownload van de bezorgingsserver. Als de toepassing is voltooid, wordt de machine automatisch opnieuw opgestart.
2 Klik op [Delivered Update]. Geplande aflevering verwijderen U kunt de geplande aflevering van de firmware verwijderen. 1 3 Klik in de bovenste pagina van de UI op afstand op [Settings/Registration] → [License/Others] → [Register/Update Software]. Klik op [Delete Firmware]. 2 Klik op [Delivered Update]. 3 Klik op [Delete Scheduled Delivery]. Systeemopties/MEAP-toepassingen gebruiken 3 4 Controleer de firmware die moet worden verwijderd → klik op [Yes]. De firmware wordt verwijderd.
De geplande aflevering wordt verwijderd. Bijwerken door deze machine niet aan te sluiten op een extern netwerk In dit gedeelte wordt beschreven hoe u de firmware bijwerkt zonder de machine op een extern netwerk aan te sluiten. 3 Klik op [Browse] → selecteer de firmware die u wilt bijwerken → klik op [Next]. 4 Controleer op het bevestigingsscherm de inhoud die wordt bijgewerkt → klik op [Yes].
Systeemopties/MEAP-toepassingen gebruiken .&.
Canon Inc. 30-2, Shimomaruko 3-chome, Ohta-ku, Tokyo 146-8501, Japan Europe, Africa and Middle East Canon Europa N.V. Postbus 2262, 1180 EG Amstelveen, Nederland Nederland: Canon Nederland NV Hoofdkantoor: Bovenkerkerweg 59-61 1185 XB Amstelveen Tel. 023 - 5670123 Fax 023 - 5670124 België: Canon Belgium NV/SA Berkenlaan 3 B-1831 Diegem Belgium Tel. +32 2 722 04 11 Fax +32 2 721 32 74 Groot-Hertogdom-Luxemburg: Canon Luxembourg SA 21, Rue des Joncs 1818 Howald Tel. 352/48 47 96 222 Fax.