F A C S I M I L E S MultiPASSTM C50 GETTING STARTED I. Installation Guide The following pages have been copied from the MultiPASS C50 User Documentation to get you started. Please use these manuals for full details. Unpacking and Assembling the MultiPASS C50 ......................................... I-2 Connecting the MultiPASS C50 to your PC ................................................. I-6 Connecting the Telephone Line .....................................................................
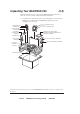
Unpacking Your MultiPASS C50 (2-5) Follow the directions below to unpack your MultiPASS C50 properly, and to make sure you have all of its components and documentation. 1. Carefully remove all items from the box. You should have someone help by holding the box while you lift the MultiPASS C50 and its protective packaging out of the carton.
Removing Shipping Materials (2-8) 1. Remove all pieces of shipping tape from the outside of the MultiPASS C50. 2. Remove the shipping tape and protective cardboard from the sheet feeder. 3. Open the operation panel by grasping it with both hands and gently pulling it toward you. 4. Remove the soft styrofoam sheet from the unit’s Automatic Document Feeder (ADF), then gently push the operation panel shut until it clicks.
Attaching the Sending Document Support (2-11) To install this support, insert one of its tabs into the corresponding slot above the MultiPASS C50’s Automatic Document Feeder (ADF), then – firmly but gently – insert the other. Attaching the Document Support (2-12) The ends of the metal support fit into the slots on the front of the MultiPASS C50, as shown below. To install it, slightly squeeze the ends of the support toward each other, insert them in the slots, and gently release them.
Attaching the Output Tray Extension (2-13) The ends of the metal support fit into the slots on the output tray, as shown below. To install it, squeeze the ends of the support toward each other, insert them into the slots, and gently release them. Attaching the Local Language Labels Fit the faceplate in the right position. FUNCTION /PAUSE RECEIVE MODE RESOLUTION CARTRIDGE RESUME ALARM 1 CODED DIAL 4 TONE/+ 2 3 5 PRINTER RESET 6 D.T.
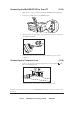
Connecting the MultiPASS C50 to Your PC (2-14) 1. Make sure the computer is turned off and the MultiPASS C50 is unplugged. 2. Connect the parallel cable to your MultiPASS C50: 3. Open the ferrite core and attach it to the parallel cable near the end closest to the MultiPASS C50 unit. 4. Connect the other end of the cable to the parallel interface port on your computer. Connecting the Telephone Line (2-16) 1. Connect one end of the supplied telephone line to the jack marked side of the MultiPASS C50.
Connecting the Power Cord (2-18) 1. Plug the supplied power cord into the power receptacle on the MultiPASS C50. 2. Plug the other end of the power cord into the outlet. Installing the BJ Cartridge (2-31) 1. Make sure the MultiPASS C50 is plugged in. CARTRIDGE 2. Press CARTRIDGE. J The cartridge holder moves toward the centre of the unit. 3. Open the printer cover by grasping the document guides and lifting. 4. Raise the green cartridge lock lever (on the cartridge holder) by gently pulling up on it.
5. Peel the protective foil off the new BJ cartridge’s protective packaging, and remove the cartridge. 6. Lift the orange cap off the cartridge’s print head, then remove the orange tape. 7. Hold the cartridge so the label faces outward, tilt it slightly forward and to the right, then slide it into the cartridge holder. 8. Lower the green lock lever completely. The BJ cartridge is now locked into position. 9. Set the paper thickness lever.
Loading Print Media for Manual Feed (2-49) You will need to select manual feed from the print dialog box of your Windows application before printing. (See the MultiPASS Desktop Manager User’s Guide for instructions.) Load the sheet when the dialog box prompts you to do so. If you attempt to load the sheet without selecting manual feed, the sheet will be ejected. 1.
Entering Your Identification Information (2-58) When the C50 is connected to your PC, we recommend that you use the Setup Options dialog box in the Desktop Manager for Windows. Do not make your changes via the operation panel of the C50. C50 data is overwritten by the Desktop Manager for Windows software. FUNCTION 1 2 1. Press FUNCTION. 2. Use or to select USER SETTINGS, then press START/COPY. DATE & TIME 3. Press START/COPY once more. J The currently set date and time appear. 4.
Installing the Desktop Manager Software If you are attempting to reinstall the Desktop Manager software, you must first uninstall your current installation of the software. For instructions on uninstalling the software, refer to Chapter 8, ”C50 Setup and Other Utilities in the Desktop Manager.” Installing in Windows 95/98 (2-4) This section provides instructions for installing the C50 printer driver and Desktop Manager in Windows 95/98.
Setting Up C50 Options in the Desktop Manager (8-2) Since you can make changes to most option settings either on the C50 or in the Desktop Manager, be aware of the following: J Any option setting you make on the C50 does not display in the Desktop Manager Setup Options dialog box. J Any change you make to an option in the Desktop Manager overrides the corresponding setting you may have made on the C50 device itself.
Notes I-13 Canon MultiPASS C50 Getting Started ENGLISH
Notes I-14 Canon MultiPASS C50 Getting Started ENGLISH
Notes I-15 Canon MultiPASS C50 Getting Started ENGLISH
Notes I-16 Canon MultiPASS C50 Getting Started ENGLISH
Notes I-17 Canon MultiPASS C50 Getting Started ENGLISH
F A C S I M I L E S MultiPASSTM C50 GETTING STARTED II. Quick Reference Guide The following pages have been copied from the MultiPASS C50 User Documentation to get you started. Please use these manuals for full details. The Operation Panel ...................................................................................... II-2 Sending Documents Memory Sending ............................................................................ II-5 Manual Sending via the Handset .................................
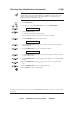
Getting Acquainted with Your MultiPASS C50 Paper Rest Sending Document Support Paper Guide Automatic Document Feeder (ADF) Sheet Feeder Printer Cover Document Guides Operation Panel Document Support For Scanned Documents Output Tray Extension Output Tray Paper Output Guides The Operation Panel (2-23) B Receive Mode C LCD Display A Document Feed Lever ABC 1 GHI 4 PQRS 7 DEF 2 JKL 3 MNO 5 TUV D Resolution E One-Touch Speed Dial/ Special Function Buttons FUNCTION CARTRIDGE RESUME 6 WXYZ 8
A Document feed lever Set this lever to the left ( ) for automatic document feed, or to the right ( ) for manual document feed. B RECEIVE MODE button Use this button to select whether the MultiPASS C50 is set to receive faxes manually (”MANUAL MODE”), to treat all calls as faxes (”FAX ONLY MODE”), to use an answering machine to receive all calls (”ANS. MACHINE MODE”), or to automatically switch between telephone and fax receiving, depending on the type of call (”Fax/Tel Mode”).
Special Function Buttons FUNCTION 1 (2-25) CARTRIDGE RESUME 2 4 3 5 TONE/+ PRINTER RESET 6 D.T. R J FUNCTION button Use this button to access different functions, such as when entering user information, running the MultiPASS C50’s self-cleaning process, checking the nozzles, or printing faxes stored in the MultiPASS C50’s memory. Also, use this button to enable access to some of the special function buttons described below.
Sending Documents Memory Sending (4-10) Memory sending is a quick and easy way to send a fax. When you use memory sending, the MultiPASS C50 scans the document into its memory as it dials the fax number. If the line is free, the MultiPASS C50 begins sending the fax as it scans the rest of the document. 1. Prepare the document and load it, face down, into the Automatic Document Feeder (ADF). ABC 1 GHI 4 PQRS 3 8 2. Use the numeric buttons to dial the other party’s fax number.
Using One-Touch Speed Dialling (3-8) 1. Prepare the document and load it, face down, into the Automatic Document Feeder (ADF). ~6 1 R 2. Press the one-touch speed dialling button assigned to the number to which you wish to fax. 3. Press START/COPY. Using Coded Speed Dialling (3-15) 1. Prepare the document and load it, face down, into the Automatic Document Feeder (ADF). CODED DIAL ABC 1 GHI 4 PQRS 3 MNO 5 TUV 7 3.
Different Ways to Receive a Fax (5-2) The MultiPASS C50 provides you with four different modes for receiving faxes. To decide which mode will best suit your requirements, consider how you want to use the MultiPASS C50: J FAX ONLY MODE: Use this mode if the MultiPASS C50 will be connected to a separate telephone line used only for transmitting faxes. The MultiPASS C50 answers all calls, but accepts only those from fax machines and disconnects all others.
Making Copies (6-13) 1. Prepare the document and load, face down, into the Automatic Document Feeder (ADF). 2. Press START/COPY. J The display now shows COPY, the reduction size the copy will be printed at (the default is 100%), and the number of copies (the default is 1): RESOLUTION 1 2 3. To change the copying resolution, press RESOLUTION. 4. If you want to reduce the size of the copies, use the and buttons to select the reduction percentage you want (70%, 80%, 90%, or 100%). 5.
Storing Numbers for Coded Speed Dialling (3-10) You can store up to 50 telephone/fax numbers for coded speed dialling. As with one-touch speed dialling, you can register the numbers directly from the operation panel of the MultiPASS C50 or from the Desktop Manager. For more details on entering numbers from your PC, refer to the MultiPASS Desktop Manager User’s Guide. FUNCTION 1 2 1. Press FUNCTION. 2. Press or until TEL REGISTRATION is displayed. TEL REGISTRATION 3.
Storing Numbers for One-Touch Speed Dialling (3-3) Your MultiPASS C50 can store up to 6 of your most frequently dialled numbers under the one-touch speed dialling buttons. You can register the numbers directly from the MultiPASS C50 operation panel or from the Desktop Manager. See the MultiPASS Desktop Manager User’s Guide for instructions on entering numbers from your PC. FUNCTION 1 1. Press FUNCTION. 2. Press 2 or to select TEL REGISTRATION. 3. Press START/COPY twice. 1-TOUCH SPD DIAL 1 4.
Creating Groups for Group Dialling (3-17) The numbers you use in a group must already be stored under one-touch speed dialling buttons or coded speed dialling codes. Each group is stored under a onetouch speed dialling button or a coded speed dialling code. FUNCTION 1 1. Press FUNCTION. 2. Press 2 or until TEL REGISTRATION is displayed. TEL REGISTRATION 3. Press START/COPY, then use 1 or to select GROUP DIAL. GROUP DIAL 2 4. Press START/COPY.
8. Press START/COPY twice, then use the numeric buttons to enter a name for the group. 9. Press START/COPY. 10. To enter additional group, repeat steps 5 to 9. -orIf you have finished registering groups press STOP to return to standby mode.
Sending a Fax from Your Computer (PC Faxing) (5-2) You can send a PC fax from any Windows application that allows printing. To PC fax, you create and then print a document from the desired Windows application using the C50 fax driver. The following instructions summarise the procedures for sending a PC fax. To send a PC fax: 1. Within your Windows application, with the document open, click the print command. 2. In the print dialog box, in the Name box, set C50 Fax as your printer and then click OK. 3.
Receiving a Fax (5-11) An incoming fax is received by your C50 and can be uploaded to the Desktop Manager. The uploaded fax is stored in the In Box folder for your review. A flashing arrow next to the folder name signals that you have received a new incoming fax. Once you open the folder to review the newly received fax, the flashing arrow no longer appears until another fax is received.
Printing a Document (3-2) Once you have installed the software, you are ready to print a document – from a Windows application, such as Word for Windows – using the C50. Printer options are initially installed with default settings, enabling you to print immediately. The printer options consist of settings that determine the type of output for your document. For example, when you print a document, the document is printed to a particular paper size and orientation.
Scanning with the Desktop Manager (6-4) You can use the C50 and the Desktop Manager to scan a monochrome image of a document. The resulting document in the Desktop Manager is automatically provided a unique system-assigned name. You can rename the document later. Each image you scan is placed in the Scan folder as a TIFF document. A scan document remains in the Scan folder until you move or delete it. The scan document can be reviewed, annotated, printed, or sent as a fax.
Scanning from a Windows Application (6-5) You can use the C50 to scan documents directly into a Windows application that supports a TWAIN interface (such as Corel Print House Magic). Some applications allow multiple page scans, while others do not. If you are unsure whether your Windows application supports this feature, refer to your user documentation for the application. The following instructions summarise the procedures for scanning an image.
Setting Up Speed Dial Assignments (8-15) On the Speed Dial tab, you can set up fax numbers for speed dialling with the C50. You use the fax recipients set up in your Address Book, and assign the desired individual recipients to speed dial codes. If the recipient has not yet been set up in the Address Book, you can add the recipient while creating speed dial assignments. You can also set up a group speed dial, by assigning two or more individual speed dial assignments to a single speed dial assignment.
Using MultiPASS Diagnostics (8-26) If you have difficulties with your MultiPASS software or hardware, you can use the MultiPASS Diagnostics. You use the MultiPASS Diagnostics to verify your MultiPASS software and hardware installation, and identify hardware problems. The MultiPASS Diagnostics produces a report with information you can use to resolve your problem. You can save the report to an ASCII text file on your hard drive. To use MultiPASS Diagnostics: 1. Open the MultiPASS Diagnostics.
Jams in the Automatic Document Feeder (ADF) (8-6) 1. Press STOP. 2. Open the operation panel by gently pulling it toward you. 3. Remove the jammed page by pulling it in either direction. 4. Gently push the operation panel shut until it clicks. 5. Press STOP to clear the error message. Jams in the Sheet Feeder (8-8) 1. Gently pull any jammed paper out of the unit as shown. 2.
Error Codes, Messages, and Solutions (8-30) This table lists the error messages that appear in the MultiPASS C50’s LCD display and the corresponding error codes that appear in activity reports, and tells what to do for each. Message Error Code AUTO REDIAL BUSY/NO SIGNAL Cause Action – The receiving fax machine was busy and the MultiPASS C50 is waiting to redial. #005/018 The telephone number you dialled is busy. Try sending the document again later.
Message Error Code CHANGE CARTRIDGE CHECK DOCUMENT #052 #001 Cause Action The BJ cartridge is empty or its ink has dried out. Make a copy or print a document. If the printout is light or blank, replace the BJ cartridge. Documents received in memory will then be printed automatically. The MultiPASS C50’s image memory may be full because the BJ cartridge ran out of ink. Replace the BJ cartridge and have the other party send the fax again.
Message Error Code DOC TOO LONG #003 Cause Action It took more than 32 minutes to send or copy a document. Divide the document and send or copy each part separately. It took more than 32 minutes to receive a document. Contact the sender, and have them divide the document and send each part separately. The document is longer than 1 metre. Use a copy machine to copy each page of the document and send the copy.
Message Error Code MEMORY FULL #037 Cause Action The MultiPASS C50’s memory is full because it has received too many documents, or a very long or detailed document. Print out any documents that are stored in memory. Then start the operation again. See page 5-12. The memory is full because you sent too many pages at once, or a very long or detailed document. Divide the document and send each part separately. If the memory contains any faxes, you do not need to delete them.
Message Error Code Cause Action REC’D IN MEMORY – The paper or ink ran out, or a paper jam occurred, so the MultiPASS C50 received the document in memory. Add paper to the sheet feeder, change the BJ cartridge, or clear the paper jam, as needed. Print the document from memory by pressing the (STOP) button. RECEIVED IN FILE – The PC was off and a document was received in the MultiPASS C50 memory. Print the file from the PC. START AGAIN – An error occurred in the phone line or in the system.
Notes II-26 Canon MultiPASS C50 Getting Started ENGLISH
Notes II-27 Canon MultiPASS C50 Getting Started ENGLISH
Notes II-28 Canon MultiPASS C50 Getting Started ENGLISH
Notes II-29 Canon MultiPASS C50 Getting Started ENGLISH
Notes II-30 Canon MultiPASS C50 Getting Started ENGLISH
Notes II-31 Canon MultiPASS C50 Getting Started ENGLISH