
Operation Guide


46
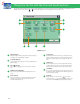
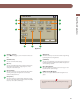
1
[Select Color]
You can select the Full Color or Black mode. You can also set
the machine to automatically select a color mode according
to the original.
2
[Resolution]
If the resolution is high, you can store ne text and images
clearly. If the resolution is low, the data size becomes smaller.
3
[Direct]/[Copy Ratio]
This mode enables you to change the copy ratio by enlarging/
reducing a copy to a preset paper size, or by entering a value
to specify a desired copy ratio.
4
[Scan Size]
You can select the original scanning size. If you press [Auto],
the machine automatically recognizes the size of the original
when scanning.
5
[File Format]
You can set a le format, such as a PDF format to the scanned
document so that it can be accessed from your computer.
6
[Favorite Settings]
You can register frequently used scan settings. You can recall
the registered frequently used settings for future use.
7
[Restore Default Set.]
This mode is useful if you want to clear all settings and reset
the settings. All settings are cleared.
8
[2-Sided Original]
Set to scan two-sided originals. You can select [Book Type] or
[Calendar Type].
9
[Density]
Change the exposure. You can press to make the
exposure darker or to make the exposure lighter. You
can set the machine to automatically adjust the exposure.
10
[File Name]
You can specify a le name for the data to be scanned.
11
[Original Type]
Image quality for scanning is adjusted according to the type
of original, such as [Text/Photo], [Map], [Printed Image],
[Photo Printout], or [Text].
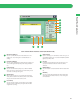
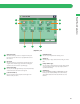
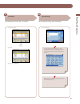
To scan the original and store it, press [Scan and Store] on the Main Menu screen. This section describes the functions you can use on the
Scan and Store Basic Features screen and the [Options] screen. If you press [Scan] after selecting the storage location, the screen below
appears.
Things You Can Do with the Scan and Store Functions
4
6
5
7
1
2
3
8
9
10
11
Scan Screen
The available functions may di er, depending on the storage
location.