
[Windows] UFR II/UFRII LT V4 Printer Driver Installation Guide (V6.3)

When adding a WSD port
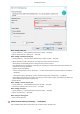
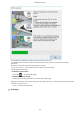
(1) Click [Add Port] → select [WSD Port] from [Port to Add] → click [OK].
(2) Enter the IP address or host name → click [OK].
When adding a standard TCP/IP port
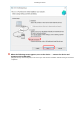
(1) Click [Add Port] → select [Standard TCP/IP Port] from [Port to Add] → click [OK].
(2) Enter the device name or IP address according to the instructions of the wizard.
[Port Name] is automatically entered. Change the port name if required.
If the [Additional port information required] screen is displayed, click the subsequent "Open details" and
perform the necessary operations.
Perform one of the following.
- Return to the previous screen in the wizard → re-enter the information for [Printer Name or IP Address] →
click [Next].
- Select [Device Type] > [Standard] > [Canon Network Printing Device with P9100] → click [Next].
Depending on the device you are using, the name you select in [Device Type] > [Standard] may differ from
[Canon Network Printing Device with P9100].
(3) Click [Finish].
When adding a network printer port
(1) Click [Add Port] → select [Network] from [Port to Add] → click [OK].
(2) Select the network printer you are using → click [OK].
When adding a local port
(1) Click [Add Port] → select [Local Port] from [Port to Add] → click [OK].
(2) Enter the port name → click [OK].
When using an existing port
Select a port from [Port].
8
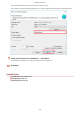
Select [Printer Name] if necessary → click [Next].
[Set as default]: Select this to set the device as the device that is normally used.
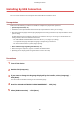
Installing the Driver
28