
[Windows] Generic Plus UFR II Printer Driver Installation Guide (V1.02)


Installing Using a USB Connection
You can connect the device and computer with a USB cable and install the driver.
During installation, the conguration prole corresponding to the printer model is automatically set. You can
change or import the conguration prole if necessary.
Prerequisites
Conrm that the following conditions are satised. Make sure all preparations have been completed.
● System Requirements(P. 15)
● Installation of the optional USB interface board (if required with the device you are using)
● Page description language selection (Plug & Play) function setting of the device (if required with the device
you are using)
Set [PDL Selection (Plug and Play)] at the device to match the driver you are using. For details about the
setting method, refer to the manual of the device.
● Notes and Warnings Regarding Installation(P. 17)
● When starting the computer, logon as a member of Administrators.
● Display the [Desktop] screen (when using Windows 8/8.1/Server 2012/Server 2012 R2).
Procedure
1
Turn off the device.
2
Start the installer.
If you are using an installer downloaded from the web site:
Double-click the downloaded le to decompress it. If the installer does not start automatically after it is
decompressed, double-click [Setup.exe].
If you are using the accompanying CD-ROM:
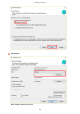
(1) Set the CD-ROM in the computer → click [Installation].
(2) In the [Installation] screen, conrm the driver → click [Installation].
If the CD-ROM menu is not displayed, click the subsequent "Open details".
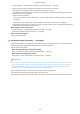
Start the installer by following the procedure below.
- If a message prompting you to insert a CD-ROM is displayed or if Windows Explorer is displayed: Execute
[MInst.exe].
- If nothing is displayed: Double-click the CD-ROM icon.
- If the above [MInst.exe] does not exist: Execute [Setup.exe] in the driver folder of the CD-ROM.
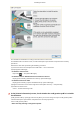
3
Select a language.
Installing the Driver
31