Getting Started 1 Preface P. 2 2 3 Installing the Machine P. 4 Connecting to a Computer and Installing the Drivers P. 12 4 Configuring and Connecting the Fax P. 24 Read this guide first. Please read this guide before operating this product. The remarks for important safety instructions are described in the Basic Operation Guide. After you finish reading this guide, store it in a safe place for future reference.
Checking the Supplied Accessories Confirm that all the supplied accessories are contained in the box. If an item is missing or damaged, please contact the Canon Authorized Service Facilities or the Canon Customer Care Center. Machine Unit Wireless LAN Setting Guide The toner cartridge is already installed.
Checking the Supplied Accessories Included Documents Printed Manuals Starter Guide This manual PRINTED IN KOREA Getting Started This manual describes the configuration and software installation. Wireless LAN Setting Guide This manual explains the wireless LAN setup procedures and troubleshooting during the setup. Basic Operation Guide This manual describes the basic use of the machine.
Removing the Packing Materials Remove all the packing materials, such as orange tape. Packing materials may change in form or placement, or may be added or removed without prior notice. 1 Do not remove the cap from the USB port. Cap 3 4 Check! Are all the packing materials removed? Tape Packing materials with tape Proper Handling Hold here. Hold here.
Removing the Packing Materials 2 Establishing an Installation Site = 4" (100 mm) When the optional Cassette Feeding Unit-V1 is not installed 52 1/4" (1,327 mm) 26 1/2" (674 mm) 33 1/2" (851 mm) ★ ★ ★ When the optional Cassette Feeding Unit-V1 is installed 52 1/4" (1,327 mm) 26 3/4" (679 mm) 37 1/2" (951 mm) ★ ★ ★ ★ ★ ★ ★ Do not place the machine near the following: • Alcohol, paint thinner, or other flammable substances ▶ If flammable substances come into contact with electrical p
Preparing the Toner Cartridge 1 2 5 Check! Are all the packing materials removed? Sealing Tape Supplied Toner Cartridges • The average yield is 1,200 sheets for the included K (Black) toner cartridge, and 1,400 sheets for the included Composite C (Cyan), M (Magenta), and Y (Yellow) toner cartridges.* The average yield of replacement toner cartridges differ from the supplied toner cartridges.
Preparing the Toner Cartridge 3 4 Serial Number of the Machine Write down the serial number and purchase date on the back cover of the Basic Operation Guide enclosed in the package. You need this information when contacting your local authorized Canon dealer or Canon Customer Care Center. CANON INC. 30-2, Shimomaruko 3-chome, Ohta-ku, Tokyo 146-8501, Japan CANON MARKETING JAPAN INC. 16-6, Konan 2-chome, Minato-ku, Tokyo 108-8011, Japan CANON U.S.A., INC. One Canon Park, Melville, NY 11747, U.S.A.
Loading Paper 1 5 Set the paper under the hooks. Make sure that the paper stack does not exceed the load limit mark. 2 Press the lock release lever and spread the side paper guides a little wider than the width of the paper. 6 Press the lock release lever, and slide the side paper guides inward until they are aligned securely against the edges of the paper. Loading Paper Other than Letter Size The procedure here is for loading Letter size paper.
Loading Paper 1 3 Press the lock release lever and spread the front-center paper guide a little wider than the length of the paper. 4 7 Press the lock release lever, and slide the front-center paper guide inward until it is aligned securely against the edges of the paper. 8 Preface 2 Installing the Machine 3 Load paper so that its edge is aligned with the rear side of the paper drawer.
Connecting the Power Cord 1 OFF 5 8 2 Make sure that the machine is turned OFF, and then connect the power cord. Do not connect the USB cable. Connect the cable when installing the software. Turn ON the machine. ON Press . Select whether or not to perform color correction. It is recommended to perform color correction to obtain optimum copy or printout results. Perform color correction. “Performing Color Correction” (P. 30) Proceed to the next step.
Connecting the Power Cord 3 Press [▲] or [▼] to highlight a language, and then press [OK]. 6 Press [▲] or [▼] to highlight your time zone*, and then press [OK]. 4 7 Press [▲] or [▼] to highlight a region, and then press [OK]. Enter the date and time, and then press . • Press [◀] or [▶] to move the cursor to the left and right. • Press [▲] or [▼] to change the numeric value, or AM/PM. The factory default settings for time display is set as 12-Hour.
Connecting to the Computer Check! Choosing the Method to Connect the Machine to the Computer First, you need to decide on the method you would like to connect your machine to the computer. Choose from the following three options. Connecting via a Wired LAN You can connect the machine to the computer through a wired router. Use the LAN cables to connect the machine to the wired router. • Make sure that there is an available port in the router to connect the machine and the computer.
Connecting to the Computer 1 Wired LAN Connection Check the following first. Windows 1 Are the computer and the router properly Internet connected using a LAN cable? Router For details, see the instruction manual provided with your network device, or contact the manufacturer. LAN Cable 2 Has the network settings on the computer been complete? If the computer is not properly configured, you may not use the wired LAN connection even after completing the following settings.
Connecting to the Computer 3 Wired LAN Connection Install the software. Windows Install the MF Drivers and the MF Toolbox. Make sure that the machine is turned ON, and log on to Windows as a user with administrative privileges. Shut down all applications that are running. See MF Driver Installation Guide for details about installation. NOTE • If you are operating in the IPv6 environment, you may not install the software following the procedures below.
Connecting to the Computer 1 Wired LAN Connection Check the following first. Macintosh 1 Are the computer and the router properly Internet connected using a LAN cable? Router For details, see the instruction manual provided with your network device, or contact the manufacturer. LAN Cable 2 Has the network settings on the computer been complete? If the computer is not properly configured, you may not use the wired LAN connection even after completing the following settings.
Connecting to the Computer 3 Wired LAN Connection Install the software. Macintosh Install the MF Drivers for Macintosh. It requires Mac OS X 10.5.8 version or later. The installation screen varies depending on the version of Mac OS X. This operation is for Macintosh. If using Windows, see P. 14. 1 4 ▲ Insert the User Software CD-ROM and double-click the CD-ROM icon. ▼ 2 ◀ Click! • Installing the drivers is now complete. Continued with registratiion operations on the desktop.
Connecting to the Computer 6 Connecting with the manual setting ◀ Click! ◀ Select ◀ Click! ▼ • If you are using Mac OS X 10.5.8, click [+], select [Canon MF8500] from the dialog box displayed, and then proceed to next step. ◀ Enter ▼ 7 ◀1 Click! ◀ Select ◀ Select ▼ ◀ ◀ Select Click! ◀ Select 2 Select a printer name for which [Bonjour] is displayed in the [Kind] or [Connection] column. 3 If you are using Mac OS X 10.5.x, select the corresponding driver from [Print Using].
Connecting to the Computer Macintosh ◀ Click! • If you are using Mac OS X 10.5.x, select [Select a driver to use] and the corresponding driver from [Print Using], and then click [Add]. ▼ 8 ◀2 Click! Check that this machine is added. ◀ Computer connection via the wired LAN is now complete. Proceed to P. 24 to configure the fax.
Connecting to the Computer 1 USB Connection Install the Software. Windows Install the MF Drivers and the MF Toolbox. Make sure that the machine is turned ON, and log on to Windows as a user with administrative privileges. Shut down all applications that are running. See MF Driver Installation Guide for details about installation. Do not connect the USB cable yet. Connect the USB cable after installing the MF Drivers and the MF Toolbox.
Connecting to the Computer 2 USB Connection Connect the USB cable. Windows After installing the software, such as MF Driver, connect the USB cable. Make sure the software is installed first. Remove this. Flat Connector Connect to the computer. Computer connection via the USB is now complete. Proceed to P. 24 to configure the fax. 20 Square Connector Connect to the machine.
Connecting to the Computer 1 USB Connection Install the software. Macintosh Install the MF Drivers for Macintosh. It requires Mac OS X 10.5.8 version or later. The installation screen varies depending on the version of Mac OS X. This operation is for Macintosh. If using Windows, see P. 19 Do not connect the USB cable yet. Connect the USB cable after installing the MF Drivers and the MF Toolbox.
Connecting to the Computer 2 USB Connection Connect the USB cable. Macintosh After installing the software, such as MF Driver, connect the USB cable. Make sure the software is installed first. Remove this. Flat Connector Connect to the computer. Square Connector Connect to the machine. Computer connection via the USB is now complete. Proceed to P. 24 to configure the fax.
1 Preface 2 Installing the Machine 3 Connecting to a Computer and Installing the Drivers 4 Configuring and Connecting the Fax 23
Configuring the Fax Check! Selecting a Receive Mode That Fits Your Purpose Choose your purpose to know the receive mode* to use. Remember the receive mode to configure the setting in “Selecting the Fax Receive Mode” (P. 26). * If you have subscribed to a Distinctive Ring Pattern Detection (DRPD) service provided by your telephone company, is also available for the receiving mode. See the e-Manual for details about other receive mode.
Configuring the Fax Set Up 1 Registering the Fax Number and Unit Name • If you select , the receive mode will be set to . • To reconfigure the settings, press → → . • Enter the unit name, and then press . “Entering Text” (P. 35) Proceed to the next page Registered information will be printed on the recipient's paper. The fax number and unit name registered here will be printed on the recipient's paper as the sender information.
Configuring the Fax Set Up 2 Selecting the Fax Receive Mode Set the receive mode that you confirmed in “Selecting a Receive Mode That Fits Your Purpose” (P. 24). ◀ Check! Yes • To set to Auto mode → → [OK] • To set to other receive modes → → [OK] The screen that appears varies depending on the receive mode selected.
Configuring the Fax Set Up 3 Connecting the Telephone Line You cannot use the fax function if it is not properly connected. Press [▲] to select . To an analog telephone line Turn OFF the machine. Connect if necessary Telephone (answering machine) Wait for at least 10 seconds. Turn ON the machine. The machine will restart, and the telephone line type will be automatically set*. * If the telephone line type is not automatically set: See the Basic Operation Guide to set manually.
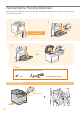
Appendix Loading Paper Other than Letter Size To load paper other than Letter size, such as Legal or Statement, see “Loading Paper” (P. 8) and the following procedure to load paper and specify the paper size and type. 1 When loading Legal size paper • Pull out the paper drawer. • Slide the paper guides, and spread them a little wider than the actual paper width. Press the lock release lever and adjust the length of the paper drawer.
Appendix • Press [▲] or [▼] to highlight a paper size, and then press [OK]. • Press [▲] or [▼] to highlight , and then press [OK]. • Press [▲] or [▼] to highlight a paper type, and then press [OK]. • Press [▲] or [▼] to highlight the paper drawer for which you want to set the paper size and type, and then press [OK].
Appendix Performing Color Correction It is recommended to perform color correction to obtain optimum copy or printout results. 1 • When the above screen is displayed during initial settings, select to perform color correction. • Make sure that paper is loaded, and then press [OK]. • Confirm the procedure for color correction, and then press [OK]. • An adjustment image is printed.
Appendix If appears: • Is the paper loaded correctly? → Load plain or recycled paper of A4/Letter size in the paper drawer. • Is the adjustment image placed on the platen glass correctly? → Place the adjustment image with the print side face down and the black stripe toward the back of the machine. • Has a paper jam occurred? → Remove the jammed paper. If you want to perform color correction again, press , and then select the following settings in the following order.
Appendix Checking the IP Address You can check the IP address of the machine. Use it when you need to enter the IP address during the configuration or registration. 1 • Press [▲] or [▼] to highlight , and then press [OK]. 2 5 • The IP address is displayed. Press [Status Monitor] to close the screen. • Press [▲] or [▼] to highlight , and then press [OK].
Appendix Using the e-Manual The e-Manual is an electronic manual document that is displayed on the computer. All features of the machine are categorized by subject, and you can quickly view the information you need by using its search function. Use the e-Manual as a reference. Click to refer to the contents and instructions for using the e-Manual. Click to display practical uses of the machine. Click a topic to access information. Click when performing troubleshooting or maintenance of the machine.
Disclaimers The information in this document is subject to change without notice. CANON INC. MAKES NO WARRANTY OF ANY KIND WITH REGARD TO THIS MATERIAL, EITHER EXPRESS OR IMPLIED, EXCEPT AS PROVIDED HEREIN, INCLUDING WITHOUT LIMITATION, THEREOF, WARRANTIES AS TO MARKETABILITY, MERCHANTABILITY, FITNESS FOR A PARTICULAR PURPOSE OF USE OR NON-INFRINGEMENT. CANON INC.
Entering Text During the setup or initial configuration, you may need to enter letters and numbers. Use [▲], [▼], [◀], [▶], numeric keys, , , and [OK] to enter text. OK ▼▲◀▶ Numeric Key Entry Mode (See below on how to change the Entry mode) @.-_/ <12> 1 ABC abc 2 DEF def 3 GHI ghi 4 JKL jkl 5 MNO mno 6 PQRS pqrs 7 TUV tuv 8 WXYZ wxyz 9 (Not available) 0 (space) @ .
Contacting the Service Center When you have a problem with your machine, refer to “Troubleshooting” in the Basic Operation Guide or the e-Manual first. If you cannot solve the problem after referring the manuals, contact the Canon Authorized Service Facilities or the Canon Customer Care Center. Canon Customer Care Center 1-800-OK-CANON (U.S.A./Canada) U.S.A. Monday through Friday From 8:00 A.M. to 8:00 P.M. EST Canada Monday through Friday From 9:00 A.M. to 8:00 P.M. EST http://www.canon.