User Guide ENGLISH Guía del usuario ESPAÑOL Guide d'utilisation FRANÇAIS Connecting the Printer to a Camera and Printing Conexión de la impresora a la cámara e impresión Connexion de l'imprimante à l'appareil photo Connecting the Printer to a Computer and Printing Conexión de la impresora a un ordenador e impresión Connexion de l'imprimante à un ordinateur et impression CDI-M168-010 xx04Nixx © 2004 CANON INC.
English Contents Enjoy Various Kinds of Printing...................................................................2 Printing Procedure and Reference Guides .................................................4 Package Contents..........................................................................................6 Quick Start......................................................................................................7 Before You Begin.................................................................
Enjoy Various Kinds of Printing Enjoy Printing Images from Your Digital Camera or Digital Camcorder Enjoy Printing Images from Your Computer Be sure to install the software and the printer driver before connecting the printer to the computer.
L size paper cassette (sold separately) Print easily at home. Credit card size paper cassette (sold separately) Make label stickers. (8 per sheet) Postcard size paper cassette Make original large size postcards. Wide size paper cassette (sold separately) Make original greeting cards. Various types of paper cassettes Season's Greetings You can design layouts as you like. Titles, captions, etc., can be added.
Printing Procedure and Reference Guides Connecting a digital camera or digital video camera to the printer Connecting Preparing Basic operations Detailed instructions Reference Guides User Guide (This Guide) p. 25 User Guide (This Guide) p. 29 Direct Print User Guide Connecting the printer to a computer and printing Preparing Installing the Software Reference Guides User Guide (This Guide) p.
and printing Printing Print settings are made using the camera. or Camera User Guide Printing Error Messages Troubleshooting ? Using the Non-Canon Digital cameras, refer to the user guide that came with your camera.
Package Contents Compact Photo Printer SELPHY Paper Cassette (Postcard size) CP Printer Solution Disk Standard Paper (Postcard size, 5 sheets) Ink Cassette (Postcard size, for 5 sheets) Cleaner Stick Compact Power Adapter CA-CP200 Power Cord • User Guide (This Guide) • Warranty Card*1 • Canon Customer Support Leaflet*1 *1 Not included in some regions. The following products are sold separately.
Quick Start Let’s start by printing on postcard size paper. This section explains the procedures required to print with the paper and the ink cassette (trial kit) included with your printer. General camera descriptions in this guide refer to digital cameras or digital camcorders compatible with the compact photo printer (CP400). However, in detailed instructions, “camera” refers to “digital cameras”, and “compact power adapter” refers to “power source” throughout this guide.
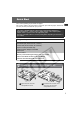
Quick Start (Continued) 2 Placing the Paper into the Paper Cassette (p. 26) Paper (Glossy side up) Top cover Middle cover Middle cover (Address/stamp side next to the middle cover) 1 Open the paper cassette’s top and middle covers. 3 3 Place the paper (postcard size, 5 sheets), glossy side up and the address/stamp side next to the middle cover, in the paper cassette. Place the middle cover back to its original position, and leave the top cover open.
4 Connecting the Printer to a Power Source (p. 29) DC IN terminal 1 Insert the power cord into the compact power adapter and plug the other end into a power outlet. To power source 2 Connect the compact power adapter to the printer’s DC IN terminal. • At this point, the power will turn on and the printer’s display window will light blue. 5 1 Connecting the Camera to the Printer (p. 29) Connect the interface cable (included with the camera) to the camera’s DIGITAL terminal.
Quick Start (Continued) 6 Printing (p. 31) 1 Turn the camera’s power on and display the images. 2 Press the camera’s • The (Canon Direct Print) mark or the upper left corner of the LCD monitor. (PictBridge) mark appears on the , SET or SELECT button. • The button to be pressed differs depending on the camera. • If the button is pressed, printing starts immediately. Screen shot of the camera’s LCD monitor The screen shot differs depending on the model of your camera.
Before You Begin Thank you for your purchase of the Canon Compact Photo Printer SELPHY CP400. This guide explains the printer’s general flow of operations, from camera print settings to printing and computer connection operations to printing. For information about how to make prints, refer to the Camera User Guide or Direct Print User Guide that came with your camera and to the Printer Software Guide (bundled on the CP Printer Solution Disk).
What Can Be Accomplished with this Printer Connects directly to supporting Canon cameras Allows easy printing from any Canon camera that supports direct printing with the compact photo printer (CP400). Just connect the interface cable and you’re ready to go. Connects directly to computers Simply connect the printer to a computer with a commercially available USB cable to perform the following operations; • • • • Print the shots taken with your camera in a variety of layouts.
Read This First Safety Precautions • Before using the devices, please ensure that you have read and understood the safety precautions described below. Always ensure that the devices are operated correctly. • The safety precautions noted on the following pages are intended to instruct you in the safe and correct operation of the devices to prevent injuries or damage to yourself and other persons. • “Devices” refers to the “printer” or “compact power adapter” throughout this guide.
Power Do not exceed the cable and power outlet ratings when operating this product. Do not operate this product outside of the specified voltage rating. Connecting too many devices to the same outlet may result in fire. Check that the voltage of the outlet is compatible with the devices before plugging them in. If the power cord becomes damaged (if internal wiring is exposed, etc.), immediately unplug it from the power outlet. Continued use poses risk of fire or electric shock.
CAUTIONS Devices Do not block the air vents on the printer. Blocking the vents may cause the inside of the printer to overheat, resulting in damage to internal components and risk of equipment failure or fire. Use the devices in a well-ventilated area. Do not rest heavy objects on the devices. Objects may fall off the devices and cause injury. Weight placed on the devices may deform the casing, resulting in damage to internal parts and posing risk of fire. Unplug the devices when you are not using them.
Usage Location Do not use the devices in locations that are smoky, humid, dusty, or subject to strong vibration. Entry of water or dust into the devices, or internal damage caused by strong vibration, may pose risk of fire or electric shock. Have the devices checked approximately once a year (contact your dealer), preferably before the onset of your area’s humid season. Do not leave the devices exposed to high temperatures.
Proper Usage and Handling Usage Location Do not use near strong magnets or near devices that produce strong electromagnetic fields. Electromagnetic radiation from devices such as TVs and game machines, and strong magnetic fields from devices such as speakers and large motors, may cause distortion in printed images. Use in a well-ventilated, level area. Leave about 15 cm (6 in.) of clearance at the front and back of the devices and 10 cm (4 in.) of clearance on both sides.
To Prevent Damage from Condensation Condensation may form in the printer if you suddenly move it from a cold location to a warm location. To prevent damage that might be caused by condensation, place the printer in a sealed plastic bag prior to moving it, and allow it to reach room temperature before using it. Stop using the printer immediately if you detect condensation. Continued use may damage the equipment. Wait until the moisture evaporates completely before resuming use.
Proper Handling of Paper Cassettes Do not apply excessive force to the paper cassette. Force or impact on the cassette may result in paper jams or equipment damage. Do not bend or deform the spring located at the rear of the middle cover of the paper cassette. Spring Do not place any foreign objects in the print output receptacle (on the top of the paper cassette). This area is for paper only.
Do not touch paper while it is being printed. During printing, the sheet repeatedly moves back and forth along the top of the paper cassette and in and out through the paper-handling slot. Please do not touch the sheet during this process. Do not allow too many prints to accumulate in the print output receptacle. Do not allow more than 9 sheets to accumulate in the print output receptacle.
Components Guide Compact Photo Printer SELPHY CP400 Front View Display Window* Indicates the printer’s status. Blue: (Ready to print) Standby mode Blinking blue: Printing in progress Red/Blinking red: Error Ink Cassette Slot The ink cassette is inserted into this compartment. Paper Cassette Slot Ink Cassette Compartment Cover The paper cassette loads into this compartment.
Back View DC IN Terminal Connects to the Compact Power Adapter. Air Vents USB Port Connects commercially available USB cables to a computer. Direct Print Port Paper-handling Slot Paper extends out from this slot while printing is in progress. 22 Connects the interface cable (included with the camera) to the camera.
Let’s Print Preparing Your Ink Cassette/Paper Sets and Paper Cassette Since there are several kinds of ink/paper set (including the separately sold sets), please make sure you are using the right ink cassette and paper cassette for the chosen paper. If the set is not correct, you will not be able to print. Please check the sets and the names of their components in the table below.
Printing on Credit Card Size Paper (54 × 86 mm (2.1 × 3.4 in.)) Paper Number of Sheets Paper Cassette Name Ink Cassette Name The design of the seal on your ink cassette may slightly differ from the examples below. 36 Standard Paper 18 Full-sized Label 18 8-sticker Label • The paper cassette PCC-CP100 (sold separately) is required when printing on credit card size paper. Printing on Wide Size Paper (100 × 200 mm (4 × 8 in.
Loading the Ink Cassette 1 Open the ink cassette compartment cover. 2 Remove any slack from the ink sheet. Ink sheet 3 Sprocket Clip • Push in on the sprocket, and turn it gently in the indicated direction to take up the slack until the ink sheet straightens out (It will not be possible to print to all of the paper if you overwind the ink sheet). Hold the cassette so that the embossed arrow is at the top, and insert it all the way into the compartment (in the direction of the arrow).
Placing the Paper into the Paper Cassette 1 Open the paper cassette’s top cover and middle cover. Top cover • Open the top cover, then push the middle cover in the direction of the arrow and lift it up. Middle cover 2 Paper (Glossy side up) Fan the paper stack properly and place the paper into the paper cassette, with the printable side (glossy side) facing up. • Insert the postcard size paper with the glossy side up and the address/stamp side next to the middle cover as shown in the figure.
• Insert the L size paper (sold separately) as shown in the figure below Paper (Glossy side up) 3 Place the middle cover back to its original position. • After pulling the middle cover down, slide it in the direction of the arrows until it clicks back into place. • Do not close the top cover. • Please use specified paper types only. • Do not insert more than 18 sheets in the paper cassette. • Do not insert more than 12 sheets wide size paper (100 × 200 mm (4 × 8 in.
Loading the Paper Cassette 1 Open the paper cassette compartment cover. 2 Push the paper cassette all the way into the paper cassette slot. • Be sure the paper is set correctly before pushing the cassette in. • Insert the paper cassette evenly so that it slides over the bottom of the slot entrance. Middle cover closed Top cover open • Do not remove the paper cassette while feeding, printing, or ejection is in progress.
Connecting a Power Source and the Camera to the Printer Connect the camera to the printer using the cable (included with the camera) and turn the printer’s power on. For more detailed camera connection instructions, refer to your Camera User Guide or Direct Print User Guide. Camera* To DIGITAL terminal 5 To DC IN terminal 1 Interface cable included with the camera 4 15 cm (6 in.) at the front and back of the devices and 10 cm (4 in.
4 5 6 Connect the Compact Power Adapter cable to the printer. • The power turns on and the printer’s display window lights blue. Connect the interface cable to the camera. • Use the interface cable that came with your camera. Connect the interface cable to the printer. • Insert the cable in the left port, with the mark on the cable facing down. Turning the Printer’s Power Off Unplug the cable of the compact power adapter from the printer.
Printing This section explains the flow of printing operations with Canon cameras*. For more details, refer to your Camera User Guide or Direct Print User Guide. * In other cases, please refer to the Printing with Non-Canon Digital Cameras (p. 57). 1 2 Turn the camera’s power on and display the images. • Check that the (Canon Direct Print)/ (PictBridge) mark is displayed in the upper left corner of the LCD monitor. • Some camera models automatically power up when the cable is connected to the printer.
Printing on the Separately Sold Wide Size (100 × 200 mm (4 × 8 in.)) Paper You can make your own message cards and greeting cards. The cards are printed as explained below. When the Camera is Connected to the Printer Printed on the 100 × 150 mm (4 × 6 in.) portion of the card. When a Computer is Connected to the Printer Printed on the whole card. Nothing is printed on this portion so you can write your message with an oil-based pen.
Troubleshooting If the printer does not seem to be working properly, run through the checks below to see if you can identify and correct the problem. If you are not able to solve the problem, please call your dealer or contact a Canon Customer Support help desk for assistance. Problem Cause Solution The printer has no power. The compact power adapter or power cord is not correctly connected. Be sure that the compact power adapter and power cord are connected correctly.
Problem Cause Solution The printer’s display window There is a malfunction in the lights red without the camera’s printer. LCD monitor displaying any error message. Remove the paper from the paper-handling slot and take up any slack in the ink sheet. Turn the printer’s power off and turn it on again. Print quality is not good. You are not using the correct paper type. Use the designated paper type. Paper is loaded with the wrong side up. Load the paper correctly. (p.
Error Messages If a problem occurs while the printer is connected to the camera, the printer’s display window will light or blink red and the camera’s LCD monitor may display one of the messages indicated below. (If the camera is connected to a TV, the message will appear on the TV screen.) Error Message No paper No Ink Cause Solution Paper cassette is incorrectly installed. Load the paper cassette correctly. Paper is not loaded correctly in the paper cassette. Load paper into the cassette correctly.
Error Message 36 Cause Solution Cannot Print! The image was taken with a different camera, recorded in a different format, or has been altered by a computer. Check whether the image’s size matches the camera’s pixel capacity. If the size is not appropriate, resize the image and convert as necessary so that the image is in a JPEG format that the camera can display.
Specifications Compact Photo Printer SELPHY CP400 General Specifications Printer Type Full-color direct digital printer Print Method Dye-sublimation thermal transfer (with overcoating) Resolution Reproduction 300 × 300 dpi Gradation 256 gradations/color Ink Dedicated ink cassette for each paper size (Y/M/C/overcoating) Paper Postcard size (standard sheets) L size (standard sheets) Credit card size (standard sheets, full-sized label and 8-label sticker) Wide size (100 × 200 mm (4 × 8 in.
Interface Signal Transfer Proprietary protocol for Canon cameras, PictBridge Connection Method Camera/Printer connection Interface cable included with the camera Computer/Printer connection Commercially available USB cable Recommended printer cable Material: AWG 28 or upper-grade Type: Twisted-pair, sealed cable (compatible with high-speed mode) Length: max. 5.0 m (16.4 ft.
Connecting the Printer to a Computer and Printing Read Carefully Before Using! CANON SOFTWARE LICENSE AGREEMENT IMPORTANT – READ THIS AGREEMENT BEFORE USING THE SOFTWARE ON THE CD-ROM IN THIS BOX. BY USING THE SOFTWARE, YOU AGREE TO BE BOUND BY THE TERMS OF THIS AGREEMENT. This is a license agreement (the “Agreement”) between you and Canon Inc. (“Canon”).
SOME STATES, PROVINCES OR LEGAL JURISDICTIONS DO NOT ALLOW THE EXCLUSION OF IMPLIED WARRANTIES, OR THE LIMITATION OR EXCLUSION OF LIABILITY FOR INCIDENTAL OR CONSEQUENTIAL DAMAGES, OR PERSONAL INJURY OR DEATH RESULTING FROM NEGLIGENCE ON THE PART OF THE SELLER, SO THE ABOVE DISCLAIMERS AND EXCLUSIONS MAY NOT APPLY TO YOU. 5. TERM: This Agreement is effective upon your using the SOFTWARE and remains in effect until expiration of all copyright interests in the SOFTWARE unless earlier terminated.
System Requirements Please install the software on a computer meeting the following minimum requirements. Windows OS Windows 98 Second Edition (SE) Windows Me Windows 2000 Service Pack 4 Windows XP (including the Service Pack 1) Computer Model The above OS should be pre-installed on computers with built-in USB ports.
Printing Operations Overview Follow the steps outlined below to prepare the printer and install the necessary software to enable printing. Prepare the printer. Load the paper and ink cassette into the printer and turn the printer power on. See this guide. (p. 25 – p. 30) Install the software and the printer driver onto the computer. See this guide. Place the supplied CP Printer Windows p. 43 Solution Disk in the computer’s Macintosh p.
Installing the Software and the Printer Driver The CP Printer Solution Disk contains software that your computer will require for printing. Install the software and the printer driver according to the following steps. Windows • Be sure to install the software and the printer driver before connecting the printer to the computer. • With Windows XP or Windows 2000, be sure to log on with Administrator privileges (computer system administrator) when installing the software.
4 5 6 Select [Easy Installation] as the setup type and click [Next]. • Select [Custom Installation] to select programs for individual installation. Click [Yes] if you consent to all the conditions of the software license agreement. Review the installation settings and click [Next]. • Follow the screen messages to proceed. • Restart your computer when a dialog box appears instructing you to do so. • When the installation is complete, the installer panel will appear.
10 When the screen below appears, connect the printer to the computer with a USB cable. • Refer to Connecting the Printer to Your Computer (p. 49) on how to connect. • Follow the screen messages to proceed. 11 When the installation is complete, click [Exit], and then remove the CP Printer Solution Disk from the CD-ROM drive. • Restart your computer when a dialog box appears instructing you to do so.
Macintosh • Be sure to install the software and the printer driver before connecting the printer to the computer. • The instructions in this section are intended for Mac OS X (v10.1). If you are using another version of Mac OS, actual screen contents and procedures may differ slightly from those indicated here. 1 2 Quit any programs that are running. Place the CP Printer Solution Disk in the CD-ROM drive, and double-click the [Canon CP Printer Installer] icon in the CDROM.
Next, install the printer driver to your computer. 7 Click the CP Printer Driver [Install] button. 8 9 10 Click the printer you are using. Click [Agree] if you consent to all the conditions of the software license agreement. • The installer starts. Select [Easy Install], and then click the [Install] button. • Follow the screen messages to proceed. • Restart your computer when a dialog box appears instructing you to do so. 11 Remove the CP Printer Solution Disk from the CD-ROM drive.
Next, register your printer on the Printer List 48 12 Turn the printer power on, then connect the printer to the computer with the USB cable. 13 14 15 Double-click the hard disk icon where Mac OS X is installed. 16 Select [USB], select the printer name, and then click the [Add] button. 17 Close the window by clicking corner. • For directions on connecting the printer, see Connecting the Printer to Your Computer (p. 49).
Connecting the Printer to Your Computer Notes about connection In using the USB cable, be sure to connect the printer directly to your computer. If you connect the USB cable via a USB hub, the printer may not function properly. Do not use other USB devices (with the exception of a USB mouse or keyboard) with the printer. The printer may not function properly. Disconnect the other USB devices from your computer and then reconnect the printer.
1 Connect one end of a commercially available USB cable (sold separately) to the USB port on the printer, and the other end to a USB port on your computer. • There is no need to turn off the printer or your computer. • When connecting the printer to your computer, make sure the connectors on the ends of the USB cable match the ports on the printer and your computer. • For the location and direction of your computer’s USB port, refer to the documentation provided with your computer.
Viewing the PDF Manuals • Adobe Reader or Adobe Acrobat Reader must be installed to view the PDF Manuals. If this software is not installed in your computer, access the following web site and download the software. http://www.adobe.com/products/acrobat/readstep2.html Printer Software Guide 1 Install the software from the CP Printer Solution Disk. (Windows p. 43, Macintosh p.
Uninstalling the Software This section describes how to uninstall the software. • Uninstall the software when it is no longer needed, or if a problem occurs and uninstalling becomes necessary. Note that if you uninstall the software, you will not be able to use it anymore. Windows The instructions in this section are intended for uninstallation of ZoomBrowser EX. 1 Click the [Start] button and select [Programs] or [All Programs], [Canon Utilities], [ZoomBrowser EX], and [ZoomBrowser EX Uninstall].
Macintosh Uninstall the programs by dragging the application’s folder (the folder in which it was installed) into the Trash, and then empty the Trash. • Please be careful not to accidentally delete any folders with downloaded images that may be contained within the application folder.
Uninstalling the Printer Driver This section describes how to uninstall the printer driver. • Uninstall the printer driver if it is no longer needed, or if a problem occurs and uninstalling becomes necessary. Note that if you uninstall the printer driver, you will no longer be able to use the printer to print. Be sure to follow the procedures described in this section to uninstall the printer. Windows 54 1 Click the [Start] and select [Programs] or [All Programs], [Canon SELPHY CPXXX], [Uninstall].
Macintosh 1 Place the CP Printer Solution Disk in the CD-ROM drive, and double-click the [Canon CP Printer Installer] icon. 2 3 4 5 Click the CP Printer Driver [Install] button. • The installer panel appears. Click the printer you wish to uninstall. Click [Agree] if you consent to all the conditions of the software license agreement. Select [Uninstall], and then click the [Uninstall] button. • Follow the screen messages to proceed.
6 7 Click the [Continue] button to automatically close any applications other than the uninstaller. When the uninstallation is complete, click [Quit], and then remove the CP Printer Solution Disk from the CD-ROM drive. Next, delete the printer from the Printer List. 56 8 9 10 Double-click the hard disk icon where Mac OS X is installed. 11 Close the window by clicking corner. Double-click the [Print Center] or [Printer Setup Utility] icon in [Applications] [Utilities] folder.
Printing with Non-Canon Digital Cameras Since the CP400 printers support the direct print PictBridge* standard, you can connect PictBridge compliant non-Canon digital cameras to easily print high image quality photos. * PictBridge: PictBridge is an industry standard for direct printing that allows you to print images without using a computer by directly connecting a digital camera or digital camcorder (hereafter “camera”) to a printer, regardless of their brands and models.
Functions Not Available with Non-Canon Cameras • Printing indexes with the file name. • Printing speed may differ according to your camera model and the image’s number of recorded pixels. (The value written on page 37 is a printing speed obtained when printing with a Canon camera.
Disclaimer • While every effort has been made to ensure that the information contained in this guide is accurate and complete, no liability can be accepted for any errors or omissions. Canon reserves the right to change the specifications of the hardware and software described herein at any time without prior notice.
FCC Notice (Printer, Model CD1012/CD1013) This device complies with Part 15 of the FCC Rules. Operation is subject to the following two conditions; (1) this device may not cause harmful interference, and (2) this device must accept any interference received, including interference that may cause undesired operation. Note: This equipment has been tested and found to comply with the limits for Class B digital devices, pursuant to Part 15 of the FCC rules.