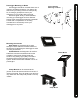
CAUTION: READ THIS MANUAL CAREFULLY BEFORE OPERATING YOUR NEW CANNON® DOWNRIGGER. ® RETAIN FOR FUTURE REFERENCE. EASI-TROLL hS EASI-TROLL /E LAKE-TROLL NOTE: Do not return your CANNON® Downrigger to your retailer. Your retailer is not authorized to repair or replace this unit. You may obtain service by: • calling CANNON® at 1-800-227-6433; • returning your downrigger to the Factory Service Center; • sending or taking your downrigger to any CANNON® Authorized Service Center on enclosed list.
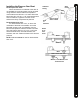
Introduction to downriggers Introduction to Controlled Depth Fishing Undoubtedly there are many fishermen familiar with the methods and use of controlled depth fishing. During the mid 1960's the state of Michigan introduced Pacific salmon into the Great lakes in an attempt to revitalize its sport fishing industry. From this successful transplant, new fishing techniques and equipment were developed.
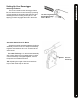
Arrows Indicate Mounting Locations MOUNTING & SETUP Downrigger Mounting on Boats A downrigger should be mounted where ever it is easy to operate and observe. You want to be able to see your fishing rod and to react quickly. So, choosing a good spot to mount your downrigger on your boat is 99% of the job. Due to the great variety of boats available, mounting your downrigger can be a dilemma. Having proper mounting accessories is essential.
MOUNTING & SETUP Side Rail Mounting Side/Rail mounts can be mounted to a welded T-section. It can also be used at the two rail section butt joint. In both installations it is recommended to use a non-slip material, such as rubber or a thin wood sheet, between metal surfaces. You can also use these for mounting to a very narrow side gunwale. There is a plate provided for back-up with bolts and washers. If the gunwale compartment is foamed in, then wellnuts should be used.
Decks up to 7/16" thick Where access to the underside of the deck is not available, the mounting base can be mounted using wellnuts. Use the base as a template to mark locations and drill four 1/2" holes. Mount the base using four 1/4"-20 x 1 1/2" truss head screws and four wellnuts. Tighten the screws so the wellnuts are firmly compressed as pictured. Decks thicker than 7/16" For decks thicker than 7/16", or where the underside of the deck is accessible, mount the base with screws, nuts, and washers.
MOUNTING & SETUP Decks thinner than 1/4" Use a Cannon Deck Plate to prevent deflection and add stability to decks thinner than 1/4". Use the deck plate as a template to mark the hole locations. If access to the underside of the deck is not available, the deck plate can be mounted using screws and wellnuts. Drill 1/2" holes. Use four 1/4”-20 x 2" flat head screws and four wellnuts to mount deck plate as pictured. Tighten the screws so the wellnuts are firmly compressed.
MOUNTING & SETUP Setting Up Your Downrigger Attaching the Boom The boom inserts into the downrigger frame. Be sure that the boom is held securely by seating it firmly against the shoulder inside the fame and fastening the boom locking screw (#8 X 1” self tapping) so that it engages the hole in the boom. The 3/4"-Long Phillips Screw Must Engage Hole in Boom Assemble Swivel Head To Boom Spread the swivel head side plates and slip the assembly over the boom end.
Attaching the crank handle Attaching the Crank Handle Assembly Make sure the thrust bearing is sandwiched between its two races. The thrust bearing spring should be oriented where the narrow end is toward the bearing. Slide the bearing with races and spring over the ratchet shaft. Then, carefully thread the crank handle onto the shaft and continue turning the handle clockwise until the clutch is fully tightened NOTE: Place your fingertip on the edge of the bearing and races.
Rubber Cushion Cable Examine the top of the terminator and note the order shown in the detail to run cable. Unwind about 2 feet of cable and thread the cable through the rubber cushion. CABLE IN CABLE IN Attach to terminator. CABLE OUT Snap & Swivel TERMINATOR & LINE RELEASE Terminating the Downrigger Cable Tip: A set of pliers with wire cutters is recommended for this part of setup. TIP: Use only straight cable, not kinked. Lead cable into HOLE A. Pull six inches of cable through.
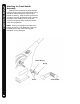
ATTACHING THE ROD HOLDER Attaching the Rod Holder The positive lock rod holder incorporates a locking disk that allows the rod holder to be aligned in 15 degree increments. Slide the rod holder tube into the clamp to the desired position within the recommended area (see below). Be sure the angled shoulders are facing up. Place the locking disk into the mating recess of the frame. Slip the clamp arms in place where the obround tab on the disk fits into the slot on the clamp.
After mounting the Cannon downrigger to your boat, release some line from your rod and reel so that the lure is anywhere from 5 to 100 feet behind the boat, this is called drop back. Attach the fishing line firmly into the line release. Lower the weight to the desired depth as indicated on the depth meter. Place the fishing rod in the rod holder and reel up the slack so that your rod has a slight bend in it. When a fish strikes the lure, the line will separate from the release.
Simply stated, blowback is what happens to the downrigger weight when you pull it through the water behind your boat. As your speed increases, so does the horizontal distance between the weight and your downrigger. The faster you go, the farther the weight is behind you. The farther the weight is behind you, the shallower the weight is.
NOTE: Actual fishing depth may vary from depth shown on meter due to trolling speed and weight of cannon ball. (See "Blowback") Maintaining Your Downrigger At the beginning of each fishing season and more often during periods of heavy usage, lightly grease the thrust bearing, reel shaft bearings, swivel head pulley, ratchet brake face, and ratchet dog. When using for saltwater fishing, thoroughly rinse the entire downrigger with fresh water after each trip and lubricate on a frequent basis.
TROLLING TIPS Ten Good Trolling Tips 1) Test your lures over the boat side before sending them down and back. Do this to make sure the lure wiggles and wobbles properly without going belly up or wandering off. Some lures can be adjusted, fine tuned actually, to impart maximum action. For example, a slight bend in the tail of a spoon or twist of the hook eye in the nose of a plug can make a noticeable difference in how the lure performs.
Johnson Outdoors Inc. warrants to the original purchaser that if the accompanying product (see exclusions below) proves to be defective in material or workmanship within the following warranty periods, Johnson Outdoors Inc.
To download product manuals or purchase Cannon products from an authorized dealer, please visit our web page at www.cannondownriggers.com Johnson Outdoors, Inc. / Cannon Division 121 Power Drive, Mankato, MN 56001 1-800-227-6433 © 2008 Johnson Outdoors, Inc. All rights reserved. All CANNON Downriggers are covered by US Pat.D-269, 992. Copyright 2006 Johnson Outdoors, Inc. All rights reserved.