
Instruction Manual
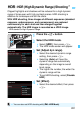
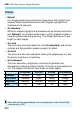
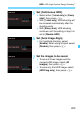

Table Of Contents
- Cover
- Introduction
- Getting Started
- Charging the Battery
- Installing and Removing the Battery
- Installing and Removing the Card
- Turning on the Power
- Setting the Date, Time, and Zone
- Selecting the Interface Language
- Attaching and Detaching a Lens
- Basic Operation
- Quick Control for Shooting Functions
- Menu Operations
- Before You Start
- Displaying the Grid
- Displaying the Electronic Level
- Setting the Viewfinder Information Display
- Help
- Basic Shooting
- Setting the AF and Drive Modes
- Image Settings
- Selecting the Card for Recording and Playback
- Setting the Image-Recording Quality
- Setting Crop/Aspect Ratio
- Setting the ISO Speed
- Selecting a Picture Style
- Customizing a Picture Style
- Registering a Picture Style
- Setting the White Balance
- White Balance Correction
- Auto Correction of Brightness and Contrast
- Setting Noise Reduction
- Highlight Tone Priority
- Correction of Lens Peripheral Illumination and Aberration
- Reducing Flicker
- Setting the Color Space
- Creating and Selecting a Folder
- Changing the File Name
- File Numbering Methods
- Setting Copyright Information
- Advanced Operations
- Program AE
- Shutter-Priority AE
- Aperture-Priority AE
- Manual Exposure
- Selecting the Metering Mode
- Setting Exposure Compensation
- Auto Exposure Bracketing (AEB)
- AE Lock
- Bulb Exposures
- HDR (High Dynamic Range) Shooting
- Multiple Exposures
- Mirror Lockup
- Using the Eyepiece Cover
- Using a Remote Switch
- Remote Control Shooting
- Interval Timer Shooting
- Flash Photography
- Shooting with the LCD Monitor (Live View Shooting)
- Shooting Movies
- Image Playback
- Image Playback
- Shooting Information Display
- Searching for Images Quickly
- Magnifying Images
- Comparing Images (Two-Image Display)
- Rotating the Image
- Protecting Images
- Setting Ratings
- Quick Control for Playback
- Enjoying Movies
- Playing Back Movies
- Editing a Movie’s First and Last Scenes
- Slide Show (Auto Playback)
- Viewing Images on a TV Set
- Copying Images
- Erasing Images
- Changing Image Playback Settings
- Post-Processing Images
- Sensor Cleaning
- Printing Images and Transferring Images to a Computer
- Customizing the Camera
- Reference
- Viewing the CD-ROM Instruction Manuals / Downloading Images to Your Computer

225
w: HDR (High Dynamic Range) ShootingN
When shooting HDR images with [Auto Image Align] set to [Enable],
AF point display information (p.325) and Dust Delete Data (p.375) will
not be appended to the image.
If you perform handheld HDR shooting while [Auto Image Align] is set
to [Enable], image periphery will be slightly cropped and resolution will
be slightly lowered (except when shooting with [1.3x (crop)] or [1.6x
(crop)]). Also, if the images cannot be aligned properly due to camera
shake, etc., auto image alignment may not take effect. Note that when
shooting with excessively bright (or dark) exposure settings, auto image
alignment may not work properly.
If you perform handheld HDR shooting while [Auto Image Align] is set
to [Disable], the 3 images may not be properly aligned and the HDR
effect may be minimal. Using a tripod is recommended.
Auto image alignment may not work properly with repetitive patterns
(lattice, stripes, etc.) or flat, single-tone images.
The color gradation of the sky or white walls may not be reproduced
correctly. Irregular colors, irregular exposure or noise may appear.
HDR shooting under fluorescent or LED lighting may result in unnatural
color reproduction of the illuminated areas.
With HDR shooting, the images will be merged, then saved to the card,
so it may take some time. Therefore, it will take a longer time to record
the HDR image to the card than with normal shooting. During the
processing of the images, “buSY” will be displayed in the viewfinder and
on the LCD panel, and you cannot take another picture until the
processing is completed.
If you change the shooting mode or switch to movie shooting after setting
HDR shooting, HDR shooting setting may be cleared ([Adjust dyn
range] setting may be switched to [Disable HDR]).