
Instruction Manual
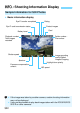

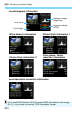
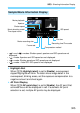
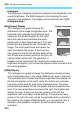
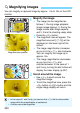
Table Of Contents
- Cover
- Introduction
- Getting Started
- Charging the Battery
- Installing and Removing the Battery
- Installing and Removing the Card
- Turning on the Power
- Setting the Date, Time, and Zone
- Selecting the Interface Language
- Attaching and Detaching a Lens
- Basic Operation
- Quick Control for Shooting Functions
- Menu Operations
- Before You Start
- Displaying the Grid
- Displaying the Electronic Level
- Setting the Viewfinder Information Display
- Help
- Basic Shooting
- Setting the AF and Drive Modes
- Image Settings
- Selecting the Card for Recording and Playback
- Setting the Image-Recording Quality
- Setting Crop/Aspect Ratio
- Setting the ISO Speed
- Selecting a Picture Style
- Customizing a Picture Style
- Registering a Picture Style
- Setting the White Balance
- White Balance Correction
- Auto Correction of Brightness and Contrast
- Setting Noise Reduction
- Highlight Tone Priority
- Correction of Lens Peripheral Illumination and Aberration
- Reducing Flicker
- Setting the Color Space
- Creating and Selecting a Folder
- Changing the File Name
- File Numbering Methods
- Setting Copyright Information
- Advanced Operations
- Program AE
- Shutter-Priority AE
- Aperture-Priority AE
- Manual Exposure
- Selecting the Metering Mode
- Setting Exposure Compensation
- Auto Exposure Bracketing (AEB)
- AE Lock
- Bulb Exposures
- HDR (High Dynamic Range) Shooting
- Multiple Exposures
- Mirror Lockup
- Using the Eyepiece Cover
- Using a Remote Switch
- Remote Control Shooting
- Interval Timer Shooting
- Flash Photography
- Shooting with the LCD Monitor (Live View Shooting)
- Shooting Movies
- Image Playback
- Image Playback
- Shooting Information Display
- Searching for Images Quickly
- Magnifying Images
- Comparing Images (Two-Image Display)
- Rotating the Image
- Protecting Images
- Setting Ratings
- Quick Control for Playback
- Enjoying Movies
- Playing Back Movies
- Editing a Movie’s First and Last Scenes
- Slide Show (Auto Playback)
- Viewing Images on a TV Set
- Copying Images
- Erasing Images
- Changing Image Playback Settings
- Post-Processing Images
- Sensor Cleaning
- Printing Images and Transferring Images to a Computer
- Customizing the Camera
- Reference
- Viewing the CD-ROM Instruction Manuals / Downloading Images to Your Computer
B: Shooting Information Display
326
Histogram
The brightness histogram shows the exposure level distribution and
overall brightness. The RGB histogram is for checking the color
saturation and gradation. The display can be switched with [33:
Histogram disp.].
[Brightness] Display
This histogram is a graph showing the
distribution of the image’s brightness level. The
horizontal axis indicates the brightness level
(darker on the left and brighter on the right),
while the vertical axis indicates how many
pixels exist for each brightness level. The more
pixels there are toward the left, the darker the
image. The more pixels there are toward the
right, the brighter the image. If there are too
many pixels on the left, the shadow detail will be
lost. If there are too many pixels on the right, the
highlight detail will be lost. The gradation in-
between will be reproduced. By checking the image and its
brightness histogram, you can see the exposure level inclination and
the overall gradation.
[RGB] Display
This histogram is a graph showing the distribution of each primary
color’s brightness level in the image (RGB or red, green, and blue).
The horizontal axis indicates the color’s brightness level (darker on
the left and brighter on the right), while the vertical axis indicates
how many pixels exist for each color brightness level. The more
pixels there are toward the left, the darker and less prominent the
color. The more pixels there are toward the right, the brighter and
denser the color. If there are too many pixels on the left, the
respective color information will be lacking. If there are too many
pixels on the right, the color will be too saturated with no gradation.
By checking the image’s RGB histogram, you can see the color’s
saturation and gradation condition, as well as white balance
inclination.
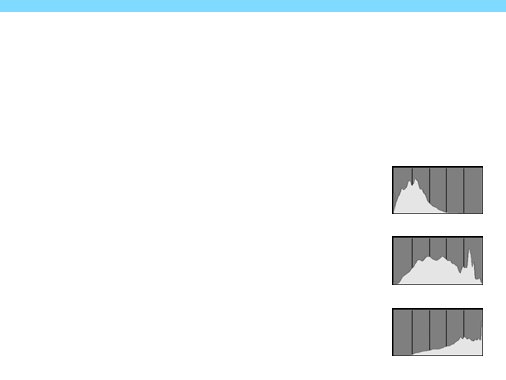
Sample Histograms
Dark image
Normal brightness
Bright image