
Instruction Manual
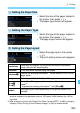

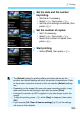


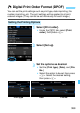

Table Of Contents
- Cover
- Introduction
- Getting Started
- Charging the Battery
- Installing and Removing the Battery
- Installing and Removing the Card
- Turning on the Power
- Setting the Date, Time, and Zone
- Selecting the Interface Language
- Attaching and Detaching a Lens
- Basic Operation
- Quick Control for Shooting Functions
- Menu Operations
- Before You Start
- Displaying the Grid
- Displaying the Electronic Level
- Setting the Viewfinder Information Display
- Help
- Basic Shooting
- Setting the AF and Drive Modes
- Image Settings
- Selecting the Card for Recording and Playback
- Setting the Image-Recording Quality
- Setting Crop/Aspect Ratio
- Setting the ISO Speed
- Selecting a Picture Style
- Customizing a Picture Style
- Registering a Picture Style
- Setting the White Balance
- White Balance Correction
- Auto Correction of Brightness and Contrast
- Setting Noise Reduction
- Highlight Tone Priority
- Correction of Lens Peripheral Illumination and Aberration
- Reducing Flicker
- Setting the Color Space
- Creating and Selecting a Folder
- Changing the File Name
- File Numbering Methods
- Setting Copyright Information
- Advanced Operations
- Program AE
- Shutter-Priority AE
- Aperture-Priority AE
- Manual Exposure
- Selecting the Metering Mode
- Setting Exposure Compensation
- Auto Exposure Bracketing (AEB)
- AE Lock
- Bulb Exposures
- HDR (High Dynamic Range) Shooting
- Multiple Exposures
- Mirror Lockup
- Using the Eyepiece Cover
- Using a Remote Switch
- Remote Control Shooting
- Interval Timer Shooting
- Flash Photography
- Shooting with the LCD Monitor (Live View Shooting)
- Shooting Movies
- Image Playback
- Image Playback
- Shooting Information Display
- Searching for Images Quickly
- Magnifying Images
- Comparing Images (Two-Image Display)
- Rotating the Image
- Protecting Images
- Setting Ratings
- Quick Control for Playback
- Enjoying Movies
- Playing Back Movies
- Editing a Movie’s First and Last Scenes
- Slide Show (Auto Playback)
- Viewing Images on a TV Set
- Copying Images
- Erasing Images
- Changing Image Playback Settings
- Post-Processing Images
- Sensor Cleaning
- Printing Images and Transferring Images to a Computer
- Customizing the Camera
- Reference
- Viewing the CD-ROM Instruction Manuals / Downloading Images to Your Computer

385
w Printing
5
Set the date and file number
imprinting.
Set them if necessary.
Select <
I>, then press <0>.
Set the print settings as desired, then
press <0>.
6
Set the number of copies.
Set it if necessary.
Select <
R>, then press <0>.
Select the number of copies, then
press <0>.
7
Start printing.
Select [Print], then press <0>.
The [Default] setting for printing effects and other options are the
printer’s own default settings as set by the printer’s manufacturer. Refer
to the printer’s instruction manual to find out what the [Default] settings
are.
Depending on the image’s file size and image-recording quality, it may
take some time for the printing to start after you select [Print].
If image tilt correction (p.387) is applied, it may take longer to print the
image.
To stop the printing, press <
0> while [Stop] is displayed, then select
[OK].
If you execute [54: Clear all camera settings] (p.70), all the settings
will revert to their defaults.