
Instruction Manual

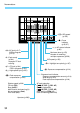
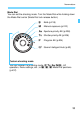
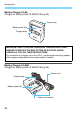

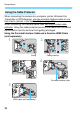
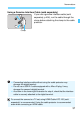


Table Of Contents
- Cover
- Introduction
- Getting Started
- Charging the Battery
- Installing and Removing the Battery
- Installing and Removing the Card
- Turning on the Power
- Setting the Date, Time, and Zone
- Selecting the Interface Language
- Attaching and Detaching a Lens
- Basic Operation
- Quick Control for Shooting Functions
- Menu Operations
- Before You Start
- Displaying the Grid
- Displaying the Electronic Level
- Setting the Viewfinder Information Display
- Help
- Basic Shooting
- Setting the AF and Drive Modes
- Image Settings
- Selecting the Card for Recording and Playback
- Setting the Image-Recording Quality
- Setting Crop/Aspect Ratio
- Setting the ISO Speed
- Selecting a Picture Style
- Customizing a Picture Style
- Registering a Picture Style
- Setting the White Balance
- White Balance Correction
- Auto Correction of Brightness and Contrast
- Setting Noise Reduction
- Highlight Tone Priority
- Correction of Lens Peripheral Illumination and Aberration
- Reducing Flicker
- Setting the Color Space
- Creating and Selecting a Folder
- Changing the File Name
- File Numbering Methods
- Setting Copyright Information
- Advanced Operations
- Program AE
- Shutter-Priority AE
- Aperture-Priority AE
- Manual Exposure
- Selecting the Metering Mode
- Setting Exposure Compensation
- Auto Exposure Bracketing (AEB)
- AE Lock
- Bulb Exposures
- HDR (High Dynamic Range) Shooting
- Multiple Exposures
- Mirror Lockup
- Using the Eyepiece Cover
- Using a Remote Switch
- Remote Control Shooting
- Interval Timer Shooting
- Flash Photography
- Shooting with the LCD Monitor (Live View Shooting)
- Shooting Movies
- Image Playback
- Image Playback
- Shooting Information Display
- Searching for Images Quickly
- Magnifying Images
- Comparing Images (Two-Image Display)
- Rotating the Image
- Protecting Images
- Setting Ratings
- Quick Control for Playback
- Enjoying Movies
- Playing Back Movies
- Editing a Movie’s First and Last Scenes
- Slide Show (Auto Playback)
- Viewing Images on a TV Set
- Copying Images
- Erasing Images
- Changing Image Playback Settings
- Post-Processing Images
- Sensor Cleaning
- Printing Images and Transferring Images to a Computer
- Customizing the Camera
- Reference
- Viewing the CD-ROM Instruction Manuals / Downloading Images to Your Computer
40
1
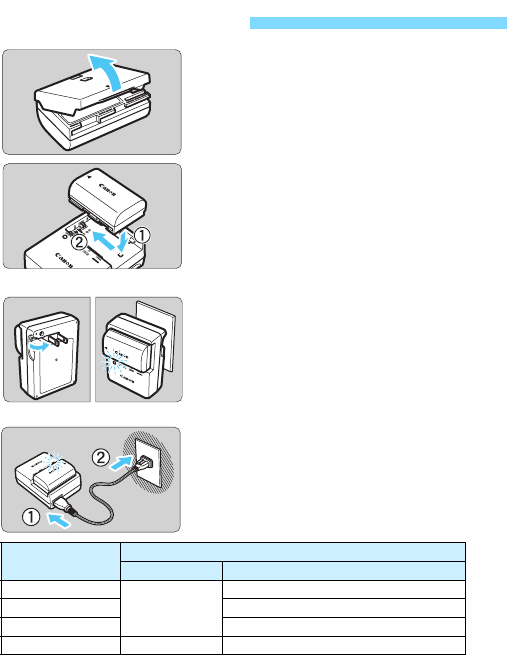
Remove the protective cover.
Detach the protective cover provided
with the battery.
2
Attach the battery.
As shown in the illustration, attach the
battery securely to the charger.
To detach the battery, follow the
above procedure in reverse.
3
Recharge the battery.
For LC-E6
As shown by the arrow, flip out the
battery charger’s prongs and insert
the prongs into a power outlet.
For LC-E6E
Connect the power cord to the
charger and insert the plug into a
power outlet.
X Recharging starts automatically and
the charge lamp blinks in orange.
It takes approx. 2 hr. and 30 min. to fully recharge a completely exhausted battery at
room temperature (23°C / 73°F).
The time required to recharge the battery will vary
greatly depending on the ambient temperature and the battery’s remaining capacity.
For safety reasons, recharging in low temperatures (5°C - 10°C /
41°F - 50°F) will take longer (up to approx. 4 hr.).
Charging the Battery
LC-E6
LC-E6E
Charge Level
Charge Lamp
Color Display
0-49%
Orange
Blinks once per second
50-74% Blinks twice per second
75% or higher Blinks three times per second
Fully charged Green Lights up