
User manual

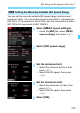
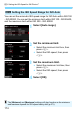
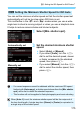
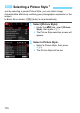
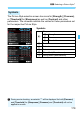
Table Of Contents
- Cover
- Introduction
- Getting Started and Basic Camera Operations
- Charging the Battery
- Installing and Removing the Battery
- Installing and Removing the Card
- Using the LCD Monitor
- Turning on the Power
- Setting the Date, Time, and Zone
- Selecting the Interface Language
- Attaching and Detaching a Lens
- Basic Shooting Operations
- Quick Control for Shooting Functions
- Menu Operations and Configurations
- Operating the Camera with Touch Screen
- Formatting the Card
- Before You Start
- Displaying the Grid in the Viewfinder
- Displaying the Electronic Level
- Setting the Viewfinder Information Display
- Button Functions
- Setting the Multi Function Lock
- Setting the Shooting Mode Guide
- Setting the Feature Guide
- Help
- Basic Shooting
- Fully Automatic Shooting (Scene Intelligent Auto)
- Full Auto Techniques (Scene Intelligent Auto)
- Creative Auto Shooting
- Special Scene Mode
- Shooting Portraits
- Shooting Group Photos
- Shooting Landscapes
- Shooting Moving Subjects
- Photographing Children
- Panning
- Shooting Close-ups
- Shooting Food
- Shooting Candlelight Portraits
- Shooting Night Portraits (With a Tripod)
- Shooting Night Scenes (Handheld)
- Shooting Backlit Scenes
- Quick Control
- Setting the AF and Drive Modes
- Image Settings
- Setting the Image-Recording Quality
- Setting the Aspect Ratio
- Setting the ISO Speed for Still Photos
- Selecting a Picture Style
- Customizing a Picture Style
- Registering a Picture Style
- Setting the White Balance
- White Balance Correction
- Auto Correction of Brightness and Contrast
- Setting Noise Reduction
- Highlight Tone Priority
- Correction of Lens Aberrations due to Optical Characteristics
- Reducing Flicker
- Setting the Color Space
- Creating and Selecting a Folder
- File Numbering Methods
- Setting Copyright Information
- GPS Settings
- Advanced Operations for Photographic Effects
- Program AE
- Shutter-Priority AE
- Aperture-Priority AE
- Manual Exposure
- Selecting the Metering Mode
- Setting the Desired Exposure Compensation
- Auto Exposure Bracketing (AEB)
- Locking the Exposure for Shooting (AE Lock)
- Long (Bulb) Exposures
- HDR (High Dynamic Range) Shooting
- Multiple Exposures
- Mirror Lockup
- Interval Timer Shooting
- Using the Eyepiece Cover
- Remote Control Shooting
- Using a Remote Switch
- Flash Photography
- Shooting with the LCD Monitor (Live View Shooting)
- Shooting Movies
- Image Playback
- Image Playback
- Shooting Information Display
- Index display (Multiple-image Display)
- Jump Display (Jumping Through Images)
- Filtering Images for Playback
- Magnifying Images
- Playing Back with the Touch Screen
- Rotating the Image
- Protecting Images
- Setting Ratings
- Quick Control for Playback
- Enjoying Movies
- Playing Back Movies
- Editing a Movie’s First and Last Scenes
- Slide Show (Auto Playback)
- Viewing Images on a TV Set
- Erasing Images
- Adjusting the LCD Monitor Brightness
- Setting the Auto Rotation of Vertical Images
- Post-Processing Images
- Sensor Cleaning
- Print order and Photobook Set-up
- Customizing the Camera
- Reference
- Software Start Guide / Downloading Images to a Computer

175
i: Setting the ISO Speed for Still PhotosN
You can set the minimum shutter speed so that the shutter speed set
automatically will not be too slow when ISO Auto is set.
This is effective in the <d> and <f> modes when you use a wide-
angle lens to shoot a moving subject or when you use a telephoto lens.
It helps to reduce camera shake and blurred subjects.
1
Select [Min. shutter spd.].
2
Set the desired minimum shutter
speed.
Select [Auto] or [Manual].
If you select [Auto], turn the <6>
dial to set the desired speed, slower
or faster compared to the standard
speed, then press <0>.
If you select [Manual], turn the <6>
dial to select the shutter speed, then
press <0>.
3 Setting the Minimum Shutter Speed for ISO Auto
Automatically set
Manually set
If a correct exposure cannot be obtained with the maximum ISO speed
limit set with [Auto range], a shutter speed slower than the [Min. shutter
spd.] will be set to obtain the standard exposure.
This function will not be applied to flash photography and movie shooting.
When [Auto: 0] is set, the minimum shutter speed will be the reciprocal of
the lens focal length. A single step from [Slower] to [Faster] is equivalent to
a single stop of the shutter speed.