
User manual
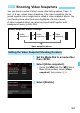
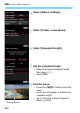

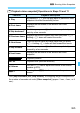
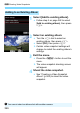
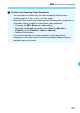

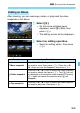
Table Of Contents
- Cover
- Introduction
- Getting Started and Basic Camera Operations
- Charging the Battery
- Installing and Removing the Battery
- Installing and Removing the Card
- Using the LCD Monitor
- Turning on the Power
- Setting the Date, Time, and Zone
- Selecting the Interface Language
- Attaching and Detaching a Lens
- Basic Shooting Operations
- Quick Control for Shooting Functions
- Menu Operations and Configurations
- Operating the Camera with Touch Screen
- Formatting the Card
- Before You Start
- Displaying the Grid in the Viewfinder
- Displaying the Electronic Level
- Setting the Viewfinder Information Display
- Button Functions
- Setting the Multi Function Lock
- Setting the Shooting Mode Guide
- Setting the Feature Guide
- Help
- Basic Shooting
- Fully Automatic Shooting (Scene Intelligent Auto)
- Full Auto Techniques (Scene Intelligent Auto)
- Creative Auto Shooting
- Special Scene Mode
- Shooting Portraits
- Shooting Group Photos
- Shooting Landscapes
- Shooting Moving Subjects
- Photographing Children
- Panning
- Shooting Close-ups
- Shooting Food
- Shooting Candlelight Portraits
- Shooting Night Portraits (With a Tripod)
- Shooting Night Scenes (Handheld)
- Shooting Backlit Scenes
- Quick Control
- Setting the AF and Drive Modes
- Image Settings
- Setting the Image-Recording Quality
- Setting the Aspect Ratio
- Setting the ISO Speed for Still Photos
- Selecting a Picture Style
- Customizing a Picture Style
- Registering a Picture Style
- Setting the White Balance
- White Balance Correction
- Auto Correction of Brightness and Contrast
- Setting Noise Reduction
- Highlight Tone Priority
- Correction of Lens Aberrations due to Optical Characteristics
- Reducing Flicker
- Setting the Color Space
- Creating and Selecting a Folder
- File Numbering Methods
- Setting Copyright Information
- GPS Settings
- Advanced Operations for Photographic Effects
- Program AE
- Shutter-Priority AE
- Aperture-Priority AE
- Manual Exposure
- Selecting the Metering Mode
- Setting the Desired Exposure Compensation
- Auto Exposure Bracketing (AEB)
- Locking the Exposure for Shooting (AE Lock)
- Long (Bulb) Exposures
- HDR (High Dynamic Range) Shooting
- Multiple Exposures
- Mirror Lockup
- Interval Timer Shooting
- Using the Eyepiece Cover
- Remote Control Shooting
- Using a Remote Switch
- Flash Photography
- Shooting with the LCD Monitor (Live View Shooting)
- Shooting Movies
- Image Playback
- Image Playback
- Shooting Information Display
- Index display (Multiple-image Display)
- Jump Display (Jumping Through Images)
- Filtering Images for Playback
- Magnifying Images
- Playing Back with the Touch Screen
- Rotating the Image
- Protecting Images
- Setting Ratings
- Quick Control for Playback
- Enjoying Movies
- Playing Back Movies
- Editing a Movie’s First and Last Scenes
- Slide Show (Auto Playback)
- Viewing Images on a TV Set
- Erasing Images
- Adjusting the LCD Monitor Brightness
- Setting the Auto Rotation of Vertical Images
- Post-Processing Images
- Sensor Cleaning
- Print order and Photobook Set-up
- Customizing the Camera
- Reference
- Software Start Guide / Downloading Images to a Computer

369
3 Shooting Video Snapshots
After shooting, you can rearrange, delete, or play back the video
snapshots in the album.
1
Select [X].
On the movie playback panel
displayed, select [X] (Edit), then
press <0>.
X The editing screen will be displayed.
2
Select an editing operation.
Select an editing option, then press
<0>.
Editing an Album
Function Description
T Move snapshot
Press the <Y> <Z> keys to select the video snapshot
you want to move, then press <0>. Press the <Y>
<Z> keys to move the snapshot, then press <0>.
L Delete snapshot
Press the <Y> <Z> keys to select the video snapshot
you want to delete, then press <0>. The [L] icon will
be displayed on the selected video snapshot. Pressing
<0> again will cancel the selection and [L] will
disappear.
7 Play snapshot
Press the <Y> <Z> keys to select the video snapshot
you want to play back, then press <0>.