EOS 6D (WG) PY O C Wi-Fi Function Basic Instruction Manual GPS Function Instruction Manual For Wi-Fi functions, basic operation procedures for easy-to-use “Transferring Images between Cameras” and “Connecting to a smartphone” are explained. For detailed explanation about Wi-Fi functions, refer to “Wi-Fi Function Instruction Manual” included in the Camera Instruction Manual CD-ROM. For GPS functions, operation procedures for all functions are explained.
EOS 6D Y(WG) P O C Wi-Fi Function Basic Instruction Manual
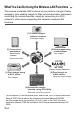
What You Can Do Using the Wireless LAN Functions This camera’s wireless LAN functions let you perform a range of tasks wirelessly, from sending images to Web services and other cameras to controlling the camera remotely, simply by connecting to a Wi-Fi network or other device supporting this camera’s wireless LAN functions.
What You Can Do Using the Wireless LAN Functions (1) z Transfer images between cameras (p.W-13) Transfer images between this camera and other Canon cameras with built-in wireless LAN functions. (2) q Connect to a smartphone (p.W-21) View saved images or operate the camera from your smartphone. You must install the dedicated application “EOS Remote” on your smartphone to use these functions.
Conventions Used in This Manual In this manual, the term “wireless LAN” is used as a general term for Wi-Fi and Canon’s original wireless communication functions. The ** (numbers) for “(p.**)” in this manual indicate reference page numbers for more information. Sections of this manual labeled with the following symbols contain particular types of information as described below. : Warnings to prevent potential problems during operation. : Supplemental information to basic operation.
Contents Introduction What You Can Do Using the Wireless LAN Functions ................ W-2 Conventions Used in This Manual ............................................... W-4 [Wi-Fi] Settings and Connection Status....................................... W-6 1 Basic Settings for Wireless LAN Functions W-7 Registering a Nickname............................................................... W-8 Basic Operation and Settings ....................................................
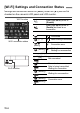
[Wi-Fi] Settings and Connection Status Settings and connection status for [Wi-Fi] under the [53] tab can be checked on the camera’s LCD panel and LCD monitor.
Basic Settings for Wireless LAN Functions This chapter describes settings necessary for using the camera’s wireless LAN functions.
Registering a Nickname First, set the camera’s nickname. When the camera is connected to another device via a wireless LAN, the nickname will be displayed on the device. Be sure to set a nickname for your camera. 1 Select [Wi-Fi]. Under the [53] tab, select [Wi-Fi], then press <0>. [Enable]. 2 Select Press the key to select [Enable], then press <0>. X [Wi-Fi function] is now selectable. 3 W-8 PY O Select C [Wi-Fi function]. Under the [53] tab, select [Wi-Fi function], then press <0>.
Registering a Nickname a nickname. 4 Enter For instructions on entering characters, see “Virtual Keyboard Operation” on the next page. Up to 16 characters can be entered. 5 Finish. When you are finished, press the button. Select [OK] on the confirmation screen, then press <0>. The nickname is registered, and [Wi-Fi function] screen will appear. PY O C To change the nickname, press the button on the screen above, then select [Edit nickname] on the screen displayed.
Registering a Nickname Virtual Keyboard Operation Switching to other input areas To switch between top and bottom input areas, press the button. Moving the cursor To move the cursor, press the key in the top area. Entering text In the bottom input area, press the or key to select characters and press <0> to enter them. You can check how many characters you have entered, and how many more can be entered, by referring to [*/*] on the upper right of the screen.
Basic Operation and Settings Using the Camera While Wireless LAN Functions Are Active When you want to prioritize wireless LAN functions, do not operate the shutter button, Mode Dial, or playback button. Otherwise, shooting or playback operation may be prioritized and wireless LAN functions may be ended during the process. When [Wi-Fi] is set to [Enable], movie shooting is disabled.
Basic Operation and Settings Connecting with an Interface Cable When [Wi-Fi] under the [53] tab is set to [Enable], interface cable connection is disabled. Set it to [Disable] to connect the interface cable. When the camera is connected to a computer, printer, GPS receiver, or any other devices via an interface cable, the settings for [Wi-Fi] cannot be changed. Disconnect the interface cable and then configure settings.
Transferring Images Between Cameras Images can be transferred between Canon cameras via the built-in wireless LAN functions. PY O C Wireless connection is possible for Canon cameras with built-in wireless LAN functions marketed in 2012 or later. Note that the camera cannot be connected to Canon camcorders, even if they have built-in wireless LAN functions. The camera cannot be connected to Canon cameras without built-in wireless LAN functions, even if they support Eye-Fi cards.
Selecting the Connection Destination Register the target camera to connect to via a wireless LAN. The camera can be connected to only one camera at a time. 1 Select [Wi-Fi function]. Under the [53] tab, set [Wi-Fi] to [Enable], then select [Wi-Fi function]. [z]. 2 Select Press the or key to select [z] (Transfer imgs between cameras), then press <0>. the connection on the target 3 Start PY camera. O CWhen the screen on the left is displayed, start the connection on the target camera as well.
Selecting the Connection Destination the images to send. 4 Select Select images on the camera sending the images (p.W-16). Do not operate the camera receiving the images. PY O C Note that GPS information is not displayed on the camera’s playback screen even if GPS information is appended to the received image. Shooting locations can be viewed on a virtual map, using the Map Utility software.
Sending Images Sending Images One by One Selected images are sent one by one. 1 Select an image to send. Press the key to select an image to send, then press <0>. Press the button and turn the <6> dial to the left to select an image on the index display. To return to the single-image display, turn the <6> dial to the right. [Send img shown]. 2 Select To select the size of the image to send, press the key and select [Resize image]. Press the key to select [Send img shown], then press <0>.
Sending Images Sending Selected Images Multiple images (up to 50 files) can be selected and sent. 1 Press <0>. [Send selected]. 2 Select To select the size of the image to send, press the key and select [Resize image]. Press the key to select [Send selected], then press <0>. PYthe images to send. OPress 3 CSelect the key to select the images to send, then press <0>. X is displayed on the upper left of the image to send.
Sending Images the image size. 4 Reduce Set it if necessary. the images. 5 Send Press the key to select [Send], then press <0> to send the images. X The transfer progress screen is displayed. To transfer other images, repeat steps 1 to 5. connection. 6 Terminate Press the button to display the confirmation PY screen. Press the O C key to select [OK], then press <0> to terminate the connection. X The [Wi-Fi function] setting screen will reappear.
Reconnecting The camera can reconnect to another camera for which connection settings have been registered. 1 Select [Wi-Fi function]. Under the [53] tab, set [Wi-Fi] to [Enable], then select [Wi-Fi function]. [z]. 2 Select Select [z] (Transfer imgs between cameras) and press <0>. a connection. Y[Connect] 3 Establish P Select and press <0>. COOn the confirmation screen, select [OK]. Perform the reconnection procedure on the target camera as well.
MEMO PY O C W-20
Connecting to a Smartphone Connecting the camera to a smartphone lets you use the smartphone to view, manage, and receive images stored in the camera. You can also use the smartphone to perform remote shooting.
Preparation Supported Smartphone Operating Systems The following smartphone operating systems are supported (as of September 2012). For updated information on supported operating systems, refer to the download site of EOS Remote software. • iOS: Version 5.0 to 5.1 • Android: Version 2.3.3 to 4.0 EOS Remote Installation Required To communicate with a smartphone, the camera needs to be connected to the smartphone using the dedicated application EOS Remote.
Using Camera Access Point Mode to Establish a Connection The camera and smartphone can be directly connected via a wireless LAN. Because the camera acts as an access point, no other access point is necessary, so you can establish communications easily even when you are out. To establish connection, operations on the smartphone is required. For details, refer to the smartphone instruction manual. 1 Select [Wi-Fi function]. Under the [53] tab, set [Wi-Fi] to [Enable], then select [Wi-Fi function]. [q].
Using Camera Access Point Mode to Establish a Connection the smartphone to the 5 Connect camera. On the Wi-Fi settings menu of the smartphone, select the SSID (network name) displayed on the camera’s LCD monitor. For the password, enter the encryption key displayed on the camera’s LCD monitor. X The next screen may be automatically displayed even when the operation on the smartphone is not completed. EOS Remote on the 6 Start smartphone.
Using Camera Access Point Mode to Establish a Connection to the camera. 9 Connect When pairing is completed, the screen on the left is displayed. Press the key to select [OK], then press <0>. A character other than in ASCII format is displayed as 8. further settings. 10 Perform To finish settings in this stage, press the key to select [OK], then press <0> to go to step 11. To change the name of the settings, select [Settings name] and press <0>. X The virtual keyboard is displayed (p.W-10).
Operating the Camera Using a Smartphone You can use a smartphone with EOS Remote installed to view images stored on the camera and shoot remotely. EOS Remote Main Screen The main functions of EOS Remote are described below. Touch the screen to learn the operation procedures. [Camera Image Viewing] Images stored in the camera can be viewed. Images stored in the camera can be saved on a smartphone. Operations such as deletion can be performed on images stored in the camera.
Operating the Camera Using a Smartphone Terminating the Connection 1 Select [Exit]. If the screen on the left is not displayed, select [Wi-Fi function] under the [53] tab on the camera’s menu screen. Select [Exit] and press <0>. [OK]. 2 Select Press the key to select [OK], then press <0> to terminate the connection. PY O C Images are saved in S2 size JPEG format on smartphones. RAW images are also saved as S2 size JPEG images. Although movies are included in the list, they cannot be saved.
Reconnecting The camera can reconnect to a smartphone for which connection settings have been registered. 1 Select [Wi-Fi function]. Under the [53] tab, set [Wi-Fi] to [Enable], then select [Wi-Fi function]. [q]. 2 Select Select [q] (Connect to smartphone) and press <0>. Ya connection. 3 Establish P Select [Connect] and press <0>. COnOthe confirmation screen, select [OK]. X The camera will reconnect to the smartphone.
EOS 6D Y(WG) P O C GPS Function Instruction Manual
Features Geotagging Images Location information*1 (latitude, longitude, elevation, and coordinated universal time*2) can be added to images. Shooting locations of geotagged images can be viewed on a virtual map on a computer. *1: Certain travel conditions or GPS settings may cause inaccurate location information to be added to images. The digital compass function is not incorporated. *2: Coordinated Universal Time, abbreviated UTC, is essentially the same as Greenwich Mean Time.
Features Setting the Camera Time The camera time can be set using GPS signals. Viewing Images and Information on a Virtual Map Shooting locations and the route traveled can be viewed on a virtual map, using the Map Utility software (p.G-18). PY O C Map data ©2012 ZENRIN - Geotagging Images on a Computer Map data ©2012 ZENRIN - Using the GPS logging function, recorded location information can be added to images.
Conventions Used in this Manual Meaning of Symbols : Warning to prevent shooting problems. : Supplemental information. (p.**) : Reference page numbers for further information. The icons and markings indicating the camera’s controls and settings used in the manual correspond to the icons and marking on the camera. Basic Assumptions All operation procedures in this manual assume that the camera power switch is set to .
Table of Contents Features ...................................................................................... G-2 Conventions Used in this Manual.............................................. G-4 Acquiring GPS Signals ............................................................... G-6 Setting the Positioning Interval ............................................... G-11 Setting Time from GPS on the Camera ................................... G-12 Logging the Route Traveled.................................
Acquiring GPS Signals To acquire GPS signals, bring the camera outdoors where the sky is unobstructed and aim it upwards. Keep your hands and other objects off the top of the camera. 1 Select [GPS]. On the [52] tab, select [GPS] and press <0>. [Select GPS device] to 2 Set [Internal GPS]. the menu. 3 ExitPress the button.
Acquiring GPS Signals GPS Acquisition Status LCD panel LCD monitor GPS signal status is indicated by the icon on the camera’s LCD panel and LCD monitor. • Constant : Signal acquired • Blinking : Signal not acquired yet PY O C When you shoot while the mark is lit, the image will be geotagged. When [Internal GPS] is selected, the mark is displayed on the camera’s LCD panel even when the camera’s power is turned off because signals from satellites are constantly received.
Acquiring GPS Signals Under favorable conditions, signal acquisition takes approx. 30-60 seconds after turning on the camera if radiowave conditions are good. The antenna of the internal GPS is located at the front of the hot shoe. GPS signals can be received even when an external flash is attached. However, acquisition will slightly be weakened. GPS signals can be received even when shooting with the camera positioned vertically. When traveling long distance, inaccurate information may be recorded.
Acquiring GPS Signals Viewing GPS Information 1 Select [GPS]. On the [52] tab, select [GPS] and press <0>. [Select GPS device] to 2 Set [Internal GPS]. When using the GPS Receiver GP-E2 (sold separately), select [External GPS]. 3 Select [Set up]. display]. 4 Select PY[GPSGPSinformation XO Detailed information is displayed. C [UTC] (Coordinated Universal Time) in this sample screenshot is essentially the same as Greenwich Mean Time. The icon indicates signal conditions.
Acquiring GPS Signals a picture. 5 Take X Shots taken after GPS signal acquisition are geotagged. Geotagging Information The screen below is displayed when pressing the button several times during image playback. Latitude Longitude Elevation UTC PY O C Connecting External GPS It is recommended to attach an external GPS to the hot shoe. When [Wi-Fi] on the [53] tab is set to [Enable], interface cable connection to the external GPS is disabled.
Setting the Positioning Interval The interval (time) to update the location information can be set. Shorter positioning intervals yield more accurate location information for your images. However, fewer shots can be taken per charge. 1 Select [GPS]. On the [52] tab, select [GPS] and press <0>. [Select GPS device] to 2 Set [Internal GPS]. 3 Select [Set up]. PY[Position update timing]. Select O 4C 5 Select the time. The number of possible shots is less when signal conditions are unfavorable.
Setting Time from GPS on the Camera The camera time can be set using GPS signals. 1 Select [GPS]. On the [52] tab, select [GPS] and press <0>. [Select GPS device] to 2 Set [Internal GPS]. 3 Select [Set up]. [Auto time setting]. 4 Select Yoption and press <0>. Select an Pupdate] O [Auto updates the time after Cthe camera is turned on and a GPS signal is received. If the GPS signal cannot be received from five or more satellites, time setting is not possible. [Set now] will be unavailable.
Logging the Route Traveled Map data ©2012 ZENRIN - 1 Using the GPS logging function, the location information of the route the camera traveled can be automatically recorded on the camera’s internal memory. When you shoot while using the GPS logging function, images will be geotagged. The recorded location information can be viewed on a virtual map on a computer using the Map Utility software (p.G-18). The GPS logging function is enabled even during auto power off and when the power is turned <2>.
Logging the Route Traveled [Log GPS position] to 5 Set [Enable]. When the GPS logging function is enabled, the icon is displayed on the camera LCD panel and LCD monitor. Location Information Logs Location information is recorded at regular intervals along the route the camera traveled, as shown in [Position update timing] in the table below. Daily logs are saved on the camera’s internal memory.
Logging the Route Traveled Importing log files to a computer You can import log files to a computer using the provided software EOS Utility, or by transferring the log data to a card at first. Routes travelled will be displayed on a virtual map when you open the log files imported to the computer with the Map Utility software (p.G-18).
Logging the Route Traveled When carrying the camera in a bag or suitcase as you travel, make sure the camera faces upward and nothing is on top of it. Set the camera time and date as accurately as possible. Also, set appropriate time zone and daylight saving time for the shooting location. When using the Map Utility software, images are geotagged by comparing image date/time tags to logged date and time information. An incorrect date and time setting may prevent accurate geotagging.
GPS Precautions Keep the following points in mind when using the GPS function. In certain countries and regions, the use of GPS may be restricted. Therefore, be sure to use GPS in accordance with the laws and regulations of your country or region. Be particularly careful when traveling outside your home country. Be careful about using GPS functions where the operation of electronic devices is restricted.
Map Utility PY O Shooting locations or Croute traveled can be displayed on Map Utility a virtual map on a computer using location information recorded on the camera. It is also possible to add location information at a later time to images shot by other EOS DIGITAL cameras and Canon compact digital cameras travelled with this camera. Internet access is necessary to install Map Utility.
Specifications Geotagging Images: Reception frequency: Positioning Interval: Time adjustment: Log data: Deleting log data: Latitude, longitude, elevation, time (UTC) and signal acquisition For cameras not compatible with GPS, geotagging is possible using the Map Utility software (based on log information). 1575.42 MHz (L1 band) 1, 5, 10, 15, or 30 seconds, or 1, 2, or 5 minutes Camera time is set from GPS time data.
MEMO PY O C G-20
MEMO PY O C G-21
CANON INC. 30-2, Shimomaruko 3-chome, Ohta-ku, Tokyo 146-8501, Japan U.S.A. CANON U.S.A. INC. http://www.usa.canon.com/eos http://www.usa.canon.com/support For all inquires concerning this product, call toll free in the U.S. 1-800-OK-CANON CANADA CANON CANADA INC. HEADQUARTERS 6390 Dixie Road, Mississauga, Ontario L5T 1P7, Canada CANON CANADA INC. MONTREAL BRANCH 5990, Côte-de-Liesse, Montréal Québec H4T 1V7, Canada CANON CANADA INC. CALGARY OFFICE 2828, 16th Street, N.E.