Introduction Picture Style File Creating Software Contents Picture Style Editor Preparing a Sample Ver. 1.16 Instruction Manual Content of this Instruction Manual PSE stands for Picture Style Editor. In this manual, the windows used in the examples are from Windows 7. indicates the selection procedure of the menu. (Example: [File] menu [Exit].) Square brackets are used to indicate items such as menu names, button names and window names that appear on the computer screen.
READ CAREFULLY BEFORE USING! CANON SOFTWARE LICENSE AGREEMENT IMPORTANT - READ THIS AGREEMENT BEFORE USING THE SOFTWARE ON THE CD-ROM IN THIS BOX. BY USING THE SOFTWARE, YOU AGREE TO BE BOUND BY THE TERMS OF THIS AGREEMENT. This is a license agreement (the [Agreement]) between you and Canon Inc. ([Canon]).
Introduction Picture Style Editor (hereinafter, “PSE”) is software that allows you to edit Picture Style to your unique image characteristics and save the edited results as original Picture Style files. What is a Picture Style file? A Picture Style file (extension “.PF2” or “.PF3”) is an extended function of a Picture Style.
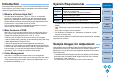
Contents Introduction ................................................................ 2 System Requirements................................................ 2 Sample Images for Adjustment .................................. 2 Preparing Sample Images.......................................... 4 Starting up PSE.......................................................... 4 Opening a Sample Image .......................................... 4 Basic Windows...........................................................
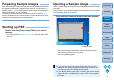
Preparing Sample Images Opening a Sample Image PSE uses a sample image to perform the various adjustments and save the adjusted results as an original Picture Style file. For this reason, a sample image (p.2) to be used for this purpose needs to be prepared in advance and saved on your computer. The settings performed in PSE are saved as a Picture Style file (p.18) which is separate from the sample image, and the sample image used to perform the adjustments is not affected at all.
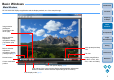
Basic Windows Introduction Main Window You can select the display magnification and the display method, etc. of the sample image. Contents Preparing a Sample Basic Windows Image rotation (90 degree increments to the left or right) Pre-adjustments Before and after adjustment comparison display (Top/bottom split) (p.6) Image Characteristics Saving 100% (actual pixel size) view Before and after adjustment comparison display (Left/right split) (p.
Enlarging a Specific Area Adjusting While Comparing with the Original Image You can enlarge a specific area in the main window to 100%. You can display before and after versions of an adjusted image in the same window and perform adjustments while checking the adjustment results. In the main window, double-click the area you want to enlarge. Select [ ] or [ ]. Introduction Contents Preparing a Sample Basic Windows Double-click The images are displayed split top and bottom or left and right.
Setting the Warning Indicators Navigator Window The display position of an image when it is enlarged in the main window and the image histogram can be displayed in the navigator window. You can also set warning indicators to prevent excessive settings being made. Display the [Navigator] window. Select the [View] menu [Navigator]. You can set warning indicators for luminance values (Y) and color values (RGB) which are useful for preventing excessive settings being made.
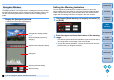
Introduction Tool Palette You can adjust the image characteristics of the Picture Style file by using the various functions of the [Tool palette]. The adjustments made with the [Tool palette] are immediately applied to the image in the main window, enabling you to check the results as you work. We recommend that you make adjustments in the following order. (1) Adjust with the [Basic] tab sheet (p.10) (2) Adjust with the [Six Color-Axes] tab sheet (p.12) (3) Adjust with the [Specific Colors] tab sheet (p.
Pre-adjusting the Images Sample images used in the adjustment process (p.2) which do not have proper exposure or white balance can be adjusted using the [Preliminary adjustment] window to correct their brightness and white balance. However, please remember that adjustments made with the [Preliminary adjustment] window are merely pre-adjustments for performing adjustments with the [Tool palette] (p.8).
Making Basic Adjustments to Image Characteristics Use the [Basic] tab sheet in the [Tool palette] to make basic adjustments to image characteristics. Select the [Basic] tab in the [Tool palette]. Load a Picture Style file (this page) Save a Picture Style file (p.19) Select a Picture Style to be used as a basis (this page) Selecting a Picture Style to Be Used as a Basis Select the Picture Style used as the basis of the adjustments from the preset Picture Styles except Auto or Monochrome.
Introduction Setting Sharpness, Contrast, Color Saturation and Color Tone Drag each slider. Adjusting the Gamma Characteristic for RGB You can use the tone curve to adjust brightness and contrast under RGB. Use the tone curve in this tab sheet before adjusting with the [Six ColorAxes] tab sheet or [Specific Colors] tab sheet. Adjust the brightness and contrast.
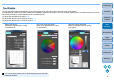
Adjusting Color You can adjust the color region you selected using hue, saturation, and luminosity. 1 2 Select the color region you want to adjust. Introduction Contents Select the [Six Color-Axes] tab in the [Tool palette]. Load a Picture Style file (p.10) Preparing a Sample Save a Picture Style file (p.18) Hue region select buttons (this page) Adjustment color wheel (this page) Basic Windows Select the color region you want to adjust from the adjustment color wheel.
Making Minute Adjustments to Color 4 Adjust color. Drag the sliders to adjust color. You can also directly enter values to adjust. H: Adjust hue. S: Adjust saturation. L: Adjust luminosity. You can make minute adjustments to a color you have specified, using the hue, saturation and luminosity functions in order to get the color you want. You can also set a range for the effect on surrounding colors which occurs when you adjust the colors you have specified.
2 Specify the color you want to adjust. Click the [ ] button and then click the color you want to adjust on the image. 3 Determine the range of effect for the color you want to adjust. Within the frame is the range of effect Introduction Contents Color of the adjustment point selected in step 2 Preparing a Sample Click Basic Windows Range of upper and lower limit of luminosity Drag to move up or down Click The selected color is displayed as an adjustment point [ the color wheel.
4 Adjust the color. 5 Check the range of application. If you checkmark [Show affected area on images], the range of application of the adjusted color blinks on the image. Introduction Contents Preparing a Sample Basic Windows 6 Repeat steps 2 to 5 to adjust multiple colors. You can select and adjust colors for up to 100 spots.
Introduction Specifying the Color Directly Displaying the Adjustment Color List and its Functions In addition to specifying the adjustment point by clicking the color on the image (p.14), you can also specify the color directly on the color wheel or by entering the color value. In addition to displaying colors before and after adjustment, the adjustment color list (p.8) shows overlapped range of effect of adjusted colors, and has a checkbox for specifying whether applying adjusted colors or not.
Introduction Color Display Mode Adjusting the Gamma Characteristic for Luminosity You can select the color display mode which will be the basis for color adjustment from three options (HSL, Lab, or RGB) as well as checking values for adjusted colors. Switches the color display mode You can adjust the brightness and contrast for the luminosity of the entire image using the tone curve.
Saving the Adjustments as a Picture Style File Adjustments specified in the [Tool palette] (p.10 to p.17) are saved on your computer as an original Picture Style file (extension “.PF2” or “.PF3”). The adjustments are saved as a Picture Style file which is separate from the sample image, and the sample image used to perform the adjustments is not affected at all. Introduction Contents 1 Click the [ ] button. the file name and save destination and then 2 Specify click the [Save] button.
Using a Picture Style File Saved Picture Style files can be registered in the camera and applied to shot images. They can also be applied to RAW images using DPP. Registering a Picture Style File to the Camera Picture Style files saved on your computer can be registered to the “Camera that has a Picture Style function settings” (For information on whether your camera is equipped with the Picture Style function, refer to the camera’s Instruction Manual.) using EOS Utility and applied to shot images.
Preferences You can perform color management settings such as specifying the work color space for the sample image displayed in the main window, or setting the profile for the monitor. Exiting PSE Introduction In the main window, select the [File] menu [Exit]. PSE exits. Contents 1 Select the [Tools] menu [Preferences]. the required settings and then click the [OK] 2 Specify button. The [Preferences] window appears.
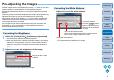
Reference Troubleshooting If PSE is not operating correctly, refer to the items below. Installation could not be completed correctly Select an administrator-level privilege ([Computer administrator], [Administrator], etc.) as a user setting. You cannot install the software if a user setting other than an administrator-level privilege is selected. For detailed information on selecting an administrator-level privilege, refer to your computer user’s manual.
About This Instruction Manual It is prohibited to reproduce, in whole or part, the contents of this Instruction Manual without permission. Canon may change without notice the software specifications and contents of this Instruction Manual. The software screens and displays printed in this Instruction Manual may differ slightly from the actual software. Please note that irrespective of the above-mentioned, Canon does not take responsibility for the outcome of the operation of the software.