
Picture Style Editor Ver.1.16 for Windows Instruction Manual


4
Introduction
Preparing
a Sample
Basic
Windows
Pre-adjustments
Image
Characteristics
Saving
Preferences
Reference
Contents
Preparing Sample Images
PSE uses a sample image to perform the various adjustments and save
the adjusted results as an original Picture Style file. For this reason, a
sample image (p.2) to be used for this purpose needs to be prepared in
advance and saved on your computer.
The settings performed in PSE are saved as a Picture Style file (p.18)
which is separate from the sample image, and the sample image used
to perform the adjustments is not affected at all.
Starting up PSE
Double-click the [Picture Style Editor] icon on the
desktop.
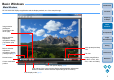
The main window (Description on the right) appears when PSE
starts up.
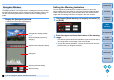
Opening a Sample Image
Open a sample image and perform various adjustments with that image
as a basis.
Noise reduction to the sample images may be applied by PSE included
in EOS Solution Disk Ver.26 or later.
Drag and drop a sample image to the main window.
The sample image is displayed in the main window with the
camera settings at the time of shooting.
The [Tool palette] appears.
Drag and drop
If you open an image as a sample image with PSE, the shot
settings on the camera will appear in the image. However, the
Auto Lighting Optimizer settings will not appear.
If you adjust a RAW image in DPP and then open it as a sample
image with PSE, the adjustments made in DPP will not appear in
the image.