
Operation Manual

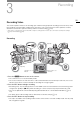

Recording Video
56
IMPORTANT
• Observe the following precautions while an access indicator is illuminated in red. Failure to do so may result in
permanent data loss.
- Do not open the card slot cover of the card being accessed and do not remove the card.
- Do not remove the power source or turn off the camera.
• Be sure to save your recordings regularly (A 161), especially after making important recordings. Canon shall
not be liable for any loss or corruption of data.
NOTES
NOTES
• If the power supplied to the camera is at or below the level set for the power level warning (A 199), the
camera will not start recording.
• If you record XF-AVC clips using the custom picture and metadata settings, those settings will be recorded
with the XF-AVC clip. For more details, refer to
Custom Picture Settings
(A 131) and
Using Metadata
(A 118).
• If the camera switches to the other CFast card while recording video due to the relay recording function
(A 52), the two parts (before/after the switch) will be recorded as separate clips.
• A single XF-AVC clip can be recorded continuously for up to 6 hours. At that point, a new clip will be created
automatically and recording will continue on a separate clip.
• You can use the [System Setup] > [Rec Operation Beep] setting to make the camera emit a sound
when you start/stop recording.
• If you set an assignable button to [Add
$
Mark] or [Add
%
Mark] (A 127), you can press the button to add
an
$
mark or
%
mark to the last XF-AVC clip recorded.
• When you use a commercially available lens adapter and the image on the screen is inverted, you can use the
[System Setup] > [Scan Reverse Rec] > [Setting] setting to return the image to the correct
orientation.
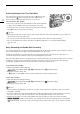
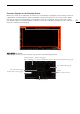
Key lock: Locking the camera’s controls
To activate the key lock function, press and hold the C button. After the countdown that appears on the
control display ends, all the physical controls (buttons, switches, etc.) will be locked except for the Q,
REC and C buttons*. This is useful in preventing settings from being changed due to inadvertently pressing
the camera’s buttons and controls. Press and hold the C button again for about 3 seconds to reactivate the
controls.
Even when the camera’s controls are locked, you can operate the camera using Browser Remote (A
170
),
an optional RC-V100 Remote Controller connected to the camera (A 123) or the controls on the lens. When
an optional OU-700 Remote Operation Unit is connected to the camera, you can select whether its controls
are locked along with those of the camera with the [System Setup] > [
C
Button] setting.
* You can also choose to lock the REC buttons using the [System Setup] > [REC Button] setting.