
Digital Photo Professional Ver.4.3 for Macintosh Instruction Manual


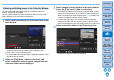
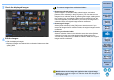

Table Of Contents
- Digital Photo Professional
- Introduction
- Downloading Images
- Viewing Images
- Organizing and Sorting Images
- Editing Images
- RAW Images
- Editing JPEG and TIFF Images
- Tool Palettes
- Editing with the Basic Adjustment Tool Palette
- Editing with the Tone Adjustment Tool Palette
- Editing with the Color Adjustment Tool Palette
- Editing with the Detailed Adjustment Tool Palette
- Editing with the Trimming/Angle Adjustment Tool Palette
- Editing with the Lens Correction Tool Palette
- Editing with the Dust Delete/Copy Stamp Tool Palette
- Setting Work Color Space
- Using the Soft-Proof Colors Function
- Saving Editing Results
- Re-Editing an Image
- Utilizing Adjustment Contents (Recipe)
- Adjusting by Comparing Multiple Images
- Editing Efficiently
- Compositing Images
- Creating HDR (High Dynamic Range) Images
- Transferring a RAW Image to Photoshop
- Customizing the Main Window Toolbar
- Printing Images
- Processing Large Numbers of RAW Images
- Remote Shooting
- Specifying Preferences
- Reference

96
3
Sorting
Images
1
2
4
5
Introduction
Contents
Downloading
Images
Viewing
Images
Printing
Images
Editing
Images
Reference/
Index
6
Processing
Large Numbers
of RAW Images
7
Remote
Shooting
8
Specifying
Preferences
You can gather selected images together in Collection folders for
viewing, comparison and editing.
You can gather images from several folders as well as from a single
folder, allowing you to work with them efficiently.
1
Click [+ Add collection] in the [Collection] area in the
main window.
A new collection folder is created in the [Collection] area.
Enter a name for the collection folder.
To create additional collection folders, repeat the operation. Up to
20 folders can be created.
2
Select the [File] Menu [Select collection], and
select a collection folder to gather images from the
collection folder names displayed.
Gathering and Editing Images in the Collection Window
3
Select images or image folders in the main window.
Select the [File] menu [Add to collection].
The images are added to the selected collection folder, and the
number of selected images in the collection folder is displayed.
When an image set to single-image display (p.21) is added, the
number of images is indicated as two images.
You can also add images to a collection folder by selecting
images and folders and then selecting [Add to collection] from
the menu that appears when you holding down the <control> key.
4
Select a collection folder in the [Collection] area.
Images in the selected folder are displayed.