
Picture Style Editor Ver.1.15 for Windows Instruction Manual


9
Introduction
Preparing
a Sample
Basic
Windows
Pre-adjustments
Image
Characteristics
Saving
Preferences
Reference
Contents
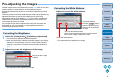
Pre-adjusting the Images
Sample images used in the adjustment process (p.2) which do not have
proper exposure or white balance can be adjusted using the
[Preliminary adjustment] window to correct their brightness and white
balance.
However, please remember that adjustments made with the [Preliminary
adjustment] window are merely pre-adjustments for performing
adjustments with the [Tool palette] (p.8). For this reason, adjustments
made with the [Preliminary adjustment] window are not saved in the
Picture Style file which you create.
If the sample image used for adjustments has proper exposure and
white balance, it is not necessary to make adjustments with the
[Preliminary adjustment] window.
1
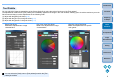
Select the [Tools] menu [Preliminary adjustment].
The [Preliminary adjustment] window appears.
When the [Preliminary adjustment] window appears, the display
switches to normal display, even if the main window display is
showing a comparison of images before and after adjustment
(p.6).
2
Adjust to correct the brightness of the image.
The adjustments are applied to the image.
Correcting the Brightness
Drag to the left or right
to adjust
Adjust to correct the white balance.
The adjustments are applied to the image.
Correcting the White Balance
Select the white balance
The color temperature slider
Select [Color temperature] from the white balance
list box, then drag the slider left or right
Click white balance
Click the [ ] button
and then click on a point
that is to be the standard
for white