Getting Started ENGLISH CEL-SW2SA210
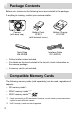
Package Contents Before use, make sure the following items are included in the package. If anything is missing, contact your camera retailer. Camera (with body cap) Battery Pack LP-E12 (with terminal cover) Neck Strap EM-200DB Battery Charger LC-E12E Interface Cable IFC-400PCU ● Printed matter is also included. ● For details on the lens included in the lens kit, check information on the camera package. ● A memory card is not included.
Manuals and Software Download camera and lens manuals and software from the following page. http://www.canon.com/icpd/ ● With a computer connected to the Internet, access the above URL. ● Access the site for your country or region. ● Adobe Reader is required to view the manuals. ● For instructions on downloading and installing the software, refer to the Camera User Guide, available for download. ● You may be requested to enter the serial number (body number) when downloading the manuals or software.
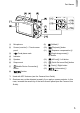
Part Names (1) Movie button (12) Terminal cover (2) Front dial (13) Lens lock pin (3) EF-M lens mount index (14) Memory card cover (4) Contacts (15) Lens release button (5) Shutter button (16) Lens mount (6) ON/OFF button (17) HDMITM terminal (7) Mode switch (18) Digital terminal (8) Flash (19) Tripod socket (9) Lamp (20) Battery cover (10) Strap mount (11) [ (Flash pop up)] switch 4 (21) DC coupler terminal cover
Part Names (1) Microphone (2) Screen (monitor)* / Touch-screen panel (9) 2 (10) [ (N-Mark)*1 (Playback)] button (4) Indicator (11) [ (Exposure compensation)] / [ (Single-image erase)] / Up button (5) Speaker (12) [ (AE lock)] / Left button (6) Strap mount (13) [ (Quick Set menu/Set)] button (7) [ (Mobile Device Connection)] button Focal plane mark (3) (8) [ ] button (14) [ (Flash)] / Right button (Information)] / (15) [ Down button *1 Used with NFC features (see the Camera User G
Part Names Lens EF-M Lens 6 (1) Focusing ring (2) Hood mount (3) Filter-mounting thread (4) Lens retraction switch (5) Lens mount index (6) Zoom ring (7) Lens retraction index (8) Zoom position index (9) Contacts
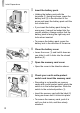
Initial Preparations 1 Attach the strap. ● Attach the included strap to the camera as shown. ● On the other side of the camera, attach the strap the same way. 2 Insert the battery pack. ● Remove the cover from the battery pack, align the marks on the battery pack and charger, and insert the battery pack by pushing it in (1) and down (2). 3 Charge the battery pack. ● Plug the power cord into the charger, then plug the other end into a power outlet.
Initial Preparations 5 Insert the battery pack. ● Holding the battery pack with the terminals (1) facing as shown, press the battery lock (2) in the direction of the arrow and insert the battery pack until the lock clicks shut. ● If you insert the battery pack facing the wrong way, it cannot be locked into the correct position. Always confirm that the battery pack is facing the right way and locks when inserted. ● To remove the battery pack, press the battery lock in the direction of the arrow.
Initial Preparations 9 Close the memory card cover. ● Close the cover in the direction shown until it clicks shut. 10 Turn the camera on. ● Press the ON/OFF button. ● The [Date/Time] screen is displayed. 11 Set the date and time. ● Press the [ ][ ] buttons to choose an item. ● Press the [ ][ date and time. ] buttons to specify the ● When finished, press the [ ] button. 12 Specify your home time zone. ● Press the [ ][ ] buttons to choose your home time zone. ● Press the [ ] button when finished.
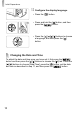
Initial Preparations 13 Configure the display language. ● Press the [ ] button. ● Press and hold the [ ] button, and then press the [ ] button. ● Press the [ ][ ][ ][ ] buttons to choose a language, and then press the [ ] button. Changing the Date and Time To adjust the date and time once you have set it, first press the [ ] button and then press the [ ][ ] buttons to choose the [ 2] tab.
Initial Preparations Attaching a Lens The camera is compatible with EF-M lenses. If you use Mount Adapter EF-EOS M, you can also use EF and EF-S lenses (see the Camera User Guide). 1 2 Make sure the camera is off. Remove the caps. ● Remove the lens cap and body cap by turning them in the directions shown. 3 Attach the lens. ● Align the mount indexes (the white dots) on the lens and camera, and then turn the lens in the direction shown until it clicks into place. 4 Remove the front lens cap.
Initial Preparations ● To retract the lens, hold the lens retraction switch toward [ ] as you turn the zoom ring. Align the lens retraction index with the zoom position index, and then release the switch. ● To zoom, turn the zoom ring on the lens with your fingers. ● If you want to zoom, do it before focusing. Turning the zoom ring after achieving focus may throw off the focus slightly. ● To protect the lens, keep the lens cap on when the camera is not in use.
Initial Preparations ● Since the image sensor size is smaller than the 35mm film format, it will look like the lens focal length is increased by approx. 1.6x. For example, the focal length of a 15-45mm lens is approximately equivalent to a focal length of 24-72mm on a 35mm camera. Lens Instruction Manuals Download lens manuals from the following page. http://www.canon.
Trying the Camera Out Shooting For fully automatic selection of the optimal settings for specific scenes, simply let the camera determine the subject and shooting conditions. 1 Turn the camera on and enter [ mode. ] ● Press the ON/OFF button. ● Set the mode switch to [ 2 ]. Compose the shot. ● When using a zoom lens, zoom by turning the zoom ring on the lens with your fingers. 3 Shoot. Shooting Still Images ● Press the shutter button lightly.
Trying the Camera Out Viewing After shooting images or movies, you can view them on the screen as follows. 1 Enter Playback mode. ● Press the [ 2 ] button. Choose images. ● To view the previous image, press the [ ] button. To view the next image, press the [ ] button. ● Movies are identified by a [ To play movies, go to step 3. 3 ] icon. Play movies. ● Press the [ ] button, press the [ ][ ] buttons to choose [ ], and then press the [ ] button again.
System Map Included Accessories Neck Strap EM-200DB* Interface Cable IFC-400PCU* Neck Strap EM-E2 Battery Pack LP-E12* (with terminal cover) Body Jacket EH28-CJ Face Jacket EH28-FJ * Also available for purchase separately.
System Map Connect Station CS100 EF-M Lenses EF Lenses EF-S Lenses Mount Adapter EF-EOS M HDMI Cable HTC-100 TV/Video System PictBridge-Compatible Printers USB Port SD/SDHC/SDXC memory cards Card Reader Card Slot Computer 17
Use of genuine Canon accessories is recommended. This product is designed to achieve excellent performance when used with genuine Canon accessories. Canon shall not be liable for any damage to this product and/or accidents such as fire, etc., caused by the malfunction of non-genuine Canon accessories (e.g., a leakage and/or explosion of a battery pack). Please note that any repairs your Canon product may require as a result of such malfunction are not covered under warranty and will incur a fee.
Disclaimer ● Unauthorized reproduction of this guide is prohibited. ● All measurements based on Canon testing standards. ● Information subject to change without notice, as are product specifications and appearance. ● Illustrations and screenshots in this guide may differ slightly from the actual equipment. ● The above items notwithstanding, Canon cannot be held liable for any loss arising from the use of this product.
- Interface Cable IFC-200U - Interface Cable IFC-500U - HDMI Cable HTC-100 20
The model number is PC2179 (including WLAN module model WM227. To identify your model, check the label on the bottom of the camera for a number beginning with PC. Countries and Regions Permitting WLAN Use - Use of WLAN is restricted in some countries and regions, and illegal use may be punishable under national or local regulations. To avoid violating WLAN regulations, visit the Canon website to check where use is allowed.