Getting Started ENGLISH CEL-SX8AA210
Manuals and Software For more information about the camera, look for feature guidance displayed on the camera, or refer to the Advanced User Guide that can be downloaded from the Canon website. Download camera and lens manuals and software from the following page. http://www.canon.com/icpd/ • With a computer connected to the Internet, access the above URL. • Access the site for your country or region. • Adobe Reader is required to view the manuals.
Preliminary Notes and Legal Information • Take and review some test shots initially to make sure the images were recorded correctly. Please note that Canon Inc., its subsidiaries and affiliates, and its distributors are not liable for any consequential damages arising from any malfunction of a camera or accessory, including memory cards, that result in the failure of an image to be recorded or to be recorded in a way that is machine readable.
Safety Instructions • Be sure to read these instructions in order to operate the product safely. • Follow these instructions to prevent injury or harm to the operator of the product or others. WARNING: Denotes the risk of serious injury or death. • Keep the product out of the reach of young children. A strap wrapped around a person’s neck may result in strangulation. The parts or provided items of cameras or accessories are dangerous if swallowed. If swallowed, seek immediate medical assistance.
Safety Instructions • Do not touch the battery charger or AC adapter connected to a power outlet during lightning storms. • Do not place heavy objects on the power cord. Do not damage, break or modify the power cord. • Do not wrap the product in cloth or other materials when in use or shortly after use when the product is still warm in temperature. • Do not unplug the product by pulling the power cord. • Do not leave the product connected to a power source for long periods of time.
Initial Preparations 2 Charge the battery. Attaching the Strap 1 Attach the included strap to the strap mount. Lamp colors - Charging: Orange - Fully charged: Green 3 Remove the battery. Charging the Battery 1 Insert the battery in the charger. Preparing a Card Use the following cards (sold separately), in any capacity. • SD memory cards*1 • SDHC memory cards*1*2 • SDXC memory cards*1*2 *1 Cards conforming to SD standards. However, not all cards have been verified to work with the camera.
Initial Preparations Inserting/Removing the Battery Inserting/Removing the Card 1 Open the cover. 1 Open the cover. 2 Insert the battery. 2 Insert the card. (1) Removal Removal 3 Close the cover. 3 Close the cover.
Initial Preparations Attaching a Lens 4 Prepare to shoot. 1 Turn the camera off. (2) (1) Press (1) as you turn (2) slightly, then release (1). Make sure the screen is blank. 2 Remove the lens and camera cap. 3 Attach the lens. Align the white mount index on the lens with the white mount index on the camera and turn the lens as shown by the arrow until it clicks in place. 8 Turn (2) a little more until it clicks.
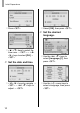
Initial Preparations Detaching a Lens 1 Turn the camera off. Setting the Date, Time, Time Zone, and Language 1 Turn the camera on. Make sure the screen is blank. 2 Detach the lens. (3) 2 Set the time zone. (2) (1) Press (1) as you turn the lens toward (2) until it stops. Remove the lens toward (3). 3 Attach the lens and camera cap. Use the keys to select the time zone, then press <0>.
Initial Preparations Press <0>. Select [OK], then press <0>. 4 Set the desired language. keys to select the time zone → <0> → keys to select [OK] → <0> 3 Set the date and time. keys to navigate → <0> → keys to adjust → <0> 10 Use the keys to select [LanguageK], then press <0>. Use the cross keys to select a language, then press <0>.
Trying the Camera 4 Out Focus (press halfway). Shooting 1 Remove the lens cap and turn the camera on. The camera beeps twice after 2 Enter mode. focusing. AF points are displayed around positions in focus. Using the flash 3 Zoom in or out, as needed. If [D] blinks, use the lever to raise the built-in flash. Turn the zoom ring on the lens with your fingers as you watch the screen.
Trying the Camera Out 5 Shoot (press fully). 2 Select an image. Recording movies Movies are labeled with [oREC] is displayed during recording. To stop recording, press the movie shooting button again. [s1]. Playing movies Viewing 1 Press the button. Press <0> twice. Use the keys to adjust the volume.
Trademarks and Licensing • The SDXC logo is a trademark of SD-3C, LLC. Disclaimer • Unauthorized reproduction of this guide is prohibited. • Illustrations and screenshots in this guide may differ slightly from the actual equipment.
The model number is PC2367 (including WLAN module and BLE module model WM601). To identify your model, check the label on the bottom of the camera or behind the tilt-up screen for a number beginning with PC. Countries and Regions Permitting Wireless Function Use - Use of wireless function is restricted in some countries and regions, and illegal use may be punishable under national or local regulations. To avoid violating wireless regulations, visit the Canon website to check where use is allowed.