
User manual
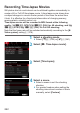


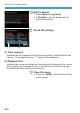
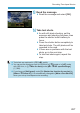


Table Of Contents
- Introduction
- Preparation and Basic Operations
- Basic Shooting
- Fully Automatic Shooting (Scene Intelligent Auto)
- Full Auto Techniques (Scene Intelligent Auto)
- Special Scene Mode
- Shooting Portraits
- Shooting Group Photos
- Shooting Landscapes
- Shooting Moving Subjects
- Photographing Children
- Panning
- Shooting Close-ups
- Shooting Food
- Shooting Night Portraits (With a Tripod)
- Shooting Night Scenes (Handheld)
- Shooting Backlit Scenes
- Shooting Quiet Scenes
- Cautions for the
Modes
- Creative Zone
- Shooting
- Shooting Still Photos
- Tab Menus: Still Photo Shooting
- Setting Image Quality
- Setting Cropping/Aspect Ratio
- Setting the Image Review Time
- Correction of Lens Aberrations due to Optical Characteristics
- Setting the Desired Exposure Compensation
- Auto Exposure Bracketing (AEB)
- Setting the ISO Speed for Still Photos
- Auto Correction of Brightness and Contrast
- Highlight Tone Priority
- Setting the Metering Timer
- Exposure Simulation
- Setting the White Balance
- White Balance Correction
- Setting the Color Space
- Selecting a Picture Style
- Customizing a Picture Style
- Registering a Picture Style
- Setting Noise Reduction
- Appending Dust Delete Data
- Shooting with the Touch Shutter
- Multiple Exposures
- HDR (High Dynamic Range) Shooting
- Interval Timer Shooting
- Reducing Flicker
- Selecting the Display Speed for High-Speed Continuous Shooting
- Card Reminder
- Setting Touch & Drag AF
- Selecting the AF Operation
- Selecting the AF Method
- Focusing on People’s Eyes
- Setting Continuous AF
- Setting Lens Electronic MF
- Setting AF-Assist Beam Firing
- Focus Bracketing
- Selecting the Drive Mode
- Using the Self-Timer
- Selecting the Metering Mode
- Locking the Exposure for Shooting (AE Lock)
- Focusing Manually
- Remote Control Shooting
- Using a Remote Switch
- Flash Photography
- Setting the Flash Function
- General Notes on Still Photo Shooting
- Recording Movies
- Shooting Still Photos
- Playback
- Tab Menus: Playback
- Image Playback
- Magnifying Images
- Index Display (Multiple-Image Display)
- Playing Back Movies
- Editing a Movie’s First and Last Scenes
- Grabbing a Frame from 4K Movies or 4K Time-Lapse Movies
- Playback on a TV
- Protecting Images
- Rotating Images
- Erasing Images
- Digital Print Order Format (DPOF)
- Specifying Images for a Photobook
- Processing RAW Images with the Camera
- Applying Your Favorite Effects (Creative Assist)
- Selecting the Type of RAW Image Processing
- Editing Video Snapshot Albums
- Cropping JPEG Images
- Resizing JPEG Images
- Setting Ratings
- Slide Show (Auto Playback)
- Filtering Images for Playback
- Jump Display (Jumping Through Images)
- Customizing Playback Information Display
- Displaying the Highlight Alert
- Displaying AF Points
- Displaying a Grid
- Specifying Initial Image Display When Playback Begins
- Setting the Initial Magnification Ratio and Position
- Set-up
- Tab Menus: Set-up
- Creating and Selecting a Folder
- File Numbering Methods
- Setting the Auto Rotation of Vertical Images
- Formatting Memory Cards
- Displaying the Shooting Mode Guide
- Displaying the Feature Guide
- Setting Eco Mode
- Setting Power-Saving Features
- Adjusting the Screen Brightness
- Setting the Date, Time, and Time Zone
- Setting the Interface Language
- Setting the Video System
- Setting the Touch Control Response
- Disabling Beeps for Camera Operations
- Checking the Battery Information
- Sensor Cleaning
- Setting the HDMI Output Resolution
- RAW Playback on an HDR TV
- Customizing Information Displayed When Shooting
- Setting a Priority for Shooting Display Performance
- Setting the Viewfinder Display Format
- Setting the Display Mode
- Customizing Shutter Button Functionality for Movie Recording
- Help
- Setting Wireless Features
- Geotagging Images
- Setting the Multi-Function Lock
- Registering Custom Shooting Modes
- Reverting the Camera to the Default Settings
- Setting Copyright Information
- Checking Other Information
- Wi-Fi (Wireless Communication) Functions
- What You Can Do via Wi-Fi (Wireless Communication) Functions
- Connecting to a Smartphone via Wi-Fi
- Connecting to a Computer via Wi-Fi
- Connecting to a Printer via Wi-Fi
- Sending Images to a Web Service
- Wi-Fi Connection via Access Points
- Reconnecting via Wi-Fi
- Changing or Deleting Connection Settings
- Clearing Wireless Communication Settings to Default
- View Info Screen
- Responding to Error Messages
- Wireless Communication Function Notes
- Security
- Checking Network Settings
- [Wireless communication settings] Screen
- [Wi-Fi settings] Screen
- Virtual Keyboard Operation
- Setting the IP Address Manually
- Wi-Fi/Bluetooth Status Display
- Custom Functions / My Menu
- Reference

269
Recording Time-lapse Movies
o
Using a tripod is recommended.
o
Taking test shots as in step 14 and recording test movies for time-lapse
movies beforehand is recommended.
o
The movie’s eld of view coverage for both the 4K and Full HD time-lapse
movie recording is approx. 100%.
o
To cancel the time-lapse movie recording in progress, either press the shutter
button completely or press the movie shooting button. The time-lapse movie
shot so far will be recorded on the card.
o
If the time required for shooting is more than 24 hours but not more than
48 hours, “2 days” will be indicated. If three or more days are required, the
number of days will be indicated in 24-hour increments.
o
Even if the time-lapse movie’s playback time is less than 1 sec., a movie le
will still be created. For [Playback time], “00'00"” will be displayed.
o
If the shooting time is long, using the household power outlet accessories (sold
separately) is recommended.
o
YCbCr 4:2:0 (8-bit) color sampling and the Rec. ITU-R BT.709 color space are
used for 4K/Full HD time-lapse movies.
o
If the card does not have enough free space to record the set number of shots,
[Playback time] will be displayed in red. Although the camera can continue
shooting, the shooting will stop when the card becomes full.
o
If the movie le size exceeds 4 GB with the [No. of shots] settings and the
card is not formatted in exFAT (
=
368), [Play back time] will be displayed
in red. If you keep shooting in this condition and the movie le size reaches
4 GB, the time-lapse movie recording will stop.