
Operation Manual


Table Of Contents
- Using this guide
- Important safety instructions
- For your safety (Australia only)
- Caution (New Zealand only)
- SETTING UP
- PREPARING TO USE YOUR FAX
- Main components of your fax
- Fax controls - the operation panel
- Guidelines for entering numbers, letters, and symbols
- Setting the TEL LINE TYPE
- Dialing through a switchboard (PBX)
- Registering sender information
- Registering one-touch speed dialing numbers and names
- Registering coded speed dialing numbers and names
- Registering UCanTalk voice tags
- DOCUMENTS AND PAPER
- MAKING COPIES
- SENDING DOCUMENTS
- RECEIVING DOCUMENTS
- USING TAM MODE (FAX-B840 only)
- SETTINGS AND ACTIVITY REPORTS
- SOLUTIONS TO COMMON PROBLEMS
- Specifications
- Index
9-6
• Discard the old BJ cartridge immediately according to the local laws and regulations for disposal of
consumables. You may want to place it in a plastic bag to keep any residual ink from spilling.
• Spilled ink can stain any surface; protect yourself and your work area.
4
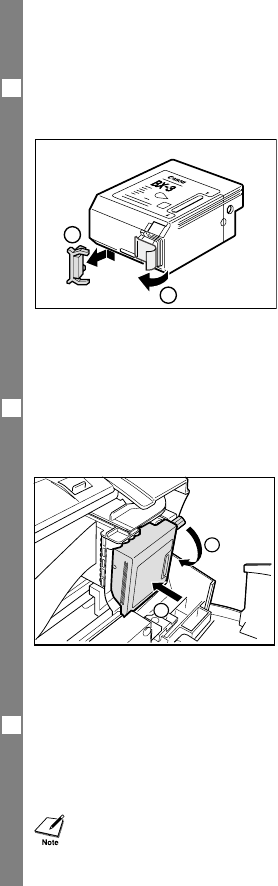
Remove the new BJ cartridge from its package, then remove the orange protective cap a
and tape
b.
• Discard the cap and tape. Never attempt to reattach them to the BJ cartridge print head.
• Install the BJ cartridge immediately after removing the cap and tape.
• Spilled ink can stain any surface; protect yourself and your work area.
5
With the label facing outwards, and align the slot in the cartridge with the yellow post in
the fax, insert the BJ cartridge into the cartridge holder
a. Lower the cartridge lock lever
b until you hear a click to lock the cartridge in place.
The yellow post (BJ cartridge guide) should be visible through the slot. The BJ cartridge tilts slightly to
the left before lowering the cartridge lock lever.
6
Close the printer cover.
If the AUTO TEST PRINT setting is set to ON:
The fax automatically prints a test page.
The fax prints a test page every time you insert a BJ cartridge.
1
2
2
1
• Load the paper in the multi-purpose tray before you replace the BJ cartridge.
• You can turn off automatic test printing by changing the AUTO TEST PRINT setting. See
SYSTEM SETTINGS, p. 8-5.