
Service manual


3-13
LASER CLASS 1060P Chapter 3: Assembly and Disassembly
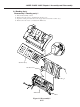
Disassembly 4. Modular board/PCNT board/Power Supply Unit and Main
Frame
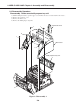
Modular board
1) Perform disassembly 1 through 3.
2) Remove the two screws a, and detach the modular board.
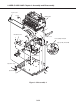
Main Frame
1) Perform disassembly 1 through 3.
2) Remove the lever, front cover, and cable cover.
3) Disconnect the cable b connected to the switch lever and the laser scanner cable c and sensor cable d;
then, disconnect the cables e and f connected to the Power supply unit cable g and the motor cable h.
4) Remove the four screws i, and detach the Main frame.
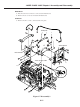
Power Supply Unit
1) Perform disassembly 1 through 3.
2) Remove the Main frame.
3) Disconnect the cables j, k and l connected to the power supply unit.
4) Remove the threes screws m and the screw n; then, detach the power supply unit.
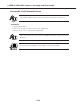
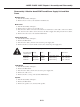
Each fuse has a different rating, so please be careful about the rating when you replace a fuse.
Recommended Rating Name Type Dimensions
manufacturer
Bussmann 125V, 5A GMC5A Medium Time-Delay 0.197" × 0.788"
Littlefuse 125V, 5A 237005 Medium-Acting 0.197" × 0.788"
Littlefuse 125V, 10A 237010 Medium-Acting 0.197" × 0.788"
PCNT Board
1) Perform disassembly 1 through 3.
2) Remove the Main frame.
3) Disconnect the cables j and k connected to the power supply unit.
4) Remove the cable cover o.
5) Remove the three screws p, and detach the PCNT board.
Speaker
1) Perform disassembly 1 through 3.
2) Remove the Main frame.
3) Remove the speaker cover, and detach the speaker.