CEL-SP3PA281 Digitale Video Camcorder Gebruiksaanwijzing
Belangrijke gebruiksinstructies Inleiding WAARSCHUWING! VOORKOM ELEKTRISCHE SCHOKKEN. VERWIJDER DAAROM DE AFDEKKING (OF ACHTERZIJDE) NIET. IN HET APPARAAT BEVINDEN ZICH GEEN ONDERDELEN DIE DE GEBRUIKER ZELF MAG OF KAN REPAREREN. LAAT DIT DOEN DOOR GEKWALIFICEERD ONDERHOUDSPERSONEEL. WAARSCHUWING! VOORKOM BRAND OF ELEKTRISCHE SCHOKKEN. STEL DIT PRODUCT DAAROM NIET BLOOT AAN REGEN OF VOCHT. VOORZICHTIG: VOORKOM ELEKTRISCHE SCHOKKEN EN STORENDE INTERFERENTIES. GEBRUIK DAAROM ALLEEN DE AANBEVOLEN ACCESSOIRES.
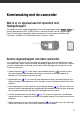
Kennismaking met de camcorder Wat is er zo speciaal aan het opnemen met flashgeheugen? Uw video’s en foto’s worden opgeslagen in het interne geheugen (alleen / ) of op een geheugenkaart (SD- of SDHC-kaart). Opnames maken met het flashgeheugen houdt in dat er geen bewegende delen aanwezig zijn in de opname-eenheid van de camcorder. Hierdoor is de camcorder kleiner, lichter en sneller.
Inhoudsopgave Inleiding ________________________________ 3 8 10 10 11 13 Kennismaking met de camcorder Wat u moet weten over deze handleiding Overzicht Meegeleverde accessoires en CD-ROM’s Overzicht van bedieningselementen Schermgegevens Voorbereidingen __________________________ 16 16 18 19 21 21 22 23 25 25 25 26 27 27 27 28 28 4 Beginnen De accu opladen De accessoires voorbereiden De stand en helderheid van het LCD-scherm bijstellen Basisbediening van de camcorder Bedieningsmodi Joystick en jo
Inhoudsopgave Video ____________________________________ 30 30 31 31 33 34 34 35 36 37 38 39 40 40 41 43 43 45 46 46 47 48 49 49 50 51 51 52 54 Elementaire opnamefuncties Video opnemen De videokwaliteit selecteren (opnamemodus) Zoomen: Optische, Geavanceerde en Digitale zoom Snelstartfunctie (Quick Start) Elementaire weergavefuncties Video afspelen Selecteren welke opnamen u wilt afspelen Scènes aan de hand van de opnamedatum selecteren Het begin voor het afspelen selecteren op de filmtijdlijn Vooraf
Foto’s ___________________________________ 55 55 55 56 Elementaire opnamefuncties Foto’s maken De grootte en kwaliteit van foto’s selecteren Een foto wissen direct nadat deze is gemaakt 57 Elementaire weergavefuncties 57 59 59 Foto’s bekijken Foto’s tijdens weergave vergroten Foto’s verwijderen 61 61 61 62 63 63 63 64 66 Aanvullende functies Histogramweergave Foto’s beveiligen / Foto’s kopiëren Andere functies voor het maken van foto’s Foto’s afdrukken Foto’s afdrukken De afdrukinstellingen selecte
Inhoudsopgave Aanvullende informatie ______________________ 77 77 79 85 85 89 97 97 100 101 101 102 Bijlage: Menu-opties - Overzicht FUNC.
Inleiding Wat u moet weten over deze handleiding Bedankt dat u hebt gekozen voor de Canon LEGRIA FS37/FS36/FS307/FS306/ FS305*. Neem deze handleiding zorgvuldig door voordat u de camcorder in gebruik neemt en bewaar de handleiding op een gemakkelijk bereikbare plaats, zodat u deze later altijd kunt raadplegen. Mocht uw camcorder niet goed werken, raadpleeg dan de tabel Problemen oplossen ( 85). * De verkrijgbaarheid verschilt per regio.
Namen van andere toetsen en schakelaars dan die van de joystick worden aangeduid binnen een “toets”-kader. Bijvoorbeeld FUNC. . Vierkante haakjes [ ] worden gebruikt voor menu-opties zoals die op het scherm worden weergegeven. In tabellen in deze handleiding is de standaardwaarde vet afgedrukt. Bijvoorbeeld [AAN], [UIT] In deze handleiding wordt de pijl gebruikt om menuselecties in te korten. Raadpleeg Gebruik van de menu’s ( 23) voor een gedetailleerde beschrijving hiervan.
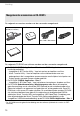
Inleiding Overzicht Meegeleverde accessoires en CD-ROM’s De volgende accessoires worden met de camcorder meegeleverd. Compacte netadapter CA-570 (incl. netsnoer) Accu BP-808 Stereovideokabel STV-250N USB-kabel IFC-300PCU Gele • Rode • Witte stekkers Beknopte handleiding De volgende CD-ROM’s en software worden met de camcorder meegeleverd.
Overzicht van bedieningselementen Aanzicht linkerzijde Aanzicht rechterzijde RESET-knop ( 88) VIDEO SNAP (Video Snapshot)-toets ( 43)/ (afdrukken/delen)-toets ( 64) DISP. (schermgegevens)-toets ( 50, 61)/ BATT.
Inleiding Achteraanzicht Bovenaanzicht Onderaanzicht LCD-scherm ( 19) ON/OFF(CHG) (aan/uit- en oplaad)indicator ( 17) Camerakeuzewiel ( 21) Start/Stop-toets ( 30) (camera/afspelen)-toets ( 22) PLAYLIST-toets ( 51)/ Inzoom T (telepositie)-toets ( 31) (stop)-toets ( 34)/ Uitzoom W (groothoek)-toets ( 31) / (afspelen/pauze)-toets ( 34)/ START/STOP-toets ( 30) FUNC.
Schermgegevens Films opnemen Films afspelen (Tijdens afspelen) Bedieningsmodus ( 21) Opnameprogramma ( 40, 41) Witbalans ( 48) Beeldeffecten ( 49) Digitale effecten ( 49) Opnamemodus ( 31) Handmatige scherpstelling ( 47) Beeldstabilisator ( 79) Functie vooropname ( 45) Opname/afspeelfunctie ( 15) Aantal opgenomen scènes (opnamepauze)/Tijdscodering (uren : minuten : seconden, tijdens het opnemen) Resterende opnameduur Op de geheugenkaart / In het interne geheugen Resterende tijd batterijgebruik ( 15) Winds
Inleiding Foto’s maken Foto’s weergeven 14 Zoom ( 31), Belichting ( 46) Opnameprogramma ( 40, 41) Witbalans ( 48) Beeldeffect ( 49) Digitaal effect ( 49) Fotokwaliteit/grootte ( 55) Handmatige scherpstelling ( 47) Resterende tijd batterijgebruik ( 15) Aantal nog te maken foto’s ( 15) Op de geheugenkaart / In het interne geheugen Zelfontspanner ( 46) AF-kader ( 80) Joystickaanduiding ( 22) Mini-videolamp ( 43) Scherpstellings- en belichtingsvergrendeling ( 55) Camcordertrillingswaarschuwing ( 80) Fotonum
Opname/afspeelfuncties Opnemen, Opnamepauze, Afspelen, Afspeelpauze, Versneld afspelen, Versneld achteruit afspelen, Vertraagd afspelen, Vertraagd achteruit afspelen Resterende opnameduur Als er geen ruimte meer beschikbaar is in het geheugen, zal [ EINDE] (intern geheugen, alleen / /) of [ EINDE] (geheugenkaart) worden getoond en zal het opnemen stoppen. , Resterende tijd batterijgebruik • Mogelijk wordt de resterende accucapaciteit niet nauwkeurig aangegeven.
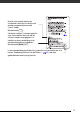
Voorbereidingen In dit hoofdstuk volgt een beschrijving van de elementaire bedieningshandelingen, zoals het navigeren door menu’s, en de instellingen die u de eerste keer moet verrichten. Zo raakt u snel vertrouwd met uw camcorder. Beginnen 2 Steek de stekker van het netsnoer in een stopcontact. 3 Sluit de compacte netadapter aan op het DC IN-aansluitpunt van de camcorder. 4 Schuif de afdekking van het accucompartiment naar de achterkant van de camcorder en open het compartiment.
ON/OFF(CHG)-indicator 7 Het laden begint zodra de camcorder is uitgeschakeld. • De ON/OFF(CHG)-indicator begint in rood te knipperen. De indicator gaat uit als de accu is opgeladen. • Indien de indicator snel knippert, raadpleeg dan Problemen oplossen ( 85). ZODRA DE ACCU VOLLEDIG OPGELADEN IS 1 Koppel de compacte netadapter van de camcorder los. 2 Trek de stekker uit het stopcontact en het netsnoer uit de compacte netadapter.
Voorbereidingen spanningsomzetters bij reizen naar andere continenten of op speciale stroombronnen zoals die in vliegtuigen en schepen, DC-AC-omzetters, etc. Anders kan het apparaat uitvallen of te heet worden. uw duim de bereiken. Start/Stop -toets kunt DE HANDGREEPRIEM VERWIJDEREN OPMERKINGEN • Zet de camcorder uit voordat u de accu oplaadt. De accu zal niet worden opgeladen wanneer de camcorder aan staat.
U kunt de polsriem uit oogpunt van bedieningsgemak en bescherming ook bevestigen aan het riembevestigingspunt op de handgreepriem. EEN SCHOUDERRIEM BEVESTIGEN De stand en helderheid van het LCDscherm bijstellen Het LCD-paneel draaien Open het LCD-paneel 90 graden • U kunt het paneel 90 graden naar beneden draaien. • U kunt het paneel 180 graden naar de lens draaien. 180 graden draaien van het LCD-paneel komt van pas als u uzelf wilt opnemen met gebruik van de zelfontspanner.
Voorbereidingen beeld en betekent niet dat er problemen zijn. LCD-achtergrondverlichting U kunt de helderheid van het scherm instellen op gedimd, normaal of helder. Om het scherm te dimmen, schakel [LCD-DIMMER] in (s 81). Om te schakelen tussen normaal en helder of om [LCD-DIMMER] uit te schakelen, voert u de volgende handelingen uit. Met de camcorder ingeschakeld, houdt u langer dan 2 seconden DISP. ingedrukt. Herhaal de handeling als u wilt schakelen tussen normaal en helder.
camcorder-instellingen naar eigen voorkeur kunt aanpassen. Basisbediening van de camcorder Bedieningsmodi De bedieningsmodus van de camcorder wordt bepaald door de stand van de -toets en de stand van het programmakeuzewiel. In deze handleiding betekent dat u de functie in de getoonde bedieningsmodus kunt gebruiken en betekent dat de functie niet beschikbaar is. Bekijk de volgende tabel voor een overzicht van de bedieningsmodi.
Voorbereidingen toegang tot de menu’s en kunt naar eigen voorkeur de instellingen aanpassen. Ook in deze modus krijgt u via de camcorder ondersteuning voor de instellingen. U kunt bijvoorbeeld de opnameprogramma’s voor speciale scènes gebruiken ( 40) om in één keer een optimale instelling te kiezen voor speciale omstandigheden tijdens een opname.
u verdere aanpassingen doen (aangeduid met kleine pijlen). Tijdens de afspeelstand selecteert u met ( ) een “rij” functies en drukt u op om toegang te krijgen tot de middelste functie of verplaatst u de joystick ( ) naar links of naar rechts om een functie links of rechts van de rij te kiezen. In het FUNC.-menueen optie selecteren in de opnamestand In elke modus zal na een aantal seconden de joystickaanduiding weer minimaal worden, maar u kunt nog steeds gebruik maken van de gekozen optie.
Voorbereidingen • Druk ( ) op de joystick in om terug te keren naar het menukeuzescherm (stap 3). Een optie selecteren in de instellingsmenu’s 1 2 Druk op FUNC. . 3 Selecteer in de linkerkolom met ( ) het gewenste menu en druk op . De titel van het geselecteerde menu verschijnt aan de bovenzijde van het scherm en daaronder ziet u de lijst met opties. 4 Selecteer met ( ) de optie die u wilt wijzigen en druk op . • De oranje keuzebalk geeft de momenteel geselecteerde menuinstelling aan.
Eerste instellingen De datum en tijd instellen U moet de datum en tijd van de camcorder instellen voordat u deze kunt gebruiken. Het [DATE/TIMEDATUM/TIJD] -scherm zal automatisch verschijnen als de klok niet is ingesteld. schermen verschijnen de datum en tijd als dag-maand-jaar (bijvoorbeeld [1.JAN.2010 12:00 AM]). De datumnotatie kunt u wijzigen ( 84). • U kunt de datum/tijd ook later wijzigen (op een ander moment dan tijdens de eerste instellingen). Het [DATE/TIME-DATUM/ TIJD]-scherm openen: FUNC.
Voorbereidingen ALS U OP REIS BENT OPMERKINGEN • Als u per ongeluk de taal hebt veranderd, selecteer het menuonderdeel met de -markering en wijzig de instelling. • De symbolen en die in sommige menuschermen verschijnen, hebben betrekking op de namen van toetsen op de camcorder en veranderen niet, ongeacht de taal die is geselecteerd. De tijdzone wijzigen Kies de tijdzone die bij uw locatie past. De standaardinstelling is Parijs. ( DE EIGEN TIJDZONE INSTELLEN FUNC. [ [ MENU] DAT/TIJD SETUP] [T.
Bij gebruik van een geheugenkaart Een geheugenkaart plaatsen en verwijderen U moet een geheugenkaart altijd eerst initialiseren voordat u deze met de camcorder kunt gebruiken ( 28). Geheugenkaarten die u met de camcorder kunt gebruiken U kunt met deze camcorder voor het maken van films en foto’s gebruik maken van SDHC (SD hoge capaciteits)geheugenkaarten en SDgeheugenkaarten. Deze zijn in de winkel verkrijgbaar.
Voorbereidingen 3 4 Steek de geheugenkaart in zijn geheel, met het label naar de achterkant van de camcorder gericht, recht in de geheugenkaartsleuf totdat de kaart vastklikt. Sluit de afdekking en schuif die voorzichtig in de richting van de lens totdat u een klik hoort. Forceer de afdekking niet om deze te sluiten als u de geheugenkaart niet op de juiste wijze hebt geplaatst. BELANGRIJK Geheugenkaarten hebben een voor- en achterzijde die van elkaar verschillen.
/ Het interne geheugen is in de fabriek al geïnitialiseerd. ( 21) Opties [INITIALISEREN] Hiermee wist u de bestandstoewijzingstabel maar de opgeslagen gegevens worden niet fysiek gewist. [COMPL.INIT.] Wist alle gegevens volledig. / FUNC. [ MENU] [ GEHEUGEN OPER.] [INITIALISEREN] De te initialiseren geheugenkaart Initialisatiemethode [JA]* [OK] FUNC. / / FUNC. [ MENU] [ GEHEUGEN OPER.] [INITIALISEREN] Initialisatiemethode [JA]* [OK] FUNC.
Video In dit hoofdstuk vindt u functies die te maken hebben met het maken van films, inclusief het opnemen, het afspelen en bewerken van het geheugen. NADAT U KLAAR BENT MET OPNEMEN Elementaire opnamefuncties 1 Controleer of de ACCESSindicator uit staat. 2 Zet de camcorder uit. 3 Sluit het LCD-paneel. Video opnemen BELANGRIJK ( 21) Neem de onderstaande voorschriften in acht wanneer de ACCESS-indicator brandt of knippert.
OPMERKINGEN De videokwaliteit selecteren (opnamemodus) • De camcorder maakt gebruik van een variabele bit rate (VBR) om video te coderen; de feitelijke opnameduur zal daarom afhangen van de inhoud van de scènes. • De camcorder onthoudt de laatst gebruikte instelling, zelfs wanneer u de camcorder in de -modus zet. De camcorder heeft 3 opnamemodi. Door de opnamemodus te wijzigen, verandert ook de resterende opnametijd in het geheugen.
Video beschikbaar; in de -modus is alleen de optische zoom beschikbaar. Gebruik van de zoom ( 21) Verplaats de zoomregelaar naar T als u wilt inzoomen (telefoto). Druk zachtjes voor een langzame zoom; druk harder voor een snellere zoom. U kunt [ZOOMSNELHEID] ( 79) ook instellen op een van de vaste snelheden (3 is het snelst, 1 het langzaamst). OPMERKINGEN W Uitzoomen T Inzoomen Verplaats de zoomregelaar naar W als u wilt uitzoomen (groothoek).
zoomsnelheid constant ingesteld staan op [ SNELHEID 3]. BELANGRIJK Verwijder de stroombron niet tijdens de standby-modus (terwijl de ON/OFF(CHG)indicator in oranje brandt). Snelstartfunctie (Quick Start) OPMERKINGEN Als u het LCD-paneel sluit terwijl de camcorder ingeschakeld is, komt de camcorder in de standby-modus. In de standby-modus verbruikt de camcorder slechts de helft van de stroom die wordt gebruikt voor het maken van opnamen, waardoor u bij gebruik van een accu bespaart op stroom.
Video Elementaire weergavefuncties Video afspelen ( 21) 4 Druk op / of om met afspelen te beginnen. • De camcorder begint met afspelen vanaf de geselecteerde scène tot het eind van de laatst opgenomen scène. • Druk nog een keer op / als u een pauze wilt inlassen. • Druk op als u het afspelen wilt stopzetten en terug wilt keren naar het indexscherm. HET VOLUME WIJZIGEN TIJDENS HET AFSPELEN 1 Zet het camerakeuzewiel op . 2 Druk op .
hebt opgenomen, niet op een ander apparaat kunt afspelen. In dat geval moet u met deze camcorder de films op de geheugenkaart afspelen. • Het kan zijn dat u op deze camcorder geen films kunt afspelen die met een ander apparaat op de geheugenkaart zijn opgenomen. OPMERKINGEN Afhankelijk van de opnameomstandigheden is tussen scènes mogelijk een korte pauze in de video- of geluidsweergave merkbaar. Speciale afspeelstanden Gebruik de joystickaanduiding ( 22) om de speciale afspeelstanden te activeren.
Video / WAAR U OP MOET LETTEN Het zoeken op datum kan alleen vanuit het indexscherm van de originele films worden uitgevoerd. Selecteren uit de opnamelijst / / Films Foto’s Opnamen in het interne geheugen Opnamen op de geheugenkaart 2 Selecteer met ( ) het / opnamemedium (alleen ) en het opnametype (scènes of foto’s). 3 Keer met ( ) weer terug naar het indexscherm om de scène of foto te selecteren.
Selectie maken in een kalenderscherm 1 2 3 4 Open het indexscherm van de originele films. • U kunt vanuit dit indexscherm ook op VIDEO SNAP drukken om het indexscherm voor Video Snapshot-scènes te openen. / U kunt de scènes • selecteren in het interne geheugen 35). of op de geheugenkaart ( Open het kalenderscherm. FUNC. [ SCENE ZOEKEN] [KALENDER] • Het kalenderscherm verschijnt. • Datums met scènes (films die zijn opgenomen op die datum) zijn wit gekleurd. Datums zonder opnamen zijn zwart.
Video Interval tussen beeldjes Datum en tijd van opname Vooraf opnamen van het indexscherm selecteren Lengte scène Huidige scène/totaal aantal scènes Gekozen beeldje voor afspeelbegin Paginaschuifbalk Tijdlijn 2 Selecteer met ( ) op de tijdlijn het afspeelbegin. 3 Druk op beginnen. om met afspelen te U kunt vooraf een aantal films of foto’s van het indexscherm selecteren om later op deze allemaal in een keer dezelfde handeling uit te voeren.
• Herhaal deze stap voor alle scènes/foto’s die u wilt toevoegen aan uw selectie (tot 100). ( 21) Opties Het totaal aantal geselecteerde scènes Geselecteerde scènes [ALLE SCENES] Verwijdert alle scènes. [ALLE SCENES (DEZE DAG)] Verwijdert alle op de geselecteerde dag opgenomen scènes. 4 Druk twee keer op menu te sluiten. FUNC. om het [ÉÉN SCENE] Verwijdert alleen de geselecteerde scène. [GESELECTEERDE SCENES] DE HELE SELECTIE ONGEDAAN MAKEN FUNC.
Video • Maak een back-up van belangrijke scènes voordat u deze wist ( 71). • Houd u aan de volgende voorzorgsmaatregelen als de ACCESSindicator aan is of knippert (tijdens het verwijderen van scènes). - Open de afdekking van de geheugenkaartsleuf niet. - Verwijder de stroombron niet en zet de camcorder niet uit. - Wijzig de bedieningsmodus niet. OPMERKINGEN • Wanneer u een scène van het indexscherm voor originele films wist, wordt die scène ook uit de afspeellijst verwijderd.
• [ VUURWERK] - Wij raden u aan gebruik te maken van een statief om camcordertrillingen te voorkomen. Maak in ieder geval gebruik van een statief in de modus, omdat de sluitertijd in die modus langer wordt. • [ PORTRET]/[ SPORT]/[ STRAND]/[ SNEEUW] - Tijdens het afspelen wordt het beeld mogelijk niet vloeiend weergegeven. • [ PORTRET] - Het wazige effect van de achtergrond neemt toe hoe meer u inzoomt (T).
Video Opties Standaardwaarde PROGRAMMA AE] [ De camcorder stelt automatisch het diafragma en de sluitertijd zo in dat voor het onderwerp een optimale belichting wordt verkregen. [ SLUITERT.P-AE] Stel de sluitertijdwaarde in. De camcorder stelt automatisch de juiste diafragmawaarde in. 1/2*, 1/3*, 1/6, 1/12, 1/25 Voor het maken van opnamen op slecht verlichte plaatsen. 1/50 Voor normale omstandigheden. 1/120 Voor het opnemen van sportscènes in een zaal. 1/250, 1/500, 1/1000** FUNC.
51) en toevoegen aan de afspeellijst ( daarna de volgorde veranderen. Mini-videolamp U kunt de mini-videolamp gebruiken voor het opnemen van video of het maken van foto’s op donkere plaatsen. ( 21) Scènes opnemen 1 Druk op de joystick ( weergeven van de joystickaanduiding. 2 Selecteer met ( ) [VIDEOLAMP ] en druk op . • Op het scherm verschijnt . • Druk nogmaals op om de minivideolamp uit te zetten.
Video Muziek toevoegen aan scènes De scènes afspelen ( 21) WAAR U OP MOET LETTEN - Gebruikers van Windows: Gebruik de bijgeleverde software Music Transfer Utility om de muziekbestanden op de bijgeleverde CD-ROM Gebruiksaanwijzing/ Muziekgegevens-disc te kopiëren naar een geheugenkaart die aangesloten is op een computer. Raadpleeg voor meer informatie de gebruikshandleiding (PDF-bestand) van de software.
- Gebruikers van Windows: Gebruik de bijgeleverde software Music Transfer Utility om de muziekbestanden op de bijgeleverde CD-ROM Gebruiksaanwijzing/ Muziekgegevens-disc te kopiëren naar een geheugenkaart die aangesloten is op een computer. Raadpleeg voor meer informatie de gebruikshandleiding (PDF-bestand) van de software.
Video Zelfontspanner Automatische tegenlichtcorrectie en handmatige belichtingsinstelling ( 21) FUNC. [ MENU] [ CAMERA SETUP] [ZELFTIMER] [AAN ] FUNC. verschijnt. -modus: Druk tijdens de opnamepauzemodus op Start/Stop . De camcorder begint met opnemen nadat 10 seconden is afgeteld. Op het scherm ziet u dat er wordt afgeteld. -modus: Druk op PHOTO ; eerst slechts halverwege om de autofocus te activeren en daarna volledig. De camcorder maakt de foto nadat 10 seconden is afgeteld.
Handmatige instelling van de belichting • Nachtscènes ( 21) WAAR U OP MOET LETTEN 1 Druk op de joystick ( weergeven van de joystickaanduiding. 2 Selecteer met ( ) [EXP ] en druk op . • Op het scherm verschijnen de indicator voor instelling van de belichting en de neutrale waarde [±0]. • Het instelbereik en de lengte van de belichtingsinstellingsindicator hangen af van de aanvankelijke helderheid van het beeld. 3 ) in voor het Stel met ( ) de helderheid van de foto in.
Video DE WITBALANS HANDMATIG INSTELLEN Witbalans De witbalansfunctie helpt u bij het nauwkeurig reproduceren van kleuren onder verschillende lichtomstandigheden, zodat witte objecten in uw opnamen altijd echt wit overkomen. ( 21) WAAR U OP MOET LETTEN Selecteer een ander opnameprogramma dan de opnameprogramma’s van de Speciale Scènes. Opties Standaardwaarde AUTO] [ De camcorder stelt de witbalans automatisch in op natuurlijke kleuren.
Beeldeffecten Digitale effecten U kunt de beeldeffecten gebruiken om de kleurverzadiging en het contrast te wijzigen, zodat u beelden kunt maken met speciale kleureffecten. ( Opties [ ( 21) WAAR U OP MOET LETTEN Selecteer een ander opnameprogramma dan de opnameprogramma’s van de Speciale Scènes. Opties Standaardwaarde BEELDEFFECT UIT] [ Hiermee maakt u opnamen zonder beeldverbeterende effecten. [ VIVID] Hiermee benadrukt u het contrast en de kleurverzadiging.
Video Faders en effecten toepassen 1 Druk op de joystick ( weergeven van de joystickaanduiding. 2 Selecteer met ( ) [D.EFFECT ] en druk op . • Het pictogram van het geselecteerde effect wordt groen. • Druk nog een keer op om het digitaal effect uit te zetten (het pictogram wordt weer wit). ) in voor het INFADEN Activeer de geselecteerde fader in de opnamepauzemodus ( ), en druk vervolgens op Start/Stop om de opname te beginnen met een fade in.
• Alleen de datacodering • Alle gegevens uitgeschakeld -modus: • Alle gegevens ingeschakeld • Alleen reguliere gegevens (verwijdert het histogram en informatiepictogrammen) • Alle gegevens uitgeschakeld * De volgende pictogrammen verschijnen zelfs als alle andere schermgegevens zijn uitgeschakeld: De pictogrammen en (in de -modus), het -pictogram en de AF-kaders als de autofocus vergrendeld is (in de -modus), schermtekens (beide opnamemodi).
Video • Op het scherm verschijnt een voortgangsbalk. • U kunt op drukken als u de bewerking wilt onderbreken terwijl deze wordt uitgevoerd. 6 Druk op als het bevestigingsscherm verschijnt. De video-opname vanaf het splitsingspunt tot het eind van de scène verschijnt als een nieuwe scène in het indexscherm. kunt ook een afspeellijst aanmaken met alleen scènes gemaakt met Video 43). Verplaatsing of Snapshot ( verwijdering van scènes in de afspeellijst heeft geen invloed op de originele opnamen.
3 Voeg de scène(s) toe aan de afspeellijst. FUNC. [ AAN PLAYLIST TOEV.] Gewenste optie [JA] • Aan het einde van de bewerking wordt [AAN PLAYLIST TOEGEV.] weergegeven. / Scènes worden • toegevoegd aan de afspeellijst op het medium waarop de scènes zijn opgenomen. • Om de afspeellijst te controleren, drukt u op PLAYLIST .
Video / Scènes kopiëren Originele films of de volledige afspeellijst kunnen alleen vanuit het interne geheugen naar de corresponderende locatie op de geheugenkaart worden / Gebruik deze gekopieerd. functie om films te kopiëren vanuit het interne geheugen naar de geheugenkaart om deze met muzieknummers te kunnen afspelen. ( 3 * Druk op als u de bewerking wilt onderbreken terwijl deze wordt uitgevoerd.
Foto’s Raadpleeg dit hoofdstuk voor meer informatie over het maken van foto’s – van het vastleggen en weergeven van foto’s tot het afdrukken hiervan. 4 Elementaire opnamefuncties Druk PHOTO volledig in. De ACCESS-indicator zal tijdens het maken van de foto knipperen. BELANGRIJK Foto’s maken ( 21) Neem de onderstaande voorschriften in acht wanneer de ACCESS-indicator brandt of knippert. U kunt uw gegevens anders voorgoed kwijtraken. - Open de afdekking van de geheugenkaartsleuf niet.
Foto’s FUNC. Een foto wissen direct nadat deze is gemaakt [ 1024x768] Gewenste fotogrootte* Gewenste fotokwaliteit* FUNC. U kunt de laatst gemaakte foto wissen terwijl u deze bekijkt binnen de tijdsduur die u hebt ingesteld bij de optie [BEKIJKEN] of onmiddellijk nadat u de foto hebt gemaakt als de optie [BEKIJKEN] op [ UIT] ingesteld is. * Druk op om te wisselen tussen de selectie van grootte en kwaliteit.
Elementaire weergavefuncties 4 Keer met ( ) terug naar het indexscherm. 5 Selecteer met ( , ) een foto. • Verplaats het oranje selectiekader naar de foto die u wilt bekijken. • Druk op de joystick ( ) in om het selectiekader uit te breiden en doorzoek met ( ) alle indexpagina’s. Druk op de joystick ( ) in om terug te keren naar het indexscherm. 6 Druk op . Het indexscherm wordt gesloten en de geselecteerde foto verschijnt op het scherm.
Foto’s doorzoek met ( ) alle indexpagina’s. Druk op de joystick ( ) in om terug te keren naar het indexscherm. Van de ene foto naar een andere foto springen en hierbij andere foto’s overslaan Als u een groot aantal foto’s hebt gemaakt, kunt u per keer van een bepaalde foto naar een andere foto springen en hierbij 10 of 100 foto’s overslaan. 3 Druk op . Het indexscherm wordt gesloten en de geselecteerde foto verschijnt op het scherm. Diashow 1 Druk op de joystick ( weergeven van de joystickaanduiding.
2 Kies een nummer dat u samen met de diashow wilt afspelen. FUNC. [ KIES MUZIEK] Selecteer met ( ) een nummer* FUNC. * Druk op stoppen. FUNC. Foto’s tijdens weergave vergroten Foto’s kunt u tijdens weergave vijfmaal zo groot maken. om het nummer te starten/ ( • U kunt muziekbestanden verwijderen om zo ruimte in het geheugen vrij te maken ( 44). • Raadpleeg Het volume aanpassen ( 34) voor informatie over het aanpassen van het luidsprekervolume.
Foto’s Eén enkele foto verwijderen 2 Selecteer met ( , ) de foto die u wilt verwijderen. Deze stap hoeft u niet uit te voeren als u alle foto’s of de foto’s die u eerder hebt geselecteerd, wilt verwijderen. 1 Selecteer met ( wilt wissen. 3 2 Druk op de joystick ( weergeven van de joystickaanduiding. Verwijder de foto(’s). FUNC. [ WISSEN] Gewenste optie [JA]* FUNC. [OK] 3 Selecteer met ( . ) 4 Selecteer met ( en druk op .
Aanvullende functies Foto’s beveiligen U kunt foto’s beveiligen tegen ongewild wissen. ( Histogramweergave 21) Eén enkele foto beveiligen Tijdens het bekijken van foto’s kunt u het histogram weergeven, evenals de pictogrammen van alle functies die ten tijde van de opname werden gebruikt. Gebruik het histogram als een referentie om de juiste belichting van de foto te controleren. ( 2 3 21) Het gebied rechts van het histogram vertegenwoordigt de lichte gebieden en de linkerzijde de schaduwen.
Foto’s FUNC. [ BEVEILIG] Gewenste optie [GESELECTEERDE FOTO’S] [JA] Kopieert alle foto’s die eerder waren geselecteerd (gemarkeerd met een vinkje ). Raadpleeg Vooraf opnamen van het indexscherm selecteren ( 38). [OK] FUNC. BELANGRIJK Door het opnamemedium te initialiseren ( 28) worden alle opnamen gewist, inclusief de beveiligde foto’s. / Foto’s kopiëren U kunt foto’s alleen maar van het interne geheugen naar de geheugenkaart kopiëren.
• Als de afdekking van de geheugenkaartsleuf open is of als de LOCK-schakelaar van de geheugenkaart op de stand beveiligen staat, kunt u geen foto’s naar de geheugenkaart kopiëren. Foto’s afdrukken Foto’s afdrukken Andere functies voor het maken van foto’s U kunt ook de volgende functies gebruiken... De volgende functies en programma’s van de camcorder kunt u gebruiken voor het opnemen van video of voor het maken van foto’s.
Foto’s • De (afdrukken/delen)-toets gaat branden en de huidige afdrukinstellingen worden circa 6 seconden weergegeven. BELANGRIJK • Indien blijft knipperen (langer dan 1 minuut) of indien niet verschijnt, dan is de camcorder niet op de juiste wijze aangesloten op de printer. Haal in dat geval de USB-kabel uit de camcorder en zet de camcorder en printer uit. Zet beide apparaten na korte tijd weer aan, zet de camcorder in de stand en herstel de verbinding.
Opties 1 Druk op de joystick ( weergeven van de joystickaanduiding. 2 Selecteer met ( ) en druk op . Het instelmenu verschijnt. [PAPIER] [ PAPIER FORMAAT]: Het hangt van het printermodel af welke papierformaten beschikbaar zijn. [ PAPIER TYPE]: Selecteer [PHOTO], [FAST PHOTO], [NORMAAL] of [STANDAARD]. Papierinstellingen Huidige papierinstellingen (papierformaat, papiertype en pagina-indeling) [ PAGINAINDELING]: Selecteer [STANDAARD], [OMKADERD] of een van de volgende paginaindelingen.
Foto’s AFDRUKFOUTEN Als er zich tijdens het afdrukken een fout voordoet, verschijnt er een foutbericht (bijvoorbeeld [GEEN PAPIER] ) op de camcorder. Los het probleem op met 95) en de behulp van de foutenlijst ( handleiding van de printer. • Canon’s PictBridge-compatibele printers: Als het afdrukken niet automatisch wordt hervat nadat u het probleem hebt verholpen, selecteer dan [DOORGAAN] en druk op om het afdrukken te hervatten.
Foto’s selecteren om af te drukken (afdrukopdracht) Vanuit het indexscherm afdrukopdrachten instellen Stel de afdrukopdrachten in voordat u de bijgeleverde USB-kabel op de camcorder aansluit. Opties Eén enkele foto markeren met een afdrukopdracht 1 Open het fotoselectiescherm. FUNC. [ PRINT OPDR.] Op het scherm verschijnt . 2 Selecteer met ( ) de foto die u wilt markeren voor een afdrukopdracht. 3 Druk op om de afdrukopdracht in te stellen. Het aantal exemplaren wordt weergegeven in oranje.
Foto’s Het afdrukken begint. Het instelmenu verdwijnt wanneer alle foto’s zijn afgedrukt. OPMERKINGEN • De aangesloten printer bepaalt of u voor stap 3 al bepaalde afdrukinstellingen kunt wijzigen ( 64). • Raadpleeg pagina 65 als u het afdrukken wilt annuleren. • Het afdrukken hervatten: Open het instelmenu zoals beschreven in stap 2. Selecteer in het menu van de afdrukinstellingen de optie [HERVAT]* en druk op . De resterende foto’s worden afgedrukt.
Externe aansluitingen Dit hoofdstuk beschrijft hoe u de camcorder aansluit op een extern apparaat zoals een TV, videorecorder of computer. Aansluitpunten op de camcorder AV OUT-aansluitpunt Toegang: Open het LCD-paneel. Geluid uit de ingebouwde luidspreker wordt onderdrukt als de stereovideokabel STV-250N op de camcorder aangesloten is. USB-aansluitpunt Toegang: Open het LCD-paneel.
Externe aansluitingen Aansluitmethode In alle opzichten exact dezelfde aansluitmethode als de aansluitmethode hierboven. Aansluiten op een standaard-TV- of videorecorder met SCART-ingang. Vereist een SCART-adapter (in de winkel verkrijgbaar).
Uw opnamen opslaan Op uw computer opnamen opslaan Films die u met deze camcorder hebt opgenomen, worden opgeslagen op de geheugenkaart of in het interne / /). geheugen (alleen Vanwege de beperkte ruimte op een geheugenkaart raden wij u aan regelmatig op de computer een backup van de films te maken. PIXELA ImageMixer 3 SE Met de bijgeleverde software ImageMixer 3 SE Transfer Utility kunt u opnamen vanuit uw camcorder kopiëren naar uw computer.
Externe aansluitingen De camcorder aansluiten op de DVDbrander en een schijf samenstellen ( 21) Opties voor het maken van DVD-schijven ( -modus) 1 Schakel de DVD-brander in. Raadpleeg DVD’s maken. 2 Sluit de camcorder aan op de DVD-brander met de bijgeleverde USB-kabel. • Aansluitmethode . Raadpleeg Aansluitschema’s ( 69) en Aansluitingen. • Als het scherm voor selectie van het apparaattype verschijnt, selecteer dan [DVD-BRANDER] en druk op .
4 Druk op de starttoets van de DVDbrander. • Op het scherm verschijnt een voortgangsbalk. • Na het indrukken van de starttoets (tijdens het beschrijven van de schijf) kunt u de bewerking niet meer annuleren. • Wanneer de schijf (of de laatste schijf bij meerdere schijven) is afgesloten, verschijnt [TAKEN UITGEVOERD] op het scherm. Haal de schijf eruit en sluit de lade.
Externe aansluitingen • De benodigde tijd voor stap 2 hangt af van het aantal scènes dat u op een schijf wilt plaatsen. Wij raden u aan het aantal scènes te beperken tot minder dan 2.000. (De verbindingstijd zal dan ongeveer 3,5 minuut bedragen). 4 Kopieeropdrachten Opties Met kopieeropdrachten kunt u vooraf markeren welke foto’s u wilt toevoegen als u een foto-DVD maakt met de optionele DVD-brander DW-100. U kunt kopieeropdrachten instellen voor maximaal 998 foto’s.
Aansluiten Sluit de camcorder aan op de videorecorder met gebruik van aansluitmethode of . Raadpleeg Aansluitschema’s ( 69). ( 1 Zet de camcorder in de modus . / Selecteer eerst het geheugen met de foto’s die u wilt kopiëren ( 35). 2 Sluit de camcorder aan op de computer met de USB-kabel. • Aansluitmethode . Raadpleeg Aansluitschema’s ( 69). • Als het scherm voor selectie van het apparaattype verschijnt, selecteer dan [PC/PRINTER] en druk op . • De toets licht op.
Externe aansluitingen AANSLUITING OP EEN COMPUTER DIE DRAAIT OP MAC OS 3 Open [Macintosh HD] en vervolgens de map [Applications]. 4 Start het Image Captureprogramma. 5 Kopieer de gewenste foto’s naar de computer. BELANGRIJK • Is de camcorder aangesloten op de computer, dan mag u de afdekking van de geheugenkaartsleuf niet openen en de geheugenkaart niet verwijderen. • Neem de onderstaande voorschriften in acht wanneer de ACCESS-indicator brandt of knippert.
Aanvullende informatie Dit hoofdstuk behandelt oplossingen voor problemen, schermberichten, tips voor het behandelen en onderhouden van de camcorder, en andere informatie. Bijlage: Menu-opties - Overzicht Menuonderdelen die niet beschikbaar zijn, hebben een grijze kleur in het FUNC.menu en een zwarte kleur in de instellingsmenu’s. Raadpleeg Gebruik van de menu’s ( 23) voor meer informatie over de wijze waarop u een onderdeel selecteert.
Aanvullende informatie FUNC.
Menu-onderdeel [WISSEN] [SCENE ZOEKEN] 1 2 3 4 Instelopties [ALLE SCENES], [ALLE SCENES (DEZE DAG)], [ÉÉN SCENE], [GESELECTEERDE SCENES], [ANNULEREN] z2 [ALLE SCENES], [ÉÉN SCENE], [ANNULEREN] z3 – 53 Bij weergave van één foto: [NEE], [JA] Van het indexscherm: [ALLE FOTO’S], [ÉÉN BEELD], [GESELECTEERDE FOTO’S], [ANNULEREN] – z 60 [KALENDER], [DATUM SELECT], [ANNULEREN] z2 – 36 – 39 Optie is niet beschikbaar in het indexscherm van originele opnamen.
Aanvullende informatie • De beeldstabilisator functioneert niet volledig bij onderwerpen met een laag contrast, met een zich herhalend patroon of zonder verticale lijnen. • Als [BEELD STAB] ingesteld is op [ DYNAMISCH] en de beweging op de achtergrond UIT]. niet natuurlijk lijkt, selecteer dan [ STANDAARD] of [ UIT] te • Het verdient aanbeveling bij gebruik van een statief de beeldstabilisator op [ zetten.
Bewerkingen van het geheugen (Initialisatie, etc.) / GEHEUGEN OPER. Menu-onderdeel Instelopties – z z z z [KAARTINFO] – z z z z – / [MEDIA:FILMS] [INGEB.GEHGEN], [KAART] z z – – 28 / [MEDIA:BEELD.] [INGEB.GEHGEN], [KAART] z z – – 28 [INITIALISEREN] / [INGEB.GEHGEN], [KAART], [ANNULEREN] z z z* z 28 / [GEHEUG.INF.] – [INITIALISEREN], [COMPL.INIT.], [ANNULEREN] * Optie beschikbaar in het indexscherm van originele opnamen en het indexscherm van Video Snapshot. [GEHEUG.
Aanvullende informatie Menu-onderdeel [TAAL ] Instelopties [ ],[DEUTSCH], [ ] [ENGLISH], [ESPAÑOL], [FRANÇAIS], [ITALIANO], [MAGYAR], [MELAYU], [NEDERLANDS], [POLSKI], [PORTUGUÊS], [ ], [TÜRKÇE], [ ], [ ], [ ], [ ], [ ], [ ], [ ], [ ], [ ] z z z z 25 [START WEEK] [ZATERDAG], [ZONDAG], [MAANDAG] – – z – – [DEMO MODUS] [ z z – – – AAN], [ UIT] [HELDERHEID]: Stelt de helderheid van het LCD-scherm in.
[DEMO MODUS]: Met de demonstratiemodus kunt u de belangrijkste functies van de camcorder bekijken. De demonstratiefunctie wordt automatisch gestart als de camcorder van stroom wordt voorzien met de netadapter en u de camcorder langer dan 5 minuten ingeschakeld laat staan. • Druk op een willekeurige toets of zet de camcorder uit als u de demonstratiefunctie wilt stopzetten zodra deze is gestart. Instelling systeem (luidsprekervolume, pieptoon, etc.) SYSTEEM SETUP Menu-onderdeel Instelopties [ACCU.
Aanvullende informatie [LUIDSPR. VOL]: Regel met ( ) het afspeelvolume. Het volume kunt u ook met de joystickaanduiding regelen ( 34). [TV TYPE]: Als u het beeld volledig en in de juiste hoogte/breedteverhouding wilt weergeven, moet u de instelling selecteren op basis van het televisietype waarop u de camcorder aansluit. [ NORMALE TV]: TV’s met een hoogte/breedteverhouding van 4:3. [ BREEDB TV]: TV’s met een hoogte/breedteverhouding van 16:9.
Problemen? Problemen oplossen Loop eerst door de lijst hieronder wanneer u problemen ondervindt bij het gebruik van uw camcorder. Soms bestaat er een simpele oplossing voor iets waarvan u denkt dat het een camcorderstoring is - lees daarom eerst de tekst in het vak “EERST CONTROLEREN” voordat u vervolgt met de meer gedetailleerde problemen en oplossingen. Neem contact op met uw dealer of een Canon Service Center als het probleem aanhoudt.
Aanvullende informatie Na lang gebruik van de camcorder wordt deze heet. - De camcorder kan warm worden nadat deze een lange tijd ononderbroken is gebruikt; dit is normaal en duidt niet op een storing. Als de camcorder snel warm wordt of dat deze zo warm wordt dat u hem niet aan kunt raken, duidt dit op een probleem met de camcorder. Neem contact op met een Canon Service Center. De accu is zelfs bij normale temperaturen snel leeg. - De accu heeft het einde van zijn levensduur bereikt.
Ik kan scènes niet verwijderen - Mogelijk kunt u geen scènes verwijderen die zijn opgenomen of bewerkt met een ander apparaat en die vervolgens werden gekopieerd naar een geheugenkaart die was aangesloten op een computer. Het verwijderen van scènes neemt meer tijd in beslag dan gewoonlijk. - Als het geheugen een groot aantal scènes bevat, dan kunnen sommige bewerkingen langer duren dan normaal. Sla uw opnamen op een extern apparaat op ( 71) en initialiseer het geheugen ( 28).
Aanvullende informatie De ON/OFF(CHG) (aan/uit-oplaad)-indicator knippert heel langzaam terwijl de camcorder bezig is met opladen. (één flits om de 2 seconden) De temperatuur van de accu is gedaald tot beneden de 0 °C of gestegen tot boven de 40 °C. Als de accu te koud is, warm deze dan op. Is de accu te warm, laat hem dan afkoelen tot de temperatuur lager is dan 40 °C. - Laad de accu op bij temperaturen tussen 0 °C en 40 °C. - De accu is beschadigd. Gebruik een andere accu.
Aansluiten van externe apparaten Op het TV-scherm verschijnt videoruis. - Als u de camcorder gebruikt in een kamer waar een TV staat, houd dan tussen de camcorder en het netsnoer en de antennekabels van de TV voldoende afstand aan. De camcorder geeft een goede weergave maar er is geen beeld op het TV-scherm. - De video-ingang op de TV is niet afgestemd op het videoaansluitpunt waarop u de camcorder hebt aangesloten. Selecteer de juiste video-ingang.
Aanvullende informatie CONTROLEER KRT - Ik krijg geen toegang tot de geheugenkaart. Controleer de geheugenkaart en zorg ervoor dat de kaart correct geplaatst is ( 27). - Er is een geheugenkaartfout opgetreden. De camcorder kan de foto niet maken of niet weergeven. - U hebt een MultiMedia Card (MMC) in de camcorder geplaatst. Vervang deze door een SD/SDHCgeheugenkaart die compatibel is voor gebruik met deze camcorder.
/ INGEBOUW GEHEUGEN AAN HET LEZEN - Bezig met lezen van gegevens vanuit het interne geheugen. KAART INITIAL. ALLEEN MET DEZE CAMCORDER - Er is een probleem dat de toegang tot de geheugenkaart verhindert. Initialiseer met deze camcorder de geheugenkaart ( 28). KAART KAN DATA NIET HERKENNEN - De geheugenkaart bevat scènes die zijn opgenomen met een ander televisiesysteem (NTSC). / KAART MAXIMUM AANTAL SCENES BEREIKT - De geheugenkaart bevat reeds 3.
Aanvullende informatie / KAN NIET KOPIËREN - Het totale aantal scènes dat u hebt geselecteerd om te worden gekopieerd, past niet op de beschikbare ruimte van de geheugenkaart. Verwijder een aantal opnamen op de geheugenkaart ( 39, 59) of verlaag het aantal te kopiëren scènes. KAN NIET OPNEMEN - Er is een probleem met het geheugen. - Dit bericht kan ook verschijnen als zich condens heeft gevormd ( volledig droog is voordat u het gebruik hervat. 101).
NETVOEDING AANSLUITEN - Als de camcorder in de -modus staat en verbonden is met de computer, verschijnt dit bericht wanneer de camcorder door de accu van stroom wordt voorzien. Sluit de compacte netadapter aan op de computer. NIET BESCHIKBAAR IN DUAL SHOT - U hebt een toets ingedrukt die in de stand een flexibele opnamemodus ( of ). niet kan worden gebruikt.
Aanvullende informatie TEVEEL FOTO'S KOPPEL USB-KABEL LOS - Verwijder de USB-kabel en verlaag het aantal foto’s op de geheugenkaart tot minder dan 1.800. Als een dialoogvenster op het computerscherm verschijnt, sluit het dan. Verwijder de USB-kabel en herstel na korte tijd de verbinding. VERWISSEL DE ACCU - De accu is vrijwel leeg. Vervang de accu of laad deze op ( 16).
SCHIJFLEESFOUT CONTROLEER SCHIJF - Er heeft zich een fout voorgedaan tijdens het lezen van de schijf of tijdens een poging om te schrijven op de schijf. - Dit bericht kan ook verschijnen als er zich condens heeft gevormd. Wacht totdat de DVD-brander volledig is opgedroogd voordat u het gebruik hervat ( 101). - De schijf is mogelijk niet goed geplaatst. Verwijder de schijf en plaats deze terug. SLUIT DEKSEL GEHEUGENKAART - De afdekking van de geheugenkaartsleuf staat open.
Aanvullende informatie LAAG INKTNIVEAU - De inktcassette moet snel worden vervangen. Selecteer [DOORGAAN] om door te gaan met afdrukken. PAPIER INVOER FOUT - Er is een fout opgetreden met de papierhendel. Stel de papierselectiehendel in de juiste stand in. PAPIER STORING - Het papier is tijdens het afdrukken vastgelopen. Selecteer [STOP] om het afdrukken te annuleren. Verwijder het vastgelopen papier, voeg opnieuw papier toe en probeer het opnieuw.
Wat u wel en niet moet doen Hoe u de camcorder moet behandelen Camcorder Zorg ervoor dat u de volgende voorzorgsmaatregelen neemt om verzekerd te zijn van een optimaal resultaat. • Sla uw opnamen regelmatig op een extern apparaat op. Zorg ervoor dat u de opnamen naar een extern apparaat (bijvoorbeeld: een computer of een digitale videorecorder) overzet ( 71) en dat u regelmatig een back-up maakt. Hierdoor beveiligt u belangrijke opnamen in geval van schade en zorgt u voor meer ruimte in het geheugen.
Aanvullende informatie Accu GEVAAR! Behandel de accu met de nodige voorzichtigheid. • Houd de accu uit de buurt van open vuur (de accu kan exploderen). • Stel de accu niet bloot aan temperaturen die hoger zijn dan 60 °C. Laat de accu niet achter in de buurt van een ingeschakeld verwarmingsapparaat of binnen een auto bij heet weer. • Probeer de accu niet uit elkaar te halen of er aan te knutselen. • Laat de accu niet vallen en stel de accu niet bloot aan schokken. • Laat de accu niet nat worden.
• • • • • • • corrupte gegevens of gegevens die verloren zijn gegaan. Raak de contactpunten niet aan en stel deze niet bloot aan stof of vuil. Gebruik geen geheugenkaarten op plaatsen die blootstaan aan sterke magnetische velden. Laat geheugenkaarten niet achter op plaatsen met een hoge vochtigheid en hoge temperaturen. Demonteer of verbuig een geheugenkaart niet, laat een geheugenkaart niet vallen en stel een geheugenkaart niet bloot aan schokken of water.
Aanvullende informatie vervolgens de afdekking aan de bovenzijde los. De batterij verwijderen Als u de camcorder afdankt, verwijder dan eerst de interne lithiumbatterij. 1 2 3 Verwijder met een schroevendraaier de 8 schroeven zoals getoond in de afbeelding. 4 Verwijder de 4 flex circuitconnectoren en 2 dradensets zoals getoond in de afbeelding, verwijder vervolgens de voorste lenseenheid, linkerpaneel (samen met het LCD-paneel), onderste paneel en achterste paneel.
Voeding/overig gesignaleerd. Als u de camcorder blijft gebruiken, kan deze beschadigd raken. Condens kan zich in de volgende situaties voordoen: Reinigen Camcorderhuis • Gebruik een zachte, droge doek om het camcorderhuis te reinigen. Gebruik nooit met chemicaliën behandelde doeken of vluchtige oplosmiddelen zoals verfverdunner. Lens De automatische scherpstelling werkt mogelijk niet correct als het lensoppervlak vuil is. • Verwijder stof of vuildeeltjes met een blaaskwastje (geen spuitbus gebruiken).
Aanvullende informatie Opnamen afspelen op een TV-scherm U kunt uw opnamen alleen afspelen op TV’s die compatibel zijn met het PALsysteem. PAL (of het compatibele SECAM-systeem) wordt gebruikt in de volgende regio’s/landen: Europa: In heel Europa en Rusland. Amerika: Alleen in Argentinië, Brazilië, Uruguay en de Franse overzeese gebieden (Frans-Guyana, Guadeloupe, Martinique, etc.). Azië: De meeste landen van Azië (behalve in Japan, de Filippijnen, Zuid-Korea, Taiwan en Myanmar).
Algemene informatie Systeemschema (De verkrijgbaarheid verschilt per regio) Schouderriem SS-600/SS-650 TV Polsriem WS-20 Video/DVD-recorder SCART-adapter Acculader CG-800E Stereovideokabel STV-250N DVD-brander DW-100 DVD-schijven Accu BP-808 USB-kabel IFC300PCU Compacte netadapter CA-570 Met PictBridge compatibele printers SD/SDHCgeheugenkaart Zachte draagtas SC-2000 Kaartlezer/schrijver Computer 103
Aanvullende informatie Optionele accessoires Gebruik van originele Canon-accessoires wordt aanbevolen. Dit product is zodanig ontworpen dat het uitstekende prestaties levert wanneer het wordt gebruikt in combinatie met originele Canon-accessoires. Canon kan niet aansprakelijk worden gehouden voor schade aan dit product en/of ongelukken zoals brand, etc. als gevolg van defecten in niet-originele Canon-accessoires (zoals lekkage en/of explosie van een accu).
Opname- en afspeelduur De opname- en afspeelduur in de tabel hieronder is bij benadering gegeven en is afhankelijk van de opnamemodus en de oplaad-, opname- en afspeelomstandigheden. De effectieve gebruikstijd van de accu kan afnemen als u opnamen maakt in koude omstandigheden, bij gebruik van de meer heldere scherminstellingen, etc. Het interne geheugen gebruiken (alleen Opnamemodus / ) XP SP LP Maximale opnameduur 210 min. 210 min. 210 min. Gebruikelijke opnameduur* 105 min. 105 min.
Aanvullende informatie Specificaties LEGRIA FS37/FS36/FS307/FS306/FS305 Systeem Opnamesysteem Televisiesysteem Opnamemedia Maximale opnametijd (bij benadering) Beeldsensor LCD-scherm Microfoon Lens Lenssamenstelling AF-systeem Minimale scherpstellingsafstand Witbalans 106 Films: SD-Video Videocompressie: MPEG-2 Audiocompressie: Dolby Digital 2ch (AC-3) Foto’s: DCF (Design rule for camera file system), compatibel met Exif1 Ver. 2.
Minimale verlichting Aanbevolen verlichting Beeldstabilisatie Afmetingen van foto’s 1 2 Opnameprogramma [NACHT], sluitertijd ingesteld op 1/6: 1,1 lx [PROGRAMMA AE], Automatische langzame sluiter [AAN], sluitersnelheid op 1/25: 4,5 lx Meer dan 100 lx Elektronische ([DYNAMISCH]-instelling beschikbaar bij het opnemen van films) 1024 x 768, 640 x 480 pixels Deze camcorder ondersteunt Exif 2.2 (ook “Exif Print” genoemd).
Aanvullende informatie Accu BP-808 Accutype Nominale spanning Gebruikstemperatuur Capaciteit accu Afmetingen Gewicht Oplaadbare lithium-ion-accu, compatibel met Intelligent System 7,4 V DC 0 – 40 °C 890 mAh 30,7 × 23,3 × 40,2 mm 46 g Gewicht en afmetingen zijn bij benadering gegeven. Fouten en omissies voorbehouden. De informatie in deze handleiding geldt vanaf mei 2010. Specificaties kunnen zonder kennisgeving worden gewijzigd.
Index Direct afdrukken . . . . . . . . . . . . . . . . . . 63 Dual Shot . . . . . . . . . . . . . . . . . . . . . . . 21 E A A Accu Accucapaciteit . . . . . . . . . . . . . . . .15 Indicator resterende accucapaciteit 15 Opladen . . . . . . . . . . . . . . . . . . . . .16 Afdrukken/delen-toets . . . . . . . . . . . . . .64 Afdrukopdracht . . . . . . . . . . . . . . . . . . .66 Afspeellijst . . . . . . . . . . . . . . . . . . . . . . .51 Afspelen Films . . . . . . . . . . . . . . . . . . . . . . . .
Aanvullende informatie Kopiëren naar computer Foto’s . . . . . . . . . . . . . . . . . . . . . . . 75 Kopiëren van opnamen naar een computer Films . . . . . . . . . . . . . . . . . . . . . . . . 71 Kopiëren* Films . . . . . . . . . . . . . . . . . . . . . . . . 54 Foto’s . . . . . . . . . . . . . . . . . . . . . . . 62 L LCD-scherm . . . . . . . . . . . . . . . . . . . . . 19 M Markeringen . . . . . . . . . . . . . . . . . . . . . 82 Medium selecteren voor opslag van opnamen* voor het afspelen . . . . .
Vooropname . . . . . . . . . . . . . . . . . . . . .45 Vuurwerk (opnameprogramma) . . . . . . .41 W Windscherm . . . . . . . . . . . . . . . . . . . . .80 Witbalans . . . . . . . . . . . . . . . . . . . . . . . .48 Z Zelfontspanner . . . . . . . . . . . . . . . . . . .46 Zoeken naar scènes aan de hand van de datum . . . . . . . . . . . . . . . . . . .36 Zonsondergang (opnameprogramma) . .41 Zoom Geavanceerde zoom . . . . . . . . . . .31 Zoomsnelheid . . . . . . . . . . . . . .
Canon Europa N.V. P.O. Box 2262, 1180 EG Amstelveen, The Netherlands Canon Luxembourg SA Rue des joncs, 21 L-1818 Howald Tel: (352) 48 47 961 www.canon.lu Canon Austria GmbH Oberlaaer Straße 233 A-1100 Wien Canon Helpdesk: Tel: 0810 0810 09 (zum Ortstarif) www.canon.at Canon Nederland N.V. Bovenkerkerweg 59-61 1185 XB Amstelveen Helpdesk: 0900-202 2915 (0,13 €/min) www.canon.nl Canon Belgium N.V. / S.A. Berkenlaan 3 1831 Diegem (Machelen) Tel: (02)-7220411 Fax: (02)-7213274 www.canon.