Map Utility Ver. 1.5 Instruction Manual ● Content of this Instruction Manual ● Switching Between Pages ● In this manual, the windows used in the Y P O ● Click on arrows on the bottom right of the screen. examples are from Windows 7. ● GPS receiver or camera is displayed as an icon. Example: GPS Receiver GP-E1 J GP-E1 EOS 6D J EOS 6D ● ` indicates the selection procedure of the menu. (Example: [File] menu ` [Exit].
READ CAREFULLY BEFORE USING! CANON SOFTWARE LICENSE AGREEMENT IMPORTANT - READ THIS AGREEMENT BEFORE USING THE SOFTWARE ON THE CD-ROM IN THIS BOX. BY USING THE SOFTWARE, YOU AGREE TO BE BOUND BY THE TERMS OF THIS AGREEMENT. This is a license agreement (the [Agreement]) between you and Canon Inc. ([Canon]).
● Geotag images Introduction Map Utility version 1.5 is a software utility for viewing the shooting locations of images shot with EOS DIGITAL cameras either with built-in GPS*1 functionality or used with a Canon GPS receiver. If you shoot photos with an EOS 6D*2 or with another EOS DIGITAL camera used with GPS Receiver GP-E2, you can view them with the route you traveled (motion paths).
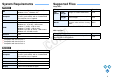
System Requirements Supported Files Image Files OS File type Windows 8.1, Windows 8, Windows 7*1, Windows Vista*2, Windows XP*3 Computer Computers running one of the above operating systems (preinstalled), with an included USB port. Internet access required. CPU 1.6 GHz Pentium or higher RAM Windows 8.1, 8 (64-bit): 2 GB or more Windows 8.
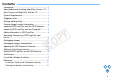
Contents Introduction ................................................................ 2 Downloading and Installing Map Utility Version 1.5 ... 2 Main Features of Map Utility Version 1.5 ................... 2 System Requirements................................................ 3 Supported Files .......................................................... 3 Starting Up Map Utility ............................................... 5 Viewing Image Location Information ..........................
Starting Up Map Utility In the taskbar, click the [Start] menu ` [All Programs] ` [Canon Utilities] ` [Map Utility] folder ` [Map Utility] icon. Open the [Applications] folder and [Canon Utilities] folder, and then open the [Map Utility] folder. Double-click the [Map Utility] icon. ➜ Map Utility starts up. ➜ Map Utility starts up. C Y P O You can also start up Map Utility from Digital Photo Professional (version 3.11 or later), which is provided with EOS DIGITAL cameras.
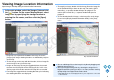
Viewing Image Location Information Import images into Map Utility and view location information. window, select the [Images] tab and click 1 Inthethe[ main ] button. On the screen displayed next, select image files by specifying the storage location or entering the file names, and then click the [Open] button. C ➜ Image files are imported and added to the image list on the [Images] tab. Image shooting locations are indicated by red pins on the map.
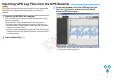
Importing GPS Log Files from the GPS Receiver GP-E2 GPS log files stored on the GPS Receiver GP-E2 can be imported into Map Utility. Once imported, the log information is saved on the computer. the main window, select the [GPS log files] tab. 3 InClick the [ ] button, and then click the [Next] button on the next screen. 1 Connect the GP-E2 to the computer. Turn on the GP-E2, and connect its [DIGITAL] terminal to a USB port on the computer. Use the interface cable provided with the camera to connect.
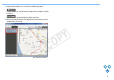
● Imported GPS log files are saved in the following locations: [Canon Utilities] in the documents folder of the computer ` [GPS Log Files] [Documents] ` [Canon Utilities] ` [GPS Log Files] ● Click a GPS log file on the GPS log file list to view routes traveled (motion paths) on a map.
Importing GPS Log Files from the Computer Editing Information in GPS Log Files GP-E2 Import GPS log files saved on the computer into Map Utility as follows. 1 In the main window, select the [GPS log files] tab and click the [ ] button. On the next screen, specify the storage location or the file names, and then click the [Open] button. EOS 6D Certain information in GPS log files imported into Map Utility can be edited.
Removing Unnecessary GPS Log Files from the List the GPS log file information, and then click the 2 Edit [OK] button. Unnecessary GPS log files can be removed from the GPS log file list. However, note that the files themselves are not deleted from the computer. the main window, select the [GPS log files] tab. 1 InSelect a log file to remove from the list, and then click the [ ➜ Edited information is applied to the GPS log file. C ] button.
Geotagging Images Images without location information can be geotagged as follows. 1 Import image files. main window, select the [Images] tab. Select 2 Inanthe image, and then click the [ ] button. (p.6) a desired location on the map, and in the dialog 3 Click box displayed next, click the [Save] button. C Y P O Map data ©2012 ZENRIN - ➜ The blue pin changes to a red pin, and location information is added to the image file.
Geotagging Images Automatically 4 Click the [Save] button. GP-E2 Images without location information can be geotagged automatically, using GPS log information from the GP-E2. 1 Import image files. 2 Import GPS log files. main window, select the [Images] tab. Click the 3 In[ the] button. (p.6) (p.7, p.9) C Y P O Map data ©2012 ZENRIN - ➜ The blue pins change to red pins, and GPS location information is added to the image files.
Updating the GPS Receiver Firmware GP-E2 GPS Receiver GP-E2 firmware can be updated to the latest version, as needed. Download the firmware from the Canon Web site before following these steps. Note that downloading firmware requires an Internet connection. the settings dialog box, select the [General] tab. 4 On Under [Firmware version], click the [Update] button. 1 Connect the GP-E2 to the computer. 2 Start up Map Utility. 3 In the main window, click the [ ] button.
Setting the Positioning Interval 5 Click the [OK] button on the settings dialog box. GP-E2 You can specify the interval the GPS Receiver GP-E2 acquires new position information. Shorter positioning intervals yield more accurate location information for your images. However, it will consume more battery power. 1 Connect the GP-E2 to the computer. 2 Start up Map Utility. 3 In the main window, click the [ ] button. (p.7) (p.5) ➜ The settings dialog box closes.
the settings dialog box, select the [Settings] tab. 4 On Drag the slider to the desired positioning interval. 5 Click the [OK] button. ➜ The setting is updated, and the settings dialog box closes. ● You can specify the interval on a eight-level scale, from every second to every 5 minutes.
Deleting GPS Log Files on the GPS Receiver GP-E2 GPS log files stored on the GPS Receiver GP-E2 can be deleted as follows. the settings dialog box, select the [Settings] tab. 4 On Under [Clear log data], click the [Clear] button. On the screen displayed next, click the [OK] button. 1 Connect the GP-E2 to the computer. 2 Start up Map Utility. 3 In the main window, click the [ ] button. (p.7) (p.5) C Y P O ➜ The GPS log files are deleted. ● A message appears when GPS log file deletion is finished.
Preferences 5 Click the [OK] button on the settings dialog box. ➜ The settings dialog box closes. GP-E2 EOS 6D In Map Utility preferences, you can configure routes traveled (motion paths) display conditions. Configuration of these conditions will narrow down the routes to be displayed, based on data recorded in GPS log files. The following two conditions can be set. ● Number of satellites used for positioning: The more satellites used for positioning, the greater the location accuracy.
the sliders under [Number of satellites in use] 3 Drag and [HDOP (Horizontal dilution of precision)] to 4 Click the [OK] button. ➜ The settings are updated, and the window closes. configure the settings. C Y P O Clicking [Apply] will apply the current settings without closing the window, which is useful in checking how the display will change.
List of Main Window Functions [GPS log files] tab (p.7, p.9, p.10) [Images] tab (p.6, p.11, p.12) Image list (p.6) Image file (p.6, p.11, p.12) GPS mark Pin (p.6, p.11, p.12) Export file for Google Earth™ button*1 Launch another program button*2 Search map button (p.11) Macintosh version: GPS device settings button (p.13, p.14, p.16) GPS log file (p.9, p.10) Help button GPS log file list (p.7, p.8, p.10) C Preferences button (p.17) Y P O Import from GPS device button (p.
*1 Export file for Google Earth™ This button enables you to export images and location information in the image list in a standard file format for maps that can be opened with Google Earth™ . As the [Save As] dialog box is displayed, specify a location to save the file, then click the [OK] button. Exported files have the file extension “.kmz” Using these files requires Google Earth™ to be installed. Note that the windows may not be displayed accurately in some versions of Google Earth™ .
Reference Installation Could not be Completed Correctly Deleting the Software (Uninstalling) ● Select an administrator-level privilege ([Computer administrator], [Administrator], etc.) as a user setting. You cannot install the software if a user setting other than an administrator-level privilege is selected. For detailed information on selecting an administrator-level privilege, refer to your computer User’s Manual.
About This Instruction Manual 1 Display the folder in which the software is saved. ➜ Open the [Canon Utilities] folder. ● It is prohibited to reproduce, in whole or part, the contents of this Instruction Manual without permission. ● Canon may change without notice the software specifications and contents of this Instruction Manual. ● The software screens and displays printed in this Instruction Manual may differ slightly from the actual software.