PŘIJÍMAČ GPS .
PŘIJÍMAČ GPS Česky
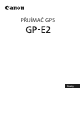
Úvod Přijímač GPS GP-E2 může doplňovat zeměpisné údaje ke snímkům a zaznamenávat trasu, kterou se pohybujete. Místa, na kterých jste pořídili snímky, a trasu, po níž jste se pohybovali, můžete zobrazit pomocí softwaru Map Utility (software pro přijímač GP-E2, str. 29). Přijímač může také nastavit čas fotoaparátu. Před použitím Před použitím přijímače GPS zkontrolujte, zda se v nabídce fotoaparátu zobrazuje položka [Nastavení zařízení GPS].
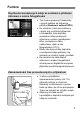
Funkce Doplňování zeměpisných údajů ke snímkům a přidávání informací o směru fotografování Tyto funkce podporují fotoaparáty, v jejichž nabídce se zobrazuje položka [Nastavení zařízení GPS]. Ke snímkům, které jsou pořízeny v době, kdy je přijímač připevněn k fotoaparátu, jsou doplněny zeměpisné údaje poskytující informace o poloze (zeměpisnou šířku, zeměpisnou délku, nadmořskou výšku a čas fotografování (UTC)).
Funkce Fotoaparát EOS 7D neumožňuje připojit ke snímkům data o směru fotografování. (Nelze použít digitální kompas přijímače.) Kromě modelu EOS 7D také některé jiné fotoaparáty neumožňují připojit data o směru fotografování ke snímkům. (Nelze použít digitální kompas přijímače.) Podrobnosti naleznete v návodu k použití fotoaparátu nebo na webu společnosti Canon. Určité podmínky při cestování, určitá místa nebo nastavení přijímače mohou způsobit přidání nepřesných informací o poloze ke snímkům.
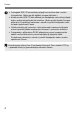
Funkce Nastavení času fotoaparátu Tuto funkci podporují fotoaparáty, v jejichž nabídce se zobrazuje položka [Nastavení zařízení GPS], s výjimkou fotoaparátu EOS 7D. Čas fotoaparátu lze nastavit pomocí signálů GPS. U fotoaparátu EOS-1D X se provede vysoce přesné nastavení s hranicí chyby přibližně ±0,02 sekundy vzhledem k času UTC a u ostatních fotoaparátů s hranicí chyby přibližně ±1 sekunda.
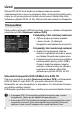
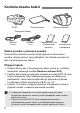
Kontrola obsahu balení GP-E2 Úložné pouzdro Přenosné pouzdro Propojovací kabely Přibližně 25 cm Přibližně 1,5 m Poznámky na úvod (Přečtěte před použitím.) Leták s informacemi o předpisech Úložné pouzdro a přenosné pouzdro Před použitím úložného pouzdra vložte přijímač do přenosného pouzdra, abyste zabránili jeho poškrábání. Do úložného pouzdra lze také umístit propojovací kabely.
Obsah Úvod................................................................................................. 2 Funkce ............................................................................................. 3 Kontrola obsahu balení .................................................................... 6 Konvence použité v tomto návodu ................................................... 8 Označení.......................................................................................... 9 Vložení baterie ..
Konvence použité v tomto návodu Význam symbolů : Upozornění umožňující předejít potížím při fotografování. : Doplňkové informace. (str. **) : Čísla referenčních stránek s dalšími informacemi. Ikony a označení ovládacích prvků přijímače a nastavení použité v tomto návodu odpovídají ikonám a označením na fotoaparátu a přijímači. Základní předpoklady U všech operací uvedených v tomto návodu se předpokládá, že vypínače napájení fotoaparátu i přijímače jsou přesunuty do polohy .
Označení Konektor Pojistný kolík upevňovací patice Kontakty Indikátor vyhledávání signálu : Vypínač napájení / : Přepínač průběžného zaznamenávání polohy Indikátor baterie Kryt prostoru pro baterie Zajišťovací páčka upevňovací patice Tlačítko uvolnění 9
Vložení baterie Vložte jednu baterii LR6 velikosti AA následujícím způsobem. 1 Otevřete kryt. Posuňte kryt prostoru pro baterii ve směru znázorněném šipkami a otevřete jej. baterii. 2 Vložte Vložte baterii záporným pólem napřed a zcela ji zasuňte. kryt. 3 Zavřete Zavřete kryt a posuňte jej ve směru znázorněném šipkami.
Připevnění a sejmutí přijímače Přijímač lze buď připevnit přímo k fotoaparátu, nebo jej můžete nosit s sebou v přenosném pouzdře. 1 Připevněte přijímač. Vypněte přijímač. Zasuňte upevňovací patici přijímače zcela do sáněk pro příslušenství. přijímač. 2 Zajistěte Posuňte zajišťovací páčku upevňovací patice doprava. Zajišťovací páčka zaskočí na místo. přijímač. 3 Sejměte Vypněte přijímač.
Zapnutí přijímače Kontrola úrovně nabití baterie Zkontrolujte úroveň nabití baterie pomocí indikátoru . Bliká pomalu : Úroveň nabití je v pořádku Bliká rychle : Zbývá málo energie Nesvítí : Vyměňte baterii Poloha Po přesunutí do této polohy pracuje přijímač pouze s fotoaparáty EOS, v jejichž nabídce se zobrazuje položka [Nastavení zařízení GPS].
Zapnutí přijímače Fotoaparát EOS 7D neumožňuje připojit ke snímkům data o směru fotografování. (Nelze použít digitální kompas přijímače.) Kromě modelu EOS 7D také některé jiné fotoaparáty neumožňují připojit data o směru fotografování ke snímkům. (Nelze použít digitální kompas přijímače.) Podrobnosti naleznete v návodu k použití fotoaparátu nebo na webu společnosti Canon.
Vyhledání signálů GPS Chcete-li vyhledat signály GPS, přeneste přijímač mimo budovu na místo, kde je přímý výhled na oblohu, a zaměřte jej směrem nahoru. Horní stranu přijímače nezakrývejte rukou ani jiným objektem. Přesunutím vypínače napájení do polohy nebo spusťte automatické vyhledávání signálů GPS. Chcete-li zkontrolovat stav vyhledávání, sledujte blikání červeného indikátoru .
Vyhledání signálů GPS Místa se špatným pokrytím signálem GPS Při špatném pokrytí signálem GPS, jako například na následujících místech, se informace o poloze nemusí zaznamenat nebo se mohou zaznamenat nepřesné informace.
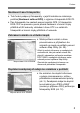
Vyhledání signálů GPS Zobrazení informací GPS Pokud je přijímač připevněn nebo připojen k fotoaparátu, v jehož nabídce se zobrazuje položka [Nastavení zařízení GPS], zkontrolujete informace GPS následujícím způsobem. 1 Vyberte položku [Nastavení zařízení GPS]. Na fotoaparátu EOS-1D X a dalších modelech, které zobrazují následující obrazovku, nastavte položku [Zařízení GPS] na možnost [Povolit] a poté vyberte položku [Nastavení zařízení GPS]. položku [Zobraz. 2 Vyberte informací GPS].
Doplňování zeměpisných údajů ke snímkům při fotografování Pokud je přijímač připevněn nebo připojen k fotoaparátu, jenž zobrazuje položku nabídky [Nastavení zařízení GPS], jsou ke snímkům při vyfotografování doplněny zeměpisné údaje. Stačí snímat s přijímačem připojeným k fotoaparátu. Ke snímkům lze také doplnit informace o směru fotografování.
Doplňování zeměpisných údajů ke snímkům při fotografování Doplňované zeměpisné informace Směr Zeměpisná šířka Zeměpisná délka Nadmořská výška UTC Fotoaparát EOS 7D neumožňuje připojit ke snímkům data o směru fotografování. (Nelze použít digitální kompas přijímače.) Kromě modelu EOS 7D také některé jiné fotoaparáty neumožňují připojit data o směru fotografování ke snímkům. (Nelze použít digitální kompas přijímače.) Podrobnosti naleznete v návodu k použití fotoaparátu nebo na webu společnosti Canon.
Zaznamenávání procestované trasy Po přesunutí vypínače napájení do polohy se budou automaticky zaznamenávat informace o poloze bodů na trase, po níž se přijímač pohybuje. (Není třeba připojit přijímač k fotoaparátu.) Zaznamenané informace o poloze lze zobrazit na virtuální mapě. Záznamy lze také použít k pozdějšímu doplnění zeměpisných údajů ke snímkům (str. 29).
Použití digitálního kompasu Zobrazení kompasu při fotografování Když fotografujete, můžete vidět, kterým směrem je fotoaparát natočen. Chcete-li zobrazit kompas, stiskněte tlačítko nebo tlačítko . Fotoaparáty vybavené elektronickým horizontem zobrazí kompas s horizontem. Kompas se také zobrazí v živém náhledu nebo při snímání filmů. Fotoaparát EOS 7D neumožňuje používání digitálního kompasu přijímače.
Použití digitálního kompasu Kalibrace digitálního kompasu Zkalibrujte digitální kompas v místě pořizování snímků. Kalibraci kompasu proveďte také v případě, že zobrazený směr, kterým fotografujete, se zdá být nesprávný. 1 Vyberte položku [Nastavení zařízení GPS]. Na fotoaparátu EOS-1D X a dalších modelech, které zobrazují následující obrazovku, nastavte položku [Zařízení GPS] na možnost [Povolit] a poté vyberte položku [Nastavení zařízení GPS].
Použití digitálního kompasu fotoaparátem. 4 Pohybujte Pohněte fotoaparátem do stran po oblouku alespoň 180°. Pohněte fotoaparátem nahoru a dolů po oblouku alespoň 180°. Otočte fotoaparát po oblouku alespoň 180° tak, aby byla jeho přední strana natočena stále stejným směrem. Dávejte pozor, aby vám fotoaparát během kalibrace nespadl. Kroky , a lze provést v libovolném pořadí. Pohybujte s fotoaparátem, dokud nebude kalibrace dokončena.
Nastavení času ve fotoaparátu ze systému GPS Čas ze systému GPS můžete nastavit, pokud je přijímač připevněn nebo připojen k fotoaparátu, jenž zobrazuje položku nabídky [Nastavení zařízení GPS] (s výjimkou fotoaparátu EOS 7D). Fotoaparát EOS-1D X provede vysoce přesné nastavení s hranicí chyby přibližně ±0,02 sekundy vzhledem k času UTC. U dalších fotoaparátů je hranice přibližně ±1 sekunda. 1 Vyberte položku [Nastavení zařízení GPS].
Bezpečnostní opatření pro použití systému GPS Při použití přijímače mějte na paměti následující body. V určitých zemích a oblastech může být použití systému GPS omezeno. Z tohoto důvodu se ujistěte, zda používáte systém GPS v souladu se zákony a předpisy dané země nebo oblasti. Buďte obzvláště opatrní při používání systému GPS mimo vaši domovskou zemi. Buďte opatrní při používání funkcí GPS v místech, kde je omezen provoz elektronických zařízení.
Map Utility Přehled softwaru Map Utility Tento software může používat informace o poloze zaznamenané přijímačem k zobrazení míst pořízení snímků, směrů fotografování a tras procestovaných s přijímačem na virtuální mapě. Také můžete přidat informace o poloze do snímků bez informací GPS. Díky propojení s přijímačem navíc můžete uložit zaznamenaná informace do počítače, změnit nastavení intervalu určování polohy, nebo odstranit zaznamenané informace.
Map Utility (2) Dvakrát klikněte na instalační soubor. Spustí se instalační program. 2 Podle pokynů na obrazovce nainstalujte software.
Map Utility Stažení a zobrazení návodu k použití softwaru Map Utility (soubor PDF) Ke stažení návodu k použití (soubor PDF) je nutné připojení k internetu. Stahování není možné v prostředích bez připojení k internetu. 1 Stáhněte návod k použití (soubor PDF). Připojte se k internetu a přejděte na následující web společnosti Canon. www.canon.com/icpd 2 Otevřete návod k použití (soubor PDF). Dvojitým kliknutím na stažený návod k použití (soubor PDF) jej otevřete.
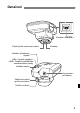
Použití držáku (prodává se samostatně) Připevnění držáku příslušenství AB-E1 (prodává se samostatně) umožňuje použít přijímač současně s externím nebo vestavěným bleskem. Připevněte fotoaparát a přijímač k držáku podle obrázku. Při připevňování dbejte na to, aby byl fotoaparát vyrovnán s držákem. Dokonce i malé vychýlení zabrání zaznamenávání přesného směru. Závit pro stativ U některých fotoaparátů není možné použít propojovací kabel.
Technické údaje Kompatibilní fotoaparáty Fotoaparáty EOS Doplňování zeměpisných údajů ke snímkům Zeměpisná šířka, zeměpisná délka, nadmořská výška, směr, koordinovaný světový čas (UTC) a stav signálu * Fotoaparáty s položkou nabídky [Nastavení zařízení GPS]: K dispozici jsou všechny funkce * Fotoaparáty bez položky nabídky [Nastavení zařízení GPS]: K dispozici je režim * Fotoaparáty kompatibilní se systémem GPS umožňují označení zeměpisnými údaji během fotografování (fotoaparáty, které nemohou po
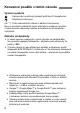
Bezpečnostní opatření Následující bezpečnostní opatření slouží jako prevence zranění uživatele či jiných osob a poškození zařízení. Před použitím přijímače se s těmito opatřeními seznamte, abyste jej dokázali správně a bezpečně obsluhovat. Varování Prevence vážných nebo smrtelných úrazů Abyste předešli požáru, nadměrnému přehřívání, úniku chemikálií a explozi, dodržujte následující bezpečnostní opatření.
Bezpečnostní opatření Upozornění Prevence úrazů a poškození zařízení Nenechávejte přijímač v automobilu za horkého počasí nebo v blízkosti zdroje tepla. Přijímač se může velmi zahřát a způsobit popáleniny, pokud se jej dotknete. Nepoužívejte přijímač, pokud je zakrytý tkaninou nebo zabalený ve tkanině. Mohlo by dojít k nahromadění tepla v přenašeči a jeho deformaci či požáru. K čištění přijímače nepoužívejte ředidla, benzen ani jiná organická rozpouštědla.
Přístroj nesmí být vystaven stékající nebo šplíchající vodě. Baterie nesmí být vystaveny nadměrnému teplu, například slunečnímu světlu, ohni a podobně. Vybité baterie nesmí být dobíjeny. Pouze Evropská unie a EHP (Norsko, Island a Lichtenštejnsko) Tento symbol znamená, že podle směrnice o OEEZ (2012/19/EU) a podle vnitrostátních právních předpisů nemá být tento výrobek likvidován s odpadem z domácností. Tento výrobek má být vrácen do sběrného místa, např.
CANON INC. 30-2 Shimomaruko 3-chome, Ohta-ku, Tokyo 146-8501, Japonsko Evropa, Afrika a Blízký východ CANON EUROPA N.V. Bovenkerkerweg 59, 1185 XB Amstelveen, Nizozemsko Informace o vaší místní kanceláři Canon naleznete v záručním listu nebo na webu www.canon-europe.com/Support Výrobek a příslušná záruka jsou v evropských zemích poskytovány společností Canon Europa N.V. CEL-SX1VA2H0 © CANON INC.