
Service manual


1 - 2
Cautions after print
head installation
*5
- After repair for trouble
concerning printing
- After re-installation of
the print head
(Before returning to
users)
- To prevent non-ejection
of ink at initial printing
(Empty ink from print
head once.)
None. 6 min.
Note: DO NOT loosen the red screws on both sides of the main chassis securing the carriage shaft position.
*1: Media sensor correction
This operation adjusts the correction value of the media sensor, installed in the sheet feeder unit, to the
EEPROM of the logic board ass’y. The adjustment is required when the sheet feeder unit or the logic board
ass’y is replaced, and values are automatically determined via use of calibration media kit (QY9-0064).
*2: Calibration media kit
The service tool for media sensor correction, consisting of 10 sheets of the reference plain paper, and 1
sheet of the reference white PET paper.
*3: Red screws of paper feed motor
The red screws securing the paper feed motor may be loosened only at replacement of the paper feed motor
unit.
*4: For details, see Section 3.4 Adjustment / Settings.
*5: Cautions after repair for trouble concerning printing or the print head re-installation
After repair for trouble concerning printing or the print head re-installation, after emptying the ink in the
print head, (if users sent the printer with ink tanks, re-set it with ink tanks) and return the printer to users.
(See Section 3.3 Special Notes on Repair Servicing (2) Notes on after repair for trouble concerning printing
or re-installation of the print head.)
(2) Periodic maintenance
No periodic maintenance is necessary.
(3) Periodic replacement parts
There are no parts in this printer that require periodic replacement by a service engineer.
(4) Replacement consumables
There are no consumables that require replacement by a service engineer.
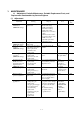
1.2 Customer Maintenance
Adjustment Timing Purpose Tool
Approx.
time
Print head alignment At print head
replacement.
To ensure accurate
dot placement.
Computer (Automatic
settings via the printer
driver)
5 min.
Print head cleaning When print quality is
not satisfying.
To improve nozzle
conditions.
- Printer buttons
- Computer (settings
via the printer
driver)
30 sec. to
1 min.
Print head deep cleaning When print quality is
not satisfying, and
not improved by
print head cleaning.
To improve nozzle
conditions.
Computer (settings
via the printer driver)
1 to 1.5
min.
Ink tank replacement When an ink tank
becomes empty.
(No ink error)
----- -----
2 min.
Paper feed roller
cleaning
When paper does not
feed properly
To clean the paper
feed rollers.
Printer buttons 2 min.
CD-R print position
alignment
When printing to
CD-R
To ensure accurate
CD-R print position
Computer (Settings
via the application)
5 min.
Cleaning inside the
printer
When the backside
of paper is dirty.
To remove ink mist
adhered to the
platen rib, using a
cloth.
-----
1 min