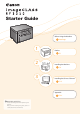
Starter Guide Before Using the Machine Next Page 1 Preface P.5 2 Installing the Machine P. 9 3 Installing the Drivers Software P. 15 Appendix P. A-1 Read this guide first. Please read this guide before operating this product. After you finish reading this guide, store it in a safe place for future reference.
Important Safety Instructions As these instructions are intended to prevent injury to the user and other persons or to prevent destruction of property, always pay attention to these instructions and operational requirements. Also, as it may result in unexpected accidents or injuries, do not perform any operation unless otherwise specified in the manual. Installation WARNING • Do not install the machine in a location near alcohol, paint thinner, or other flammable substances.
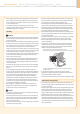
Before Using the Machine 1 Preface 2 Installing the Machine 3 Connecting to a Computer and Installing the Drivers Appendix • Always grasp the power plug when unplugging the power plug. Do not • Keep your hands and clothing away from the roller in the output area. pull on the power cord, as this may expose the core wire of the power cord or damage the cord insulation, causing electricity to leak, resulting in a fire or electrical shock.
• Some areas inside the machine are subject to high voltage. When • When removing jammed paper, be careful not to allow the toner on the removing jammed paper or when inspecting inside of the machine, be careful not to allow necklaces, bracelets, or other metal objects to touch the inside of the machine, as this can result in burns or electrical shock. • Do not dispose of used toner cartridges in open flames.
Before Using the Machine 1 Preface 2 Installing the Machine 3 Connecting to a Computer and Installing the Drivers Appendix Legal Notices International ENERGY STAR Program As an ENERGY STAR? Partner, Canon U.S.A., Inc. has determined that this product meets the ENERGY STAR Program for energy efficiency. T h e I n t e r n a t i o n a l E N E R G Y S TA R O f f i c e Equipment Program is an international program that promotes energy saving through the use of computers and other office equipment.
imageCLASS MF3010: F162100 • Reorient or relocate the receiving antenna. • Increase the separation between the equipment and receiver. • Connect the equipment to an outlet on a circuit different from This device complies with Part 15 of the FCC Rules. Operation • Consult the dealer or an experienced radio/TV technician for help. FCC (Federal Communications Commission) that to which the receiver is connected.
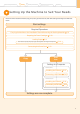
Before Using the Machine 1 Preface 2 Installing the Machine 3 Connecting to a Computer and Installing the Drivers Appendix Setting Up the Machine to Suit Your Needs Determine which machine functions (Copy, Print, Scan) you intend to use, and make settings according to the flowchart below. Start settings. Required Operations Carrying the Machine to the Installation Site and Removing the Packing Materials Preparing the Toner Cartridges Loading Paper P. 9 P. 10 P.
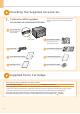
Checking the Supplied Accessories 1. Confirm that all the supplied accessories are contained in the box. If an item is missing or damaged, please contact our Canon Authorized Service Facilities or the Canon Customer Care Center. The machine unit The toner cartridge is already installed. Quick Guide Referen xxxxx xxxxxxxxxxxxxxx xxxxxxxxxxxxxxxxxxxx xxxxx xxxxxxxxxx xxxxx Quick Reference Guide Place this guide near the printer for effective usage.
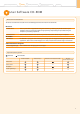
Before Using the Machine 1 Preface 2 Installing the Machine 3 Connecting to a Computer and Installing the Drivers Appendix User Software CD-ROM About the Drivers and Software The drivers and software included in the CD-ROM supplied with this machine are as follows. MF Drivers Printer driver Scanner driver MF Toolbox MF Toolbox You can print from an application using the machine by installing the printer driver on your computer.
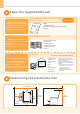
About the Supplied Manuals Read this manual first. Starter Guide This manual • Preface • Installing the Machine • Connecting to a Computer and Installing the Drivers • Appendix This manual describes the settings for setting up the machine and installing the software. Be sure to read this manual before using the machine. Quick Reference Guide Read this manual next.
Before Using the Machine 1 Preface 2 Installing the Machine 3 Connecting to a Computer and Installing the Drivers Appendix arr ying the Machine to the Installation Site C and Removing the Packing Materials 1. Carry the machine to the installation site. Hold the grips. Carry the machine. 2. Remove the packing materials. Remove the tape that is attached to the paper (the paper describes precautions).
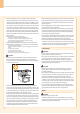
Preparing the Toner Cartridges 1. Lift the scanning platform. Hold the operation panel. Lift the scanning platform. If you cannot lift the scanning platform Make sure that the platen glass is completely closed. Do not try to forcefully lift the scanning platform as this may damage the machine. 2. Open the toner cover. Hold the grip on the left front side of toner cover. Open the toner cover. 3. Remove the packing materials from the toner cartridge, and then distribute the toner.
Before Using the Machine 1 Preface 2 Installing the Machine Remove the packing material. Lift the tab. Place the toner cartridge on a flat surface, and then lift the tab. 3 Connecting to a Computer and Installing the Drivers Shake five to six times. Appendix Remove the packing material. Insert the toner cartridge. Fit the protrusions on each side of the toner cartridge into the guides located on each side of the machine, and then slide the toner cartridge into the machine.
4. Close the toner cover, and then lower the scanning platform. Close the toner cover. Lower the scanning platform. Loading Paper 1. Open the paper cassette. 2. Load the paper, and then adjust the paper guides. Spread the paper guides. Spread the paper guides a little wider than the paper size. Load the paper. Load the paper until the edge of the paper stack meets the back of the paper cassette. Load limit guide Check! Ensure that the paper stack does not exceed the load limit guides.
Before Using the Machine 1 Preface 2 Installing the Machine Slide the paper guides to the paper width without space. 3 Connecting to a Computer and Installing the Drivers Appendix Slide the paper guide to the rear edge of the paper without space. Additional preparations for printing Lift the paper stopper. Push the protrusion. Pull out the output tray extension. Connecting the Power Cord Ensure that the machine is off. Plug the power plug into the power socket.
Turn ON the machine 1. Turn ON the machine. ON Setting a Paper Type Press [ ] (Menu setting key), and then start the menu operation. Press [ ] or [ ] to change the setting values. Press [ ] or [ ] until “P” is displayed. Check! The display and the paper types are matched as follows. Display 14 Press [ ], and set the menu to be able to change the settings. Press [ ] to confirm the setting.
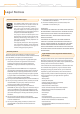
Before Using the Machine 1 Preface 2 Installing the Machine 3 Connecting to a Computer and Installing the Drivers Installing the Drivers Software Appendix (For Windows) ••Connect the USB cable after installing the software. ••Ensure that the power of the machine is turned on when connecting the USB cable. 1. Turn on the computer, and then log on as a user with administrative privileges. If you have already logged on, exit all applications which are running. 2.
Ensure that [ ] is added. Select the check box. (1) (2) Click. Click. Click. The CD-ROM may be removed once this screen appears. 3. Connect the USB cable. Remove cap plug. Remove by pulling the string. Connect the cable. • Flat end (A): (B) Connect to the USB port on the computer. • Square end (B): Connect to the USB port on the machine. (A) When a dialog box is displayed Follow the on-screen instructions and complete the installation. Checking the Installation Results P.
Before Using the Machine 1 Preface 2 Installing the Machine 3 Connecting to a Computer and Installing the Drivers Appendix Checking the Installation Results Ensure that the MF Drivers and MF Toolbox are installed correctly. Ensure that the icons for the installed software are added as follows. Software Location Icon Printer folder ••Windows 2000 From the [Start] menu, select [Settings] → [Printers]. ••Windows XP Professional From the [Start] menu, select [Printers and Faxes].
Installing the Software (For Macintosh) ••Connect the USB cable after installing the software. ••The installation screen varies depending on the version of MAC OS X. Close all applications that are running. Insert the CD-ROM. Click. * You cannot change the installation location. Click [Continue]. Double-click the CD-ROM icon. Depending on the system environment, the [Select a Destination] dialog box may not be . displayed. In this case, skip to step Double-click. Click.
Before Using the Machine 1 Preface 2 Installing the Machine 3 Connecting to a Computer and Installing the Drivers Connecting a USB Cable Appendix (For Macintosh) ••Perform the following procedure only when connecting this machine to Macintosh with a USB cable. Remove the cap plug. Remove by pulling the string. Connect the cable. • Flat end (A): Connect to the USB port on the computer. • Square end (B): Connect to the USB port on the machine.
Registering the Printer Register the printer following the procedure from Open [System Preferences]. to (For Macintosh) . Click [Print & Fax] or [Print & Scan]. Select. If you are using Mac OS X 10.4.x, select [Default Browser]. Click the [+] icon. If you are using Mac OS X 10.4.x, click [Print] in the [Print & Fax] dialog box to display the [Print] pane, and then click the [+] icon. Click. Select. Select a printer name for which [USB] is displayed in the [Kind] or [Connection] column. Select.
1 Before Using the Machine Preface 2 Installing the Machine 3 Connecting to a Computer and Installing the Drivers Appendix Using the e -Manual Page configuration of the e-Manual When you start the e-Manual, the screen below is displayed. Click to refer to the contents, glossary, and how to use the e-Manual. Enter a keyword which you want to search, and then click the right button. Click to view precautions when using Macintosh.
For Macintosh Installing the e-Manual on your computer Insert the User Software CD-ROM in your computer. Open the [Documents] folder. Drag and drop the [MF Guide] folder into a location where you want to save it. When displaying the installed e-Manual, double-click [index.html] in the saved [MF Guide] folder. Displaying the e-Manual directly from the CD-ROM Insert the User Software CD-ROM in your computer. Open the [Documents] → [MF Guide] folders. Double-click [index.html].
Before Using the Machine 1 Preface 2 Installing the Machine 3 Connecting to a Computer and Installing the Drivers Appendix If You Want to Uninstall the Installed Software If you do not need the printer driver, scanner driver, or MF Toolbox, you can uninstall them with the following procedure. 1. Confirm the following points.
For Macintosh If the machine is connected to a computer with a USB cable, disconnect the USB cable. If you want to delete the Scanner Driver or MF Toolbox, proceed to step Open [System Preferences], and then click [Print & Fax] or [Print & Scan]. . Select the machine, and then click the [-] icon. If you are using OS X 10.4.x, click [Print] to display the [Print] pane, and then click the [—] icon. Delete all print queues set from this driver. Start the Mac OS X Finder.
Before Using the Machine 1 Preface 2 Installing the Machine 3 Connecting to a Computer and Installing the Drivers Appendix Contacting the Service Center When you have a problem with your machine and you cannot solve it even if you refer to the manuals or online help, please contact our Canon Authorized Service Facilities or the Canon Customer Care Center at 1-800-OK-CANON between the hours of 8:00 A.M. to 8:00 P.M. EST for U.S.A. and 9:00 A.M. to 8:00 P.M. EST for Canada Monday through Friday.
CANON INC. 30-2, Shimomaruko 3-chome, Ohta-ku, Tokyo 146-8501, Japan CANON MARKETING JAPAN INC. 16-6, Konan 2-chome, Minato-ku, Tokyo 108-8011, Japan CANON U.S.A., INC. Replacement Toner Cartridges Model name MF3010 Supported Canon genuine toner cartridge Canon Cartridge 125 One Canon Plaza, Lake Success, NY 11042, U.S.A. CANON EUROPA N.V. Bovenkerkerweg, 59-61, 1185 XB Amstelveen, The Netherlands CANON CHINA CO. LTD. 15F Jinbao Building No.