
imageCLASS MF3200 Series Software Guide


1
2
3
4
5
6
TOP
Back Previous Next
3-43
Table of Contents
Index
Introduction
Printing
Scanning a
Document
PC Faxing
Troubleshooting
Appendix
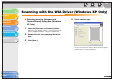
■ Scanning from the [Windows FAX &
Scan] Dialog Box (Windows Vista/7
Only)
Depending on the Edition of your Windows Vista/7, this function
may not be supported.
1. Open the [Windows FAX & Scan] dialog box.
Windows Vista: Click [Start] on the Windows task bar → select
[Control Panel] → [Hardware and Sound] → [Scan a document or
picture] in [Scanners and Cameras].
Windows 7: Enter "scanner" in [Search programs and files] under
[Start] on the Windows task bar → click [View scanners and
cameras].
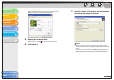
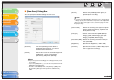
2. Click [New Scan] to open the [New Scan]
dialog box.
You can open it also from the [File] menu by selecting [New] →
[Scan].
3. Make sure the corresponding scanner driver
icon is displayed on [Scanner].
If you want to use other scanners, click [Change...] to select a
desired scanner driver icon.
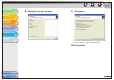
4. Specify required scan settings.
For details on the settings, see “[New Scan] Dialog Box,” on
p. 3-45.
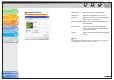
5. Click [Scan].
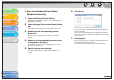
Scanning will start. When completed, the scanned image is
displayed on [Windows Fax & Scan].
When you scan more than one picture, sequential numbers are
automatically added to the file names and the image files are
saved in the [Scanned Documents] folder in the [Document]
folder.
The file names of the images can be renamed afterwards.