
imageCLASS MF3200 Series Software Guide


1
2
3
4
5
6
TOP
Back Previous Next
3-12
Table of Contents
Index
Introduction
Printing
Scanning a
Document
PC Faxing
Troubleshooting
Appendix
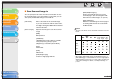
■ External Program (Mail Program)
When scanning using the [OCR], [PDF], [Scan-1], [Scan-2],
[Scan-3] or [Scan-4] buttons, you can specify an application to
be used to display the scanned image. Click [Set]
→ select the
application to use
→ click [Open]. You can also specify an
application by dragging and dropping the application icon onto
the dialog box.
To delete the link to the application, click [Delete]
When scanning using the [Mail] button, you can specify an
e-mail software to which you want to attach the scanned image.
The MF Toolbox is compatible with e-mail software such as
Outlook Express, Microsoft Outlook, EUDORA, Netscape
Messenger and Windows Mail (Windows Vista only). Click [Set]
→ select the application to use → click [OK].
If [None (Attach Manually)] is displayed, you need to attach the
image file manually.
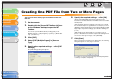
[PDF Settings] Opens the [PDF Settings] dialog box which
enables you to make advanced settings of
the PDF file. (See “Creating One PDF File
from Two or More Pages,” on p. 3-16.) This
button appears when [PDF], [PDF (Single
Page)], [PDF (Multiple Pages)] or [PDF (Add
Page)] is selected in [Save as Type].
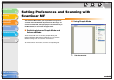
[Save Scanned
Image to]
Shows the location to save the scanned
images when an option other than [PDF
(Add Page)] is selected in [Save as Type]. To
change the location, click [Browse]
→ select
a folder
→ click [OK].
When you scan for the first time, a folder with
the scanning date will be created in the [My
Pictures] folder in the [My Documents]
folder, and your document will be saved in
this folder.
[Add Scanned
Image to]
This item appears instead of [Save Scanned
Image to] when [PDF (Add Page)] is
selected in [Save as Type]. You can select
the PDF file to which you want to add the
scanned image.
[Save Pictures to
a Subfolder with
Current Date]
Select this check box to create a folder with
current date (e.g. 2005-12-31) in the
specified location and save the scanned
images in this folder.