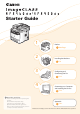
/ Starter Guide 1 Preface Next Page 2 Installing the Machine P. 6 3 Configuring and Connecting the Fax P. 14 4 Connecting to a Computer and Installing the Drivers P. 18 Read this guide first. Please read this guide before operating this product. The remarks for important safety instructions are described in "Basic Operation Guide." Read the guide also. After you finish reading this guide, store it in a safe place for future reference. Appendix P.
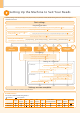
Setting Up the Machine to Suit Your Needs Specify settings related to the Copy, Print, Fax, PC Fax, Scan, Remote UI and ,Media Printing functions. Follow the steps in the flowchart below. Start settings. Required Operations Carrying the Machine to the Installation Site and Removing the Packing Materials Preparing the Toner Cartridges Attach the Optional Drawer Loading Paper P. 10 P. 10 Copy Media Print P. 8 Settings for paper sizes and paper types are required after turning the power ON.
1 Preface 2 Installing the Machine 3 Configuring and Connecting the Fax 4 Connecting to a Computer and Installing the Drivers Appendix Checking the Supplied Accessories 1. Confirm that all the supplied accessories are contained in the box. If an item is missing or damaged, please contact our Canon Authorized Service Facilities or the Canon Customer Care Center. About the LAN cable The machine does not come with a LAN cable or a hub. Have cables or a hub ready as needed.
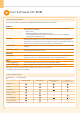
User Software CD-ROM About the Drivers and Software The drivers and software included in the CD-ROM supplied with this machine are as follows. MF Drivers Printer driver You can print from an application to the machine once you have the printer driver installed on your computer. Printer Drivers: UFRII LT/UFRII (XPS)PCL5e/PCL6/PS Printer Driver * The appropriate Printer Driver differs according to your machine. UFRII (XPS)/ PCL5e/PCL6 is for Windows only.
1 Preface 2 Installing the Machine 3 4 Configuring and Connecting the Fax Connecting to a Computer and Installing the Drivers Appendix About the Supplied Manuals Read this manual first. This manual describes the settings for setting up the machine and installing the software. Be sure to read this manual before using the machine.
Determining the Installation Site 50 3/8" (1,279 mm) 4" (100 mm) 4" (100 mm) 4" (100 mm) 31 3/8" (795 mm) 23 1/4" (590 mm) 4" (100 mm) 4" (100 mm) Notes on wireless LAN • This product is designed for indoor use 164’/50 m (may vary on the communication speed or environmental condition) or less away from an access point. Keep it at an appropriately close distance. • Check if masking is found or not. Communications across walls or between floors are generally deteriorated.
1 Preface 2 Installing the Machine Remove the packing materials. 3 Configuring and Connecting the Fax 4 Connecting to a Computer and Installing the Drivers Open the feeder. Close the feeder. Remove the packing materials. Hold the operation panel. Appendix Remove the packing materials with tape. Lift the scanning platform. Lower the scanning platform. Check! Make sure that the following packing materials are all removed from the machine.
Preparing the Toner Cartridges 1. Open the front cover. Open the front cover. Hold down the open button. 2. Remove the packing materials from the toner cartridge, and install the toner cartridge. Remove the packing material. Shake five to six times. Remove the toner cartridge. Remove the packing material. Remove the tab. Place the toner cartridge on a flat surface, and remove the tab. Pull the sealing tape completely out. The full length of the sealing tape is approximately 20 in. (50 cm).
1 Preface 2 Installing the Machine 3 Configuring and Connecting the Fax 4 Connecting to a Computer and Installing the Drivers Appendix Insert the toner cartridge. Fit the protrusions on both sides of the toner cartridge into the guides located on both sides of the machine, and slide the toner cartridge into the machine until the toner cartridge comes to rest and is held against the back of the machine. Check! Protrusion Left Side View Packing materials x2 Protrusion 3.
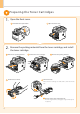
Attach the Optional Drawer to the machine Take the drawer from the carton, and remove all packing materials, including shipping tape before attaching the optional drawer to the machine. Make sure the machine and the optional drawer are facing in the same direction when being attached. NOTE When moving the main unit, be sure to carry it from front side by using the provided hand grips on the left and right sides, as seen in the illustration. Loading Paper 1. Pull out the paper drawer. 2.
1 Preface 2 Installing the Machine Load the paper. Load the paper that it aligns with the rear side of the paper drawer . 3 Configuring and Connecting the Fax 4 Connecting to a Computer and Installing the Drivers Set the paper under the hooks. Appendix Check! Make sure that the paper stack does not go over the line of the load limit mark. Hooks Hooks Up to here Hooks 3. Set the paper drawer. Connecting the Power Cord Make sure that the machine is switched OFF.
T urning On the Machine and Specifying the Initial Settings 1. Turn ON the machine. • When turning ON the machine for the first time after installation. it may output a piece of blank paper. This is not a failure. • The machine enters the Sleep mode to conserver energy when you do not operate the machine for a certain period of time. To cancel the Sleep mode, press the [ ] (Energy Saver) key on the operation panel. 2. Specify initial settings. Press [ ] or [ ] to select, and press [OK].
1 Preface 2 Installing the Machine 3 Configuring and Connecting the Fax 4 Connecting to a Computer and Installing the Drivers Appendix Setting a Paper Size and Type Press [ ] (Select Paper/Settings). Press [ ] or [ press [OK]. ] to select, and Select Paper MP Tray 1 LTR:Plain Paper Settings Press [ ] or [ press [OK]. Paper Size LTR LGL EXEC FOOLSCAP ] to select, and Press [ ] or [ press [OK]. Press [ ] or [ press [OK].
S pecifying Initial Fax Settings and Connecting a Telephone Cable Operate the machine following the on-screen instructions and perform the following settings and connection. • Registering the fax number and unit name • Setting the fax receive mode • Connecting a telephone line If you are using pulse dialing, change the line type after specifying the settings. Entering Text Enter information (text, symbols, and numbers) using the following keys.
1 2 Preface 2. Installing the Machine 3 Configuring and Connecting the Fax 4 Connecting to a Computer and Installing the Drivers Appendix Select the fax receive mode. You can specify how the machine should operate for a fax call or telephone call. By answering the prompts that appear on the display, the machine will be set to one of the following four operation modes. The receive mode is set to . → Proceed to Step 3.
3. Connect the telephone line. Press [OK]. The screen that appears varies depending on the receive mode selected. Connect phone line. Follow illustrations on the next screen: Connect line to A. *Next : Press OK Connect phone line. Follow illustrations on the next screen to make connections: 1. Phone line to A Connect the telephone line using the jack.
1 2 Preface 4. Installing the Machine 3 Configuring and Connecting the Fax 4 Connecting to a Computer and Installing the Drivers Appendix Change the line type. By default, the telephone line type is set to tone dialing. Skip the following steps in the procedure below when you choose to use tone dialing. Follow the steps in the procedure below to select pulse dialing. Contact your local telephone company when you are not sure of the line type that you are using. Press [ ] (Menu).
Selecting the method for connecting to the machine Select from the following three methods, depending on your environment and devices. If you are not sure whether the router or access point you are using supports wireless LAN or wired LAN, see the instruction manual provided with the network device you are using, or contact the manufacturer. Connecting via a USB Cable Connect them using a USB cable. • Windows Installing the USB connection P. 22 • Macintosh Installing the software P.
1 2 Preface Installing the Machine 3 Configuring and Connecting the Fax 4 Connecting to a Computer and Installing the Drivers Appendix Connecting to Wired LAN Before adding the machine to a wired LAN Check to make sure that the computer is connected by a LAN cable to a router or hub, and that the network setup is completed. If it is not set up, you will not be able to use the machine on the wired LAN network even if you perform the following steps.
Installing via Network Connection 1. 2. Check the following points. (For Windows) • The computer and machine are connected via the network. • The power of the machine is turned ON. • IP address is properly set up. Proceed to “Checking the IP Address.” on p.A-3 Turn on the computer, and then log on as a user with administrative privileges. If you have already logged on, exit all applications which are running. 3. Install the MF Drivers and MF Toolbox.
1 Preface 2 Installing the Machine Select. 3 Configuring and Connecting the Fax 4 Connecting to a Computer and Installing the Drivers Appendix If no devices are displayed in [Device List] Perform the following procedure. 1. Check the following. • The computer and device are connected via the network. • The device is turned on. • The IP address is set correctly. • The computer and device are on the same subnet. • Security software has been exited. Click. 2. Click [Update Device List].
Installing with USB Connection (For Windows) ••Connect the USB cable after installing the software. ••Ensure that the power of the machine is turned on when connecting the USB cable. To use Printer Driver other than UFRII through the USB connection You need to change the machine setting beforehand. Choose the PDL (Printer Driver) that you want to use and follow the procedures shown below.
1 Preface 2 Installing the Machine 3 Configuring and Connecting the Fax 4 Connecting to a Computer and Installing the Drivers Appendix Next, installation of MF Toolbox starts. * In Windows 2000 Server/Server 2003/2008, MF . Toolbox is not installed. Proceed to Step Click. Click. Ensure that [ ] is added. Select the check box. Click. Click. Click. The CD-ROM may be removed once this screen appears. 3. Connect the USB cable. Remove cap plug. Remove by pulling the string.
Checking the Installation Results (For Windows) Ensure that the MF Drivers and MF Toolbox are installed correctly. Ensure that the icons for the installed software are added as follows. Refer to the “User Software CD-ROM” (P. 4) for the functions of each software. Software Printer driver Location Icon Printer folder ••Windows 2000 From the [Start] menu, select [Settings] → [Printers]. ••Windows XP Professional/Server 2003 From the [Start] menu, select [Printers and Faxes].
1 Preface 2 Installing the Machine 3 Configuring and Connecting the Fax Installing the Software 4 Connecting to a Computer and Installing the Drivers Appendix (For Macintosh) ••Connect the USB cable after installing the software. ••The installation screen varies depending on the version of MAC OS X. Close all applications that are running. Insert the CD-ROM. Click. * You cannot change the installation location. Click [Continue]. Double-click the CD-ROM icon.
Connecting a USB Cable (For Macintosh) ••Perform the following procedure only when connecting this machine to Macintosh with a USB cable. Remove the cap plug. Remove by pulling the string. (A) Connect the cable. • Flat end (A): Connect to the USB port on the computer. • Square end (B): Connect to the USB port on the machine. (B) (A) Registering the Printer and Fax P.
1 Preface 2 Installing the Machine 3 Configuring and Connecting the Fax 4 Connecting to a Computer and Installing the Drivers Registering the Printer and Fax Appendix (For Macintosh) To print or send faxes from a Macintosh, you need to register this machine in the Macintosh. The registration method varies depending on the connection type. Select a method according to your environment. * The scanning function does not need to be registered.
TCP/IP Connection (For Macintosh) Register the printer and fax respectively following the procedure from to . * You may not use IPv6 with this machine. Open [System Preferences]. Click [Print & Fax]. Click the [+] icon. If you are using Mac OS X 10.4.x, click [Print] in the [Print & Fax] dialog box to display the [Print] pane, and then click the [+] icon. Enter the IP address of this machine. Select. If you are using Mac OS X 10.4.x, select [IP Printer]. Select. If you are using Mac OS X 10.4.
1 Preface 2 Installing the Machine 3 4 Configuring and Connecting the Fax USB Connection Connecting to a Computer and Installing the Drivers (For Macintosh) Register the printer and fax respectively following the procedure from Open [System Preferences]. Appendix Click [Print & Fax]. Select. If you are using Mac OS X 10.4.x, select [Default Browser]. to . Click the [+] icon. If you are using Mac OS X 10.4.
Using the e -Manual Page configuration of the e-Manual When you start the e-Manual, the screen below is displayed. Click to refer to the contents, glossary, and how to use the e-Manual. Enter a keyword which you want to search, and then click the right button. Click to view precautions when using Macintosh. Click a button for the function which you want to use or desired information. Click when performing troubleshooting or maintenance of the machine.
1 Preface 2 Installing the Machine 3 Configuring and Connecting the Fax 4 Connecting to a Computer and Installing the Drivers Appendix For Macintosh Installing the e-Manual on your computer Insert the User Software CD-ROM in your computer. Open the [Documents] folder. Drag and drop the [MF Guide] folder into a location where you want to save it. When displaying the installed e-Manual, double-click [index.html] in the saved [MF Guide] folder.
Checking the IP Address Press [ ] (Status Monitor/Cancel). Press [ ] or [ ] to select, and then press [OK]. IPv4 IP Address Subnet Mask Gateway Address Host Name Press [ ] or [ ] to select, and then press [OK]. Press [ ] or [ ] to select, and then press [OK]. Status Monitor/Cancel TX Job RX Job Fax Forwarding Erro... Network Information Network Information IPv4 IPv6 Wireless LAN Informa... IEEE802.1X Error Inf... Check the IP address. IP Address 192.168.0.
1 Preface 2 Installing the Machine 3 Configuring and Connecting the Fax 4 Connecting to a Computer and Installing the Drivers Appendix If You Want to Uninstall the Installed Software If you do not need the printer driver, fax driver, scanner driver, or MF Toolbox, you can uninstall them with the following procedure. 1. Confirm the following points. 2. Delete the software.
For Macintosh If the machine is connected to a computer with a USB cable, disconnect the USB cable. If you want to delete the Scanner Driver or MF Toolbox, proceed to step Open [System Preferences], and then click [Print & Fax]. . Select the machine, and then click the [-] icon. If you are using OS X 10.4.x, click [Print] to display the [Print] pane, and then click the [—] icon. Delete all print queues set from this driver. Start the Mac OS X Finder. From the menu bar, click [Go] → [Go to Folder].
1 Preface 2 Installing the Machine 3 Configuring and Connecting the Fax 4 Connecting to a Computer and Installing the Drivers Appendix Contacting the Service Center When you have a problem with your machine and you cannot solve it even if you refer to the manuals or online help, please contact our Canon Authorized Service Facilities or the Canon Customer Care Center at 1-800-OK-CANON between the hours of 8:00 A.M. to 8:00 P.M. EST for U.S.A. and 9:00 A.M. to 8:00 P.M.
CANON INC. 30-2, Shimomaruko 3-chome, Ohta-ku, Tokyo 146-8501, Japan CANON MARKETING JAPAN INC. 16-6, Konan 2-chome, Minato-ku, Tokyo 108-8011, Japan CANON U.S.A., INC. One Canon Plaza, Lake Success, NY 11042, U.S.A. CANON EUROPA N.V. Bovenkerkerweg, 59-61, 1185 XB Amstelveen, The Netherlands CANON CHINA CO. LTD. 15F Jinbao Building No.