
Operation Guide


The Schedule view
Introduction
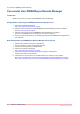
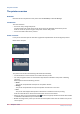
Overview of the components in the [Job scheduler] view of PRISMAsync Remote Manager.
The different components
1. Time line bar.
The time line scales the [Job scheduler] view and displays up to a maximum of 8 hours.
You can scale this time line with the buttons. You see all warnings for the connected printers
in the time line.
For a full description see
The time line
on page 46.
2. The + Job button.
This button is used to submit jobs to a printer.
For a full description see
Submit a print job to a printer
on page 23.
3. Printer overview.
This view contains:
• An overview of the configured printers.
Click one of the printers to go to the printer view.
• The current status of the printers.
For a full description see
The printer overview
on page 48.
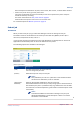
4. The [Job scheduler]
This view contains:
• The jobs queued/scheduled for the printers.
• Small thumbnails for easy recognition of the jobs.
NOTE
Thumbnails are not supported for the Océ VarioPrint 6000
+
.
• Alerts for the user.
There is extended media status info when required.
For a full description see
The Schedule
on page 53.
The time line
Introduction
You can configure the time line for the [Job scheduler].
The time line can be scaled up or down and shows a maximum length of 8 hours.
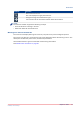
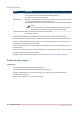
The different elements of the time line
Element
Function
The time ruler Gives you a clear indication of the timing in the [Job scheduler] view.
Navigate through time towards the left.
You can also use the horizontal scrollbar below the schedule.
Zoom the time line in.
The ruler displays a shorter period of time.
4
The Schedule view
46
Chapter 6 - Views
PRISMAsync Remote Manager