
User manual
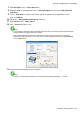
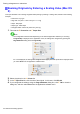
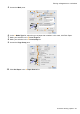

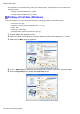
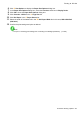
Table Of Contents
- Top
- Contents
- Introduction
- Printer Parts
- Basic Printing Workflow
- Handling Paper
- Paper
- Handling rolls
- Attaching the Roll Holder to Rolls
- Loading Rolls in the Printer
- Changing the Type of Paper
- Specifying the Paper Length
- Printing From a Desired Starting Point
- Removing the Roll from the Printer
- Removing the Roll Holder from Rolls
- Clearing Jammed Roll Paper
- Clearing Jammed Paper (Paper Feed Slot)
- Feeding Roll Paper Manually
- Keeping Track of the Amount of Roll Paper Left
- Specifying the Ink Drying Time for Rolls
- Specifying the Cutting Method for Rolls
- Cutting the Leading Edge of Roll Paper Automatically
- Reducing Dust from Cutting Rolls
- Roll Holder Set
- Handling sheets
- Output Stacker
- Working With Various Print Jobs
- Enhanced Printing Options
- Adjusting Images
- Adjusting the Color in the Printer Driver
- Fine-Tuning Colors of Photos and Images (Windows)
- Fine-Tuning Colors of Photos and Images (Mac OS X)
- Giving Priority to Particular Graphic Elements and Colors for Printing
- Choosing the Document Type and Printing Conditions (Windows)
- Choosing the Document Type and Printing Conditions (Mac OS X)
- Choosing Paper for Printing
- Printing enlargements or reductions
- Resizing Originals to Match the Paper Size
- Resizing Originals to Match the Paper Size (Windows)
- Resizing Originals to Match the Paper Size (Mac OS X)
- Resizing Originals to Fit the Roll Width
- Resizing Originals to Fit the Roll Width (Windows)
- Resizing Originals to Fit the Roll Width (Mac OS X)
- Resizing Originals by Entering a Scaling Value
- Resizing Originals by Entering a Scaling Value (Windows)
- Resizing Originals by Entering a Scaling Value (Mac OS X)
- Printing at full size
- Borderless Printing
- Borderless Printing on Paper of Equivalent Size
- Borderless Printing by Resizing Originals to Match the Paper Size (Windows)
- Borderless Printing by Resizing Originals to Match the Paper Size (Mac OS X)
- Borderless Printing by Resizing Originals to Fit the Roll Width
- Borderless Printing by Resizing Originals to Fit the Roll Width (Windows)
- Borderless Printing by Resizing Originals to Fit the Roll Width (Mac OS X)
- Borderless Printing at Actual Size
- Borderless Printing at Actual Size (Windows)
- Borderless Printing at Actual Size (Mac OS X)
- Printing banners or at other non-standard sizes
- Printing Vertical or Horizontal Banners (Large-Format Printing)
- Printing Vertical or Horizontal Banners (Large-Format Printing; Windows)
- Printing Vertical or Horizontal Banners (Large-Format Printing; Mac OS X)
- Printing on Non-Standard Paper Sizes
- Printing on Non-Standard Paper Sizes (Windows)
- Printing on Non-Standard Paper Sizes (Mac OS X)
- Tiling and multiple pages per sheet
- Printing Multiple Originals Next to Each Other
- Printing Multiple Originals Next to Each Other (Windows)
- Printing Multiple Originals Next to Each Other (Mac OS X)
- Printing Multiple Pages Continuously
- Printing Multiple Pages Continuously (Windows)
- Printing Multiple Pages Continuously (Mac OS X)
- Printing Multiple Pages Per Sheet
- Printing Multiple Pages Per Sheet (Windows)
- Printing Multiple Pages Per Sheet (Mac OS X)
- Printing Posters in Sections
- Printing Large Posters (Windows)
- Centering originals
- Conserving roll paper
- Conserving Roll Paper by Rotating Originals 90 Degrees
- Conserving Roll Paper by Rotating Originals 90 Degrees (Windows)
- Conserving Roll Paper by Rotating Originals 90 Degrees (Mac OS X)
- Conserving Roll Paper by Printing Originals Without Top and Bottom Margins
- Conserving Roll Paper by Printing Originals Without Top and Bottom Margins (Windows)
- Conserving Roll Paper by Printing Originals Without Top and Bottom Margins (Mac OS X)
- Checking Images Before Printing
- Other useful settings
- Printing With Watermarks
- Printing with Watermarks-COPY, FILE COPY, and so on (Windows)
- Making the Original Orientation Match the Paper Orientation
- Making the Original Orientation Match the Paper Orientation (Windows)
- Making the Original Orientation Match the Paper Orientation (Mac OS X)
- Using Favorites
- Using Favorites (Windows)
- Using Favorites (Mac OS X)
- Cutting Roll Paper After Printing
- Cutting Roll Paper After Printing (Windows)
- Cutting Roll Paper After Printing (Mac OS X)
- Adjusting Images
- Windows Software
- Printer Driver
- Printer Driver Settings (Windows)
- Specifying Paper in the Printer Driver (Windows)
- Confirming Print Settings (Windows)
- Checking the Layout in a Preview Before Printing (Windows)
- Using Favorites (Windows)
- Accessing the Printer Driver Dialog Box from Applications (Windows)
- Accessing the Printer Driver Dialog Box from the Operating System Menu (Windows)
- Main Sheet (Windows)
- Paper Information on Printer Dialog Box (Windows)
- Paper Detailed Settings Dialog Box (Windows)
- View Settings Dialog Box for the Printing Application (Windows)
- Color Adjustment Sheet: Color (Windows)
- Object Adjustment dialog box: Color
- Matching Sheet (Windows)
- Color Adjustment Sheet: Monochrome (Windows)
- Object Adjustment dialog box: Monochrome
- Page Setup Sheet (Windows)
- Paper Size Options Dialog Box (Windows)
- Layout Sheet (Windows)
- Page Options Dialog Box (Windows)
- Special Settings Dialog Box (Windows)
- Favorites Sheet (Windows)
- Utility Sheet (Windows)
- Support Sheet (Windows)
- Settings Summaries Dialog Box (Windows)
- Device Settings Sheet (Windows)
- Preview
- Free Layout
- The Features of Free Layout
- Operating Environment
- Starting Free Layout
- Free Layout Main Window
- Detailed Settings
- Preferences Dialog Box
- Page Options Dialog Box
- Zoom Dialog Box
- Format Dialog Box
- Laying out a Multiple-File Document on One Page
- Laying out a Document Created with Multiple Application Programs on One Page
- Selecting an Object
- Changing the Object Size
- Moving an Object
- Rotating an Object
- Laying out Objects Automatically
- Aligning Objects
- Color imageRUNNER Enlargement Copy
- The Features of Color imageRUNNER Enlargement Copy
- Operating Environment
- Starting Color imageRUNNER Enlargement Copy
- Color imageRUNNER Enlargement Copy Dialog Box
- Hot Folder
- Creating a New Hot Folder
- Specifying an Existing Shared Folder as a Hot Folder
- Setting the Print Parameters
- Printing Enlargements of Scanned Originals from a Color imageRUNNER (Windows)
- Status Monitor
- Accounting
- Accounting Manager
- Launching the Accounting Manager
- Accounting Manager Main Window
- Accounting Manager Basic Procedures
- Configuring Unit Costs in Accounting Manager
- Setting the Unit Cost for Ink
- Setting the Unit Cost for Paper
- Setting the Unit Cost for Items Other Than Ink and Paper
- Configuring Units and Display Settings in Accounting Manager
- Automatically Acquiring Print Job Logs at Regular Intervals
- Canceling Regular Print Job Log Acquisition
- Switching Between Displaying Jobs on Printer and Regularly Acquired Jobs
- Exporting Print Job Data as a CSV File
- Showing Job Properties
- Showing, Saving and Loading Selected Unit Cost Data
- Showing the Total Amount of Ink and Paper Consumed
- Digital Photo Front-Access
- Using PosterArtist to Compose Originals
- Device Setup Utility
- Printer Driver
- Mac OS X Software
- Printer Driver
- Printer Driver Settings (Mac OS X)
- Specifying Paper in the Printer Driver (Mac OS X)
- Confirming Print Settings (Mac OS X)
- Checking the Layout in a Preview Before Printing (Mac OS X)
- Using Favorites (Mac OS X)
- Accessing the Printer Driver Dialog Box from Applications (Mac OS X)
- Main Pane (Mac OS X)
- Paper Information on Printer Dialog Box (Mac OS X)
- Paper Detailed Settings Dialog Box (Mac OS X)
- View settings Dialog Box for the Printing Application (Mac OS X)
- Color Settings Pane: Color (Mac OS X)
- Color Settings Pane: Monochrome (Mac OS X)
- Page Setup Pane (Mac OS X)
- Utility Pane (Mac OS X)
- Additional Settings Pane (Mac OS X)
- Support Pane (Mac OS X)
- Preview
- The Features of Preview
- Operating Environment
- Starting Preview
- Preview Main Window
- Paper Settings Panel
- Easy Settings
- Advanced Settings
- Output Settings Panel
- Color Settings Panel
- Color Adjustment
- Matching
- Driver Matching Mode
- ICC Matching Mode
- ColorSync
- Preferences Dialog Box
- Zoom Dialog Box
- Go to Page Dialog Box
- Print with No Borders
- Print on the Center
- Not Print Spaces at the Top/Bottom
- Print Page Rotated 90 Degrees
- Display with Fitting to the Width of the Paper
- Display with All
- Display with Actual Size
- Moving a Page
- Free Layout
- The Features of Free Layout
- Operating Environment
- Starting Free Layout
- Free Layout Main Window
- Paper Settings Panel
- Easy Settings
- Advanced Settings
- Color Settings Panel
- Color Adjustment
- Matching
- Driver Matching Mode
- ICC Matching Mode
- ColorSync
- Preferences Dialog Box
- Page Setup Dialog Box
- Zoom Dialog Box
- Format Dialog Box
- Laying out a Multiple-File Document on One Page
- Laying out a Document Created with Multiple Application Programs on One Page
- Selecting an Object
- Changing the Object Size
- Moving an Object
- Rotating an Object
- Laying out Objects Automatically
- Aligning Objects
- Changing the Object Overlapping Order
- Pasting a Copied or Cut Object
- Color imageRUNNER Enlargement Copy
- The Features of Color imageRUNNER Enlargement Copy
- Operating Environment
- Starting Color imageRUNNER Enlargement Copy
- Color imageRUNNER Enlargement Copy Dialog Box
- Hot Folder
- Creating a New Hot Folder
- Editing a Hot Folder (Setting Print Conditions)
- Deleting a Hot Folder
- Setting the Print Parameters
- Paper Settings Panel
- Easy Settings
- Advanced Settings
- Output Settings Panel
- Color Settings Panel
- Driver Matching Mode
- ICC Matching Mode
- ColorSync
- Printing Enlargements of Scanned Originals from a Color imageRUNNER (Mac OS X)
- Printmonitor
- Printer Driver
- Network Setting
- Network Setting
- Network Environment
- Configuring the IP Address on the Printer
- Configuring the IP Address Using imagePROGRAF Device Setup Utility
- Configuring the IP Address Using the Printer Control Panel
- Configuring the IP Address Using ARP and PING Commands
- Configuring TCP/IPv6 Network Settings
- Using RemoteUI
- Configuring the Printer's TCP/IP Network Settings
- Configuring the Printer's AppleTalk Network Settings
- Configuring the Printer's NetWare Network Settings
- Specifying Printer-Related Information
- Configuring the Communication Mode Manually
- Email Notification When Printing is Finished or Errors Occur
- Initializing the Network Settings
- Network Setting (Windows)
- Configuring the Printer Driver Destination (Windows)
- Sharing the Printer in Windows
- Configuring the Printer's NetWare Network Settings
- Specifying the Printer's Frame Type
- Specifying NetWare Print Services
- Specifying NetWare Protocols
- Configuring NetWare Network Settings
- Installing imagePROGRAF Device Setup Utility
- Configuring the IP Address Using imagePROGRAF Device Setup Utility
- Network Setting (Mac OS X)
- Network Setting
- Adjustments for Better Print Quality
- Maintenance
- Troubleshooting
- Frequently Asked Questions
- Problems Regarding Paper
- Clearing Jammed Paper (Paper Feed Slot)
- Clearing Jammed Roll Paper
- Clearing a Jammed Sheet
- Roll Paper Cannot be Inserted into the Paper Feed Slot
- Cannot load sheets
- Paper is not cut straight
- Paper is not cut
- Depression on the leading edge is left
- The size of clear film cannot be detected
- Roll Paper is Continuously Ejected
- Printing does not start
- The printer stops during a print job
- Problems with the printing quality
- Printing is faint
- Paper rubs against the Printhead
- The edges of the paper are dirty
- The surface of the paper is dirty
- The back side of the paper is dirty
- Printed colors are inaccurate
- Banding in different colors occurs
- Colors in printed images are uneven
- Image edges are blurred or white banding occurs
- The contrast becomes uneven during printing
- The length of printed images is inaccurate in the feeding direction
- Images are printed crooked
- Documents are printed in monochrome
- Line thickness is not uniform
- Lines are misaligned
- Problems with the printing quality caused by the type of paper
- Cannot print over a network
- Installation problems
- HP-GL/2 problems
- With HP-GL/2, printing is misaligned
- Lines or images are missing in printed HP-GL/2 jobs.
- Lines are printed too thick or thin in HP-GL/2 print jobs
- HP-GL/2 jobs are printed in monochrome (or color)
- Printed colors of lines are inaccurate during HP-GL/2 printing
- HP-GL/2 jobs are printed 6 mm larger than specified
- HP-GL/2 jobs are printed at maximum size, even if a standard size is specified
- HP-GL/2 printing takes a long time
- Replotting with HP-GL/2 jobs is not possible.
- The printer stops when printing a HP-GL/2 job (the carriage stops moving)
- Other problems
- Error Message
- Messages regarding paper
- MediaType Mismatch
- The paper is too small.
- The paper is too small.
- PaprWidth Mismatch
- Paper size not detected.
- Insufficient paper for job
- This paper cannot be used.
- Roll printing is selected.
- Roll printing is selected, but sheets are loaded.
- The roll is empty.
- Sheet printing is selected.
- Regular printing is selected, but a roll is loaded.
- Paper jam
- Paper is crooked.
- Paper not aligned with right guide.
- Cannot detect papr
- Paper cutting failed.
- End of paper feed.
- Rel lever is in wrong position.
- Borderless printng not possible.
- Paper position not suitable for borderless printing.
- Roll paper is not securely in contact with roll holder.
- Messages regarding ink
- Messages regarding printing or adjustment
- Messages regarding printheads
- Messages regarding the maintenance cartridge
- Messages regarding HP-GL/2
- Other Messages
- Messages regarding paper
- Index
Printing enlargements or reductions
7. Click Roll Paper in the L Paper Source list.
8. Select the width of the loaded roll in the M Roll Paper W idth list-in this case, ISO A2/A3 Roll
(420.0mm) .
9. In the A Page Size list, click the size of the original as specied in the application. In this
case, click ISO A4 .
10. Select the C Enlarged/Reduced Printing check box.
1 1. Click ISO A4 in the G Paper Size list.
12. Click F Scaling and enter “120” .
Note
• Y ou can specify enlargement that exceeds the paper size, but in this case, the portions of f the bottom
and right edges of the paper will not be printed.
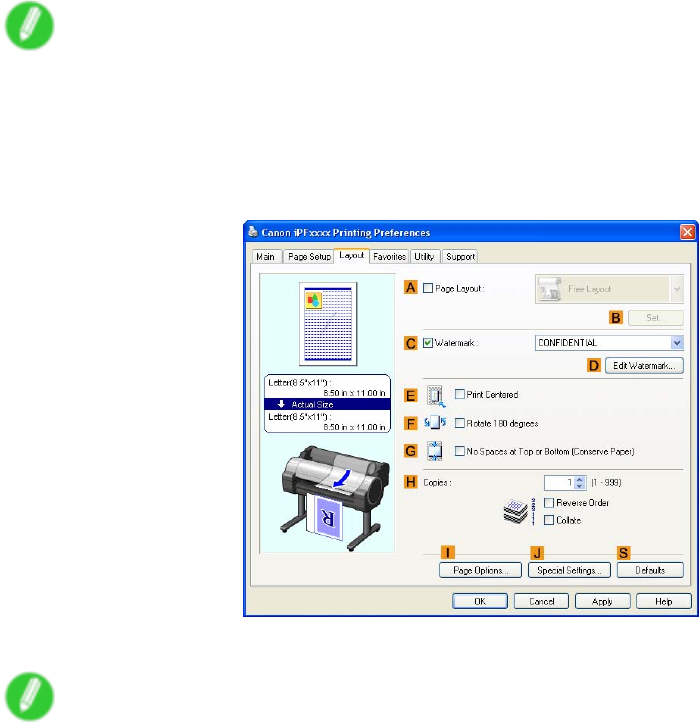
• If the original size after enlargement or reduction is smaller than the paper size, the original is
printed in the upper-left corner . In this case, you can center originals by selecting E Print Centered
on the Layout sheet.
13. Conrm the print settings and print as desired.
Note
• For tips on conrming print settings, see “Conrming Print Settings (Windows)”. (→P .340)
Enhanced Printing Options 215