
User manual
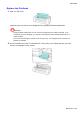
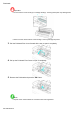
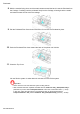
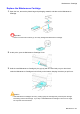
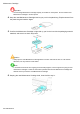
Table Of Contents
- Top
- Contents
- Introduction
- Printer Parts
- Basic Printing Workflow
- Handling Paper
- Paper
- Handling rolls
- Attaching the Roll Holder to Rolls
- Loading Rolls in the Printer
- Changing the Type of Paper
- Specifying the Paper Length
- Printing From a Desired Starting Point
- Removing the Roll from the Printer
- Removing the Roll Holder from Rolls
- Clearing Jammed Roll Paper
- Clearing Jammed Paper (Paper Feed Slot)
- Feeding Roll Paper Manually
- Keeping Track of the Amount of Roll Paper Left
- Specifying the Ink Drying Time for Rolls
- Specifying the Cutting Method for Rolls
- Cutting the Leading Edge of Roll Paper Automatically
- Reducing Dust from Cutting Rolls
- Roll Holder Set
- Handling sheets
- Output Stacker
- Working With Various Print Jobs
- Enhanced Printing Options
- Adjusting Images
- Adjusting the Color in the Printer Driver
- Fine-Tuning Colors of Photos and Images (Windows)
- Fine-Tuning Colors of Photos and Images (Mac OS X)
- Giving Priority to Particular Graphic Elements and Colors for Printing
- Choosing the Document Type and Printing Conditions (Windows)
- Choosing the Document Type and Printing Conditions (Mac OS X)
- Choosing Paper for Printing
- Printing enlargements or reductions
- Resizing Originals to Match the Paper Size
- Resizing Originals to Match the Paper Size (Windows)
- Resizing Originals to Match the Paper Size (Mac OS X)
- Resizing Originals to Fit the Roll Width
- Resizing Originals to Fit the Roll Width (Windows)
- Resizing Originals to Fit the Roll Width (Mac OS X)
- Resizing Originals by Entering a Scaling Value
- Resizing Originals by Entering a Scaling Value (Windows)
- Resizing Originals by Entering a Scaling Value (Mac OS X)
- Printing at full size
- Borderless Printing
- Borderless Printing on Paper of Equivalent Size
- Borderless Printing by Resizing Originals to Match the Paper Size (Windows)
- Borderless Printing by Resizing Originals to Match the Paper Size (Mac OS X)
- Borderless Printing by Resizing Originals to Fit the Roll Width
- Borderless Printing by Resizing Originals to Fit the Roll Width (Windows)
- Borderless Printing by Resizing Originals to Fit the Roll Width (Mac OS X)
- Borderless Printing at Actual Size
- Borderless Printing at Actual Size (Windows)
- Borderless Printing at Actual Size (Mac OS X)
- Printing banners or at other non-standard sizes
- Printing Vertical or Horizontal Banners (Large-Format Printing)
- Printing Vertical or Horizontal Banners (Large-Format Printing; Windows)
- Printing Vertical or Horizontal Banners (Large-Format Printing; Mac OS X)
- Printing on Non-Standard Paper Sizes
- Printing on Non-Standard Paper Sizes (Windows)
- Printing on Non-Standard Paper Sizes (Mac OS X)
- Tiling and multiple pages per sheet
- Printing Multiple Originals Next to Each Other
- Printing Multiple Originals Next to Each Other (Windows)
- Printing Multiple Originals Next to Each Other (Mac OS X)
- Printing Multiple Pages Continuously
- Printing Multiple Pages Continuously (Windows)
- Printing Multiple Pages Continuously (Mac OS X)
- Printing Multiple Pages Per Sheet
- Printing Multiple Pages Per Sheet (Windows)
- Printing Multiple Pages Per Sheet (Mac OS X)
- Printing Posters in Sections
- Printing Large Posters (Windows)
- Centering originals
- Conserving roll paper
- Conserving Roll Paper by Rotating Originals 90 Degrees
- Conserving Roll Paper by Rotating Originals 90 Degrees (Windows)
- Conserving Roll Paper by Rotating Originals 90 Degrees (Mac OS X)
- Conserving Roll Paper by Printing Originals Without Top and Bottom Margins
- Conserving Roll Paper by Printing Originals Without Top and Bottom Margins (Windows)
- Conserving Roll Paper by Printing Originals Without Top and Bottom Margins (Mac OS X)
- Checking Images Before Printing
- Other useful settings
- Printing With Watermarks
- Printing with Watermarks-COPY, FILE COPY, and so on (Windows)
- Making the Original Orientation Match the Paper Orientation
- Making the Original Orientation Match the Paper Orientation (Windows)
- Making the Original Orientation Match the Paper Orientation (Mac OS X)
- Using Favorites
- Using Favorites (Windows)
- Using Favorites (Mac OS X)
- Cutting Roll Paper After Printing
- Cutting Roll Paper After Printing (Windows)
- Cutting Roll Paper After Printing (Mac OS X)
- Adjusting Images
- Windows Software
- Printer Driver
- Printer Driver Settings (Windows)
- Specifying Paper in the Printer Driver (Windows)
- Confirming Print Settings (Windows)
- Checking the Layout in a Preview Before Printing (Windows)
- Using Favorites (Windows)
- Accessing the Printer Driver Dialog Box from Applications (Windows)
- Accessing the Printer Driver Dialog Box from the Operating System Menu (Windows)
- Main Sheet (Windows)
- Paper Information on Printer Dialog Box (Windows)
- Paper Detailed Settings Dialog Box (Windows)
- View Settings Dialog Box for the Printing Application (Windows)
- Color Adjustment Sheet: Color (Windows)
- Object Adjustment dialog box: Color
- Matching Sheet (Windows)
- Color Adjustment Sheet: Monochrome (Windows)
- Object Adjustment dialog box: Monochrome
- Page Setup Sheet (Windows)
- Paper Size Options Dialog Box (Windows)
- Layout Sheet (Windows)
- Page Options Dialog Box (Windows)
- Special Settings Dialog Box (Windows)
- Favorites Sheet (Windows)
- Utility Sheet (Windows)
- Support Sheet (Windows)
- Settings Summaries Dialog Box (Windows)
- Device Settings Sheet (Windows)
- Preview
- Free Layout
- The Features of Free Layout
- Operating Environment
- Starting Free Layout
- Free Layout Main Window
- Detailed Settings
- Preferences Dialog Box
- Page Options Dialog Box
- Zoom Dialog Box
- Format Dialog Box
- Laying out a Multiple-File Document on One Page
- Laying out a Document Created with Multiple Application Programs on One Page
- Selecting an Object
- Changing the Object Size
- Moving an Object
- Rotating an Object
- Laying out Objects Automatically
- Aligning Objects
- Color imageRUNNER Enlargement Copy
- The Features of Color imageRUNNER Enlargement Copy
- Operating Environment
- Starting Color imageRUNNER Enlargement Copy
- Color imageRUNNER Enlargement Copy Dialog Box
- Hot Folder
- Creating a New Hot Folder
- Specifying an Existing Shared Folder as a Hot Folder
- Setting the Print Parameters
- Printing Enlargements of Scanned Originals from a Color imageRUNNER (Windows)
- Status Monitor
- Accounting
- Accounting Manager
- Launching the Accounting Manager
- Accounting Manager Main Window
- Accounting Manager Basic Procedures
- Configuring Unit Costs in Accounting Manager
- Setting the Unit Cost for Ink
- Setting the Unit Cost for Paper
- Setting the Unit Cost for Items Other Than Ink and Paper
- Configuring Units and Display Settings in Accounting Manager
- Automatically Acquiring Print Job Logs at Regular Intervals
- Canceling Regular Print Job Log Acquisition
- Switching Between Displaying Jobs on Printer and Regularly Acquired Jobs
- Exporting Print Job Data as a CSV File
- Showing Job Properties
- Showing, Saving and Loading Selected Unit Cost Data
- Showing the Total Amount of Ink and Paper Consumed
- Digital Photo Front-Access
- Using PosterArtist to Compose Originals
- Device Setup Utility
- Printer Driver
- Mac OS X Software
- Printer Driver
- Printer Driver Settings (Mac OS X)
- Specifying Paper in the Printer Driver (Mac OS X)
- Confirming Print Settings (Mac OS X)
- Checking the Layout in a Preview Before Printing (Mac OS X)
- Using Favorites (Mac OS X)
- Accessing the Printer Driver Dialog Box from Applications (Mac OS X)
- Main Pane (Mac OS X)
- Paper Information on Printer Dialog Box (Mac OS X)
- Paper Detailed Settings Dialog Box (Mac OS X)
- View settings Dialog Box for the Printing Application (Mac OS X)
- Color Settings Pane: Color (Mac OS X)
- Color Settings Pane: Monochrome (Mac OS X)
- Page Setup Pane (Mac OS X)
- Utility Pane (Mac OS X)
- Additional Settings Pane (Mac OS X)
- Support Pane (Mac OS X)
- Preview
- The Features of Preview
- Operating Environment
- Starting Preview
- Preview Main Window
- Paper Settings Panel
- Easy Settings
- Advanced Settings
- Output Settings Panel
- Color Settings Panel
- Color Adjustment
- Matching
- Driver Matching Mode
- ICC Matching Mode
- ColorSync
- Preferences Dialog Box
- Zoom Dialog Box
- Go to Page Dialog Box
- Print with No Borders
- Print on the Center
- Not Print Spaces at the Top/Bottom
- Print Page Rotated 90 Degrees
- Display with Fitting to the Width of the Paper
- Display with All
- Display with Actual Size
- Moving a Page
- Free Layout
- The Features of Free Layout
- Operating Environment
- Starting Free Layout
- Free Layout Main Window
- Paper Settings Panel
- Easy Settings
- Advanced Settings
- Color Settings Panel
- Color Adjustment
- Matching
- Driver Matching Mode
- ICC Matching Mode
- ColorSync
- Preferences Dialog Box
- Page Setup Dialog Box
- Zoom Dialog Box
- Format Dialog Box
- Laying out a Multiple-File Document on One Page
- Laying out a Document Created with Multiple Application Programs on One Page
- Selecting an Object
- Changing the Object Size
- Moving an Object
- Rotating an Object
- Laying out Objects Automatically
- Aligning Objects
- Changing the Object Overlapping Order
- Pasting a Copied or Cut Object
- Color imageRUNNER Enlargement Copy
- The Features of Color imageRUNNER Enlargement Copy
- Operating Environment
- Starting Color imageRUNNER Enlargement Copy
- Color imageRUNNER Enlargement Copy Dialog Box
- Hot Folder
- Creating a New Hot Folder
- Editing a Hot Folder (Setting Print Conditions)
- Deleting a Hot Folder
- Setting the Print Parameters
- Paper Settings Panel
- Easy Settings
- Advanced Settings
- Output Settings Panel
- Color Settings Panel
- Driver Matching Mode
- ICC Matching Mode
- ColorSync
- Printing Enlargements of Scanned Originals from a Color imageRUNNER (Mac OS X)
- Printmonitor
- Printer Driver
- Network Setting
- Network Setting
- Network Environment
- Configuring the IP Address on the Printer
- Configuring the IP Address Using imagePROGRAF Device Setup Utility
- Configuring the IP Address Using the Printer Control Panel
- Configuring the IP Address Using ARP and PING Commands
- Configuring TCP/IPv6 Network Settings
- Using RemoteUI
- Configuring the Printer's TCP/IP Network Settings
- Configuring the Printer's AppleTalk Network Settings
- Configuring the Printer's NetWare Network Settings
- Specifying Printer-Related Information
- Configuring the Communication Mode Manually
- Email Notification When Printing is Finished or Errors Occur
- Initializing the Network Settings
- Network Setting (Windows)
- Configuring the Printer Driver Destination (Windows)
- Sharing the Printer in Windows
- Configuring the Printer's NetWare Network Settings
- Specifying the Printer's Frame Type
- Specifying NetWare Print Services
- Specifying NetWare Protocols
- Configuring NetWare Network Settings
- Installing imagePROGRAF Device Setup Utility
- Configuring the IP Address Using imagePROGRAF Device Setup Utility
- Network Setting (Mac OS X)
- Network Setting
- Adjustments for Better Print Quality
- Maintenance
- Troubleshooting
- Frequently Asked Questions
- Problems Regarding Paper
- Clearing Jammed Paper (Paper Feed Slot)
- Clearing Jammed Roll Paper
- Clearing a Jammed Sheet
- Roll Paper Cannot be Inserted into the Paper Feed Slot
- Cannot load sheets
- Paper is not cut straight
- Paper is not cut
- Depression on the leading edge is left
- The size of clear film cannot be detected
- Roll Paper is Continuously Ejected
- Printing does not start
- The printer stops during a print job
- Problems with the printing quality
- Printing is faint
- Paper rubs against the Printhead
- The edges of the paper are dirty
- The surface of the paper is dirty
- The back side of the paper is dirty
- Printed colors are inaccurate
- Banding in different colors occurs
- Colors in printed images are uneven
- Image edges are blurred or white banding occurs
- The contrast becomes uneven during printing
- The length of printed images is inaccurate in the feeding direction
- Images are printed crooked
- Documents are printed in monochrome
- Line thickness is not uniform
- Lines are misaligned
- Problems with the printing quality caused by the type of paper
- Cannot print over a network
- Installation problems
- HP-GL/2 problems
- With HP-GL/2, printing is misaligned
- Lines or images are missing in printed HP-GL/2 jobs.
- Lines are printed too thick or thin in HP-GL/2 print jobs
- HP-GL/2 jobs are printed in monochrome (or color)
- Printed colors of lines are inaccurate during HP-GL/2 printing
- HP-GL/2 jobs are printed 6 mm larger than specified
- HP-GL/2 jobs are printed at maximum size, even if a standard size is specified
- HP-GL/2 printing takes a long time
- Replotting with HP-GL/2 jobs is not possible.
- The printer stops when printing a HP-GL/2 job (the carriage stops moving)
- Other problems
- Error Message
- Messages regarding paper
- MediaType Mismatch
- The paper is too small.
- The paper is too small.
- PaprWidth Mismatch
- Paper size not detected.
- Insufficient paper for job
- This paper cannot be used.
- Roll printing is selected.
- Roll printing is selected, but sheets are loaded.
- The roll is empty.
- Sheet printing is selected.
- Regular printing is selected, but a roll is loaded.
- Paper jam
- Paper is crooked.
- Paper not aligned with right guide.
- Cannot detect papr
- Paper cutting failed.
- End of paper feed.
- Rel lever is in wrong position.
- Borderless printng not possible.
- Paper position not suitable for borderless printing.
- Roll paper is not securely in contact with roll holder.
- Messages regarding ink
- Messages regarding printing or adjustment
- Messages regarding printheads
- Messages regarding the maintenance cartridge
- Messages regarding HP-GL/2
- Other Messages
- Messages regarding paper
- Index
Printheads
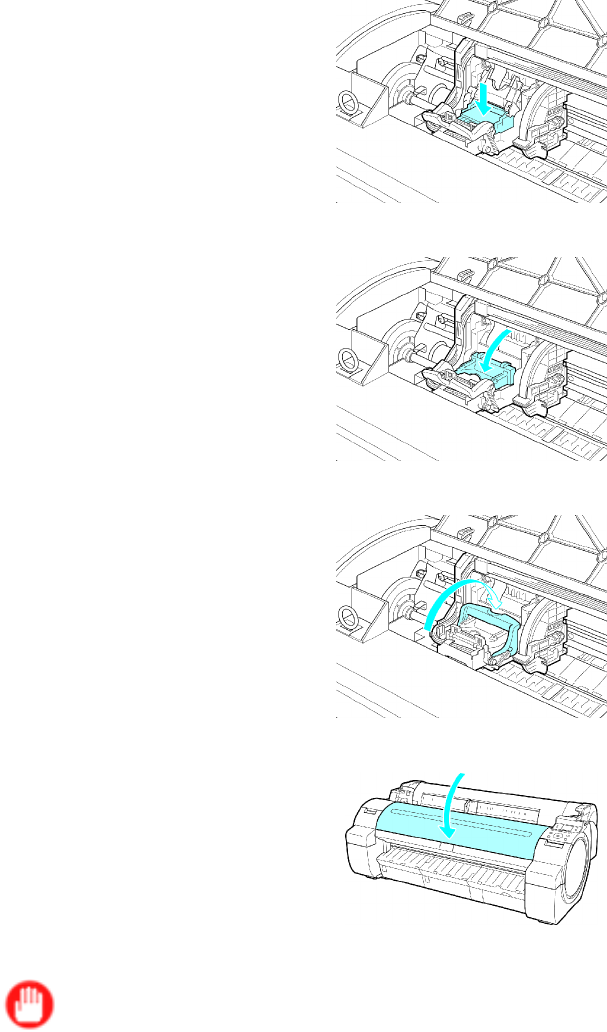
8. With the nozzles facing down and the metal contacts toward the back, insert the Printhead into
the Carriage . Carefully push the printhead rmly into the Carriage , ensuring that the nozzles
and metal contacts do not touch the carriage.
9. Pull the Printhead Fixer Cover down toward the front to lock the Printhead in place.
10. Push the Printhead Fixer Lever toward the back of the printer until it clicks.
1 1. Close the T op Cover .
Ink now lls the system. It takes about six minutes for ink to ll the system.
Important
• Never remove an Ink T ank while the system is lling with ink.
• After Printhead has been replaced and lled with ink, Head Posi. Adj. ( Auto(Advanced) ) is
performed if you have selected Rep.P .head Print > On in the Control Panel menu. ( → P .49)
In this case, follow the instructions on the Display Screen for Printhead adjustment.
If Rep.P .head Print is Off , perform Head Posi. Adj. ( Auto(Advanced) ) yourself. ( → P .604 )
638 Maintenance