Online Manual Free Layout Guide English
Contents Using This Online Manual. . . . . . . . . . . . . . . . . . . . . . . . . . . . . . . . . . . . . . . . . . . 3 Trademarks and Licenses. . . . . . . . . . . . . . . . . . . . . . . . . . . . . . . . . . . . . . . . . . . 4 Search Tips. . . . . . . . . . . . . . . . . . . . . . . . . . . . . . . . . . . . . . . . . . . . . . . . . . . . . 13 General Notes (Free Layout). . . . . . . . . . . . . . . . . . . . . . . . . . . . . . . . . . . . . . . . . . . . . . . . . . . . . . . . . .
Using This Online Manual Symbols Used in This Document Touch-enabled Device Users (Windows) Symbols Used in This Document Warning Instructions that, if ignored, could result in death or serious personal injury caused by incorrect operation of the equipment. These must be observed for safe operation. Caution Instructions that, if ignored, could result in personal injury or material damage caused by incorrect operation of the equipment. These must be observed for safe operation.
Trademarks and Licenses • Microsoft is a registered trademark of Microsoft Corporation. • Windows is a trademark or registered trademark of Microsoft Corporation in the U.S. and/or other countries. • Windows Vista is a trademark or registered trademark of Microsoft Corporation in the U.S. and/or other countries. • Internet Explorer is a trademark or registered trademark of Microsoft Corporation in the U.S. and/or other countries.
Apache License Version 2.0, January 2004 http://www.apache.org/licenses/ TERMS AND CONDITIONS FOR USE, REPRODUCTION, AND DISTRIBUTION 1. Definitions. "License" shall mean the terms and conditions for use, reproduction, and distribution as defined by Sections 1 through 9 of this document. "Licensor" shall mean the copyright owner or entity authorized by the copyright owner that is granting the License.
copyright license to reproduce, prepare Derivative Works of, publicly display, publicly perform, sublicense, and distribute the Work and such Derivative Works in Source or Object form. 3. Grant of Patent License.
limitation, any warranties or conditions of TITLE, NON-INFRINGEMENT, MERCHANTABILITY, or FITNESS FOR A PARTICULAR PURPOSE. You are solely responsible for determining the appropriateness of using or redistributing the Work and assume any risks associated with Your exercise of permissions under this License. 8. Limitation of Liability.
* Redistributions of source code must retain the above copyright notice, this list of conditions and the following disclaimer. * Redistributions in binary form must reproduce the above copyright notice, this list of conditions and the following disclaimer in the documentation and/or other materials provided with the distribution.
This distribution may include materials developed by third parties. Sun, Sun Microsystems, the Sun logo and Solaris are trademarks or registered trademarks of Sun Microsystems, Inc. in the U.S. and other countries. Redistribution and use in source and binary forms, with or without modification, are permitted provided that the following conditions are met: * Redistributions of source code must retain the above copyright notice, this list of conditions and the following disclaimer.
---- Part 6: Cisco/BUPTNIC copyright notice (BSD) ----Copyright (c) 2004, Cisco, Inc and Information Network Center of Beijing University of Posts and Telecommunications. All rights reserved. Redistribution and use in source and binary forms, with or without modification, are permitted provided that the following conditions are met: * Redistributions of source code must retain the above copyright notice, this list of conditions and the following disclaimer.
IN CONTRACT, STRICT LIABILITY, OR TORT (INCLUDING NEGLIGENCE OR OTHERWISE) ARISING IN ANY WAY OUT OF THE USE OF THIS SOFTWARE, EVEN IF ADVISED OF THE POSSIBILITY OF SUCH DAMAGE. LEADTOOLS Copyright (C) 1991-2009 LEAD Technologies, Inc. CMap Resources ----------------------------------------------------------Copyright 1990-2009 Adobe Systems Incorporated. All rights reserved. Copyright 1990-2010 Adobe Systems Incorporated. All rights reserved.
Copyright (c) 1998, 1999, 2000 Thai Open Source Software Center Ltd Permission is hereby granted, free of charge, to any person obtaining a copy of this software and associated documentation files (the "Software"), to deal in the Software without restriction, including without limitation the rights to use, copy, modify, merge, publish, distribute, sublicense, and/or sell copies of the Software, and to permit persons to whom the Software is furnished to do so, subject to the following conditions: The above c
Enter keywords in the search window and click (Search). You can search for target pages in this guide. Entry example: "(your product's model name) load paper" Search Tips You can search for target pages by entering keywords in the search window. Important • This function may not be available in some countries/regions. Note • The displayed screen may vary.
Note • The displayed screen varies depending on your product. • Searching for Application Functions Enter your application's name and a keyword for the function you want to learn about Example: When you want to learn how to print collages with My Image Garden Enter "My Image Garden collage" in the search window and perform a search • Searching for Reference Pages Enter your model name and a reference page title* * You can find reference pages more easily by entering the function name as well.
General Notes (Free Layout) When using Canon imagePROGRAF Free Layout (hereafter Free Layout), the following restrictions apply. Please familiarize yourself with them before using it. • Free Layout supports imagePROGRAF Printer Driver Ver. 4.20 or later for Windows. • This guide primarily provides explanations using the screens that are displayed when you use the Windows 10 operating system (hereafter, Windows 10). • In some cases a print job with a large amount of data cannot be printed.
The Features of Free Layout The main features of Free Layout are as follows. • Allows you to lay out at will and print a document created with application software. • You can not only lay out multiple pages on one page but also lay out and print a multiple-file document on one page, or lay out and print a document created with multiple application programs on one page. • Any two pages can be arranged and printed in a layout that becomes duplex on folding.
Starting Free Layout Follow the procedure below to start the Free Layout. 1. Open Print dialog box. From the application software's menu, select the printer setup menu to open the Print dialog box. Note • Normally, select Print from the File menu. 2. Display Layout sheet. Select a printer from the list and open the Layout sheet on the settings screen of the printer driver. 3. Select Free Layout in Page Layout sheet.
Note • When you select Free Layout, all other setting items will be disabled. 4. Click Print button. On the Print dialog box in the apllication software, click the Print button. Free Layout main window is displayed.
Description of Free Layout Screen Free Layout Main Window Detailed Settings Preferences Dialog Box Page Options Dialog Box Zoom Dialog Box Format Dialog Box 19
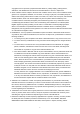
Free Layout Main Window The Free Layout main window consists of a menu bar, tool bar, layout area and status bar. Note • You can use the View menu to show or hide the tool and status bar. Menu Bar This allows you to select menus required for operations. Tool Bar This allows you to select tool buttons required for major operations. Print Executes printing.
You can also execute Print from the File menu. Undo Reverses the last edit. You can also execute Undo from the Edit menu. Redo Restores the last edit. You can also execute Redo from the Edit menu. Cut Cuts the selected object. You can also execute Cut from the Edit menu. Copy Copies the selected object. You can also execute Copy from the Edit menu. Paste Pastes the cut or copied object. You can also execute Paste from the Edit menu. Delete Deletes the selected object.
Center Vertically Lays out the objects, justifying them to the vertical center. You can also set it with Center Vertically in the Object menu. Align Bottom Lays out the objects, justifying them to the bottom. You can also set it with Align Bottom in the Object menu. Align Left Lays out the objects, justifying them to the left. You can also set it with Align Left in the Object menu. Center Horizontally Lays out the objects, justifying them to the horizontal center.
Status Bar This shows the paper size, unit of length, and number of objects.
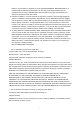
Detailed Settings The printer driver opens when you select Detailed Settings from the File menu. The printer driver is used to configure basic settings to match the type of media loaded in the printer. Note • Your printer is depicted in the lower-left area of this screen. • Some tabs may not appear in 32-bit environments. • Some printer driver settings may be disabled.
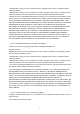
Preferences Dialog Box This dialog box appears when you select Preferences from the File menu. This allows you to configure the preferences of Free Layout. Units Select the ruler unit. Gridlines You can input a grid line interval value in numerical characters so that the grid lines serve as a guide to laying out objects. Note • You can input between 10.0 and 200.0(mm) (between 0.39 and 7.88(inch)). • You can change the numbers by clicking either button or button.
• You can change the numbers by clicking either button or button. Object Frame Style You can select the object frame style for printing. The following settings are available for the object frame style. Setting Details None You can print with no frame style. Solid Line You can print the solid line as the frame style. Dotted Line You can print the dotted line as the frame style. Dashed Line You can print the dashed line as the frame style. Crop Marks You can print with the crop marks.
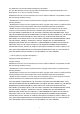
Page Options Dialog Box This dialog box appears when you select Page Options from the File menu. This allows you to configure the roll paper length, object layout order, and margins of Free Layout. Roll Paper Length Set the length of one page to print on roll paper. The following settings are available for roll paper length. Setting Details Auto Settings The one-page length to be printed on roll paper is automatically set so that the laid-out objects are printed on one page.
Setting Details Upper Left to Right The objects are laid out from upper left to right. Upper Left to Bottom The objects are laid out from upper left to bottom. Upper Right to Left The objects are laid out from upper right to left. Lower Left to Top The objects are laid out from lower left to top. Note • When you have selected Roll Paper Length > Auto Settings and Paper Orientation > Vertical, you can choose Upper Left to Right or Upper Right to Left.
Zoom Dialog Box This dialog box appears when you select Zoom from the View menu. You can enlarge or reduce the screen display. Scaling Set the magnification for enlargement or reduction of the screen display. Note • You can input between 25 and 400. • You can change the numbers by clicking button.
Format Dialog Box This dialog box appears when you select Format from the Object menu after you select an object. Size Sheet You can rotate, enlarge, or reduce an object. Note • When the objects are not selected, you can not select Format. Rotate When you click the check box, you can select Rotate Right or Rotate Left as the direction for rotating the object. Setting Details Rotate Right Rotates the object 90 degrees clockwise. Rotate Left Rotates the object 90 degrees counterclockwise.
Setting Details Scaling Allows you to input the value of the enlargement or reduction ratio of an object. Fit Paper Size Prints by enlarging or reducing each object to match the paper size. If you are using roll paper, objects are enlarged or reduced so that the width of each object matches the width of the roll paper. Fit Photo Size Prints all of the objects at the specified photo size. Note • You can input between 25 and 600.
Setting Details Vertical Pos You can input the number of the vertical position in numerical characters. Horizontal Pos You can input the number of the horizontal position in numerical characters. Page Pos You can input the number of the page position in numerical characters. Common to All Sheets Object Size You can confirm the object size. Note • When several objects are selected, you cannot display Object Size.
Various Free Layout Features Laying out a Multiple-File Document on One Page Laying out a Document Created with Multiple Application Programs on One Page Selecting an Object Changing the Object Size Moving an Object Rotating an Object Laying out Objects Automatically Aligning Objects Changing the Object Overlapping Order Pasting a Copied or Cut Object Prints using Folded Duplex 33
Laying out a Multiple-File Document on One Page You can lay out and print a multiple-file document on one page. 1. Open Print dialog box. From the application software's File menu, select the printer setup menu to open the Print dialog box. Note • Normally, select Print from the File menu. 2. Open Printing Preferences. Click Preferences to open the Printing Preferences dialog box. 3. Select Paper Source. In the Page Setup sheet, select Paper Source.
Note • Your printer is depicted in the lower-left area of this screen. 4. Select Free Layout from list. In the Layout sheet, click on the Page Layout check box and select Free Layout from the list.
Note • Your printer is depicted in the lower-left area of this screen. • When you select Free Layout, all other setting items will be disabled. 5. Click OK. Click the OK button to save the settings. 6. Set pages to print and number of copies. In the Print dialog box, specify the pages to print and the number of copies, and click the Print button.
Free Layout starts, laying out the document created with application software in the layout area as an object. 7. Open other documents.
Leaving Free Layout running, open other files with the application software and repeat the above steps.
Laying out a Document Created with Multiple Application Programs on One Page You can lay out and print a document created with multiple application programs on one page. 1. Open Print dialog box. From the application software's File menu, select the printer setup menu to open the Print dialog box. Note • Normally, select Print from the File menu. 2. Open Printing Preferences. Click Preferences to open the Printing Preferences dialog box. 3. Select Paper Source.
Note • Your printer is depicted in the lower-left area of this screen. 4. Select Free Layout from list. In the Layout sheet, click on the Page Layout check box and select Free Layout from the list.
Note • Your printer is depicted in the lower-left area of this screen. • When you select Free Layout, all other setting items will be disabled. 5. Click OK. Click the OK button to save the settings. 6. Set pages to print and number of copies. In the Print dialog box, select the pages to print and the number of copies, and click the Print button.
Free Layout starts, laying out the document created with application software in the layout area as an object. 7. Open files created with other application software.
Leaving Free Layout running, open other files with other application software and repeat the above steps.
Selecting an Object To select an object, click that object. When an object is selected, a select box (blue border) appears around the object. To select multiple objects, perform the following. • To select multiple successive objects, click them while holding down the Shift key. • To select multiple arbitrary objects, click them while holding down the Ctrl key. • To select all objects, select Select All from the Edit menu.
Changing the Object Size You can change the object size by means of mouse operation or by specifying a scaling value. Note • The vertical-to-horizontal ratio remains unchanged when the object is enlarged or reduced. Resizing by means of mouse operation 1. Select an object. Select an object. 2. Change object size. Place the pointer at a corner of the selection box around the object to show the arrow handle, and drag this handle to change the object size. Resizing by specifying a scaling value 1.
Moving an Object You can move the object position. 1. Select an object. Select an object. 2. Moving an Object Place the pointer inside the selection box of the object to show the crosshair handle, and drag it to move the object. You can also move Object Position by specifying a value for Vertical Pos, Horizontal Pos, and Page Pos on the Position sheet of the Format Dialog Box.
Rotating an Object You can rotate the object. 1. Select an object. Select an object. 2. Select rotation direction. Select Rotate Left 90 Degrees or Rotate Right 90 Degrees from the toolbar. Alternatively, you may click the Rotate check box on the Size sheet of Format Dialog Box, and select Rotate Right or Rotate Left, and then click OK.
Laying out Objects Automatically Click Auto Arrange Object from the toolbar. Alternatively, you can select Auto Arrange Object from the Object menu. Automatically positions the object. Note • The object layout order varies depending on the Order setting in the Page Options Dialog Box dialog box.
Aligning Objects You can align objects systematically. 1. Select an object. Select an object to align. 2. Click the align button. Click the align button from the toolbar. Alternatively, you may select the align menu from the Object menu. Align Top Lays out the objects, justifying them to the top. Center Vertically Lays out the objects, justifying them to the vertical center.
Align Bottom Lays out the objects, justifying them to the bottom. Align Left Lays out the objects, justifying them to the left. Center Horizontally Lays out the objects, justifying them to the horizontal center.
Align Right Lays out the objects, justifying them to the right.
Changing the Object Overlapping Order You can change the object overlapping order. 1. Select an object. Select an object whose overlapping order you want to change. 2. Select overlapping order menu. Select the Overlapping Order menu from the Object menu. Note • The order of overlapping affects the order of objects automatically laid out. • You can also change the overlapping order by right-clicking the object. Bring to Front Moves the object to the frontmost position.
Bring Forward Moves the object one position to the front. Send Backward Moves the object one position to the back.
Pasting a Copied or Cut Object 1. Select an object. Select an object to copy or cut. 2. Click Copy or Cut. Click Copy or Cut from the toolbar. Alternatively, you may select Copy or Cut from the Edit menu. 3. Paste object. The copied or cut object is pasted. Click Paste from the toolbar. Alternatively, you may select Paste from the Edit menu. Note • The copied or cut object is laid out at the end of the page. • You can also select by clicking the right button of the mouse on an object.
Folded Duplex Prints using Folded Duplex Folded Duplex Window Finished Size Settings Dialog Box Binding Settings Dialog Box 56
Prints using Folded Duplex This prints 2 pages consecutively. Folding back the paper at the fold lines of the center substitutes for duplex printing. This can be used such as for advertising posters that are suspended from the ceiling. 1. Select an object. Select two objects from the layout area of Free Layout. 2. Open Folded Duplex. Select Folded Duplex from the Edit menu of Free Layout. Open the Folded Duplex Window and arrange the selected objects in the layout area. 3.
8. Set Binding width. Specify the Binding width in Binding. 9. Set printing method of fold lines. Click the Print Fold Lines check box, and then set Fold Line Color and Fold Line Type. Note • Clicking the Only Print Center and Edges check box prints the fold lines only along the center and both edges. 10. Save settings. Click OK to save the settings. 11. Start printing. Confirm the print setting and begin printing.
Folded Duplex Window This appears when you select Folded Duplex from the Edit menu. You can use the Folded Duplex function to print with folds. The Folded Duplex window consists of the menu and tool bars, layout area and status bar. Note • The toolbar and status bar can be toggled between hidden and displayed from the View menu. • You can also add objects to be printed with folded duplex by dragging and dropping them from the layout area of Free Layout.
Tool Bar This allows you to select tool buttons required for major operations. Print Executes printing. You can also execute Print from the File menu. Binding Settings Displays the Binding Settings dialog box. You can also display this from Binding Settings in the Edit menu. Finished Size Settings Displays the Finished Size Settings dialog box. You can also display this from Finished Size Settings in the Edit menu. Help Displays the Free Layout guide. You can also display this from the Help menu.
Status Bar This shows the paper source, roll paper width, and output size.
Finished Size Settings Dialog Box This dialog box is displayed when you select Finished Size Settings from the Edit menu. This allows you to configure finished size settings. Finished Size Selects the method for setting the finished size. The following settings are available for the finished size. Setting Details Fit Roll Paper Width Prints by automatically enlarging or reducing the entire document so that the width of the document matches the roll paper width.
Binding Settings Dialog Box This is displayed when you select Binding Settings from theEdit menu. This allows you to configure the binding edge settings. Binding Edge Configures the binding edge when folding paper. The following settings are available for the binding edge. Setting Details Bottom Prints by placing the binding margin (gutter) at the bottom of the document. Top Prints by placing the binding margin (gutter) at the top of the document. Binding Configures the binding margin (gutter).
Fold Line Type You can select the fold line type. The following settings are available for the fold line type. Setting Details Solid Line You can print the solid line as the frame style. Dotted Line You can print the dotted line as the frame style. Dashed Line You can print the dashed line as the frame style. Only Print Center and Edges To print fold lines at the center and both edges, click the Only Print Center and Edges check box.