
User Manual


Scanning
8-7
Basic Scanning Operations
9
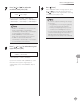
Press [Start].
If the <ORIGINAL SIZE> message appears, press
[
] or [ ] to select the original size, then
press
[Start] for each original. When scanning
is complete, press [OK] to start.
You can also adjust the following scan settings
as necessary.
Image Qaulity: See “Selecting Image Quality
(Scan to File Server),” in the e-Manual.
Density: See “Adjusting Density,” on p. 5-30.
2-Sided: See “2-Sided Originals,” on p. 5-31.
You can set the document’s name (see “Naming
a Sent Document Using a File Server,” in the e-
Manual), and the message body text (see
“Message (Scan to File Server)” in the e-Manual).
–
•
•
•
–
7
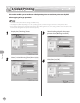
Press [ ] or [ ] to select the
resolution, then press [OK].
200 200dpi
IMAGE QUALITY
File server (FTP and SMB): <200×200dpi>,
<300×300dpi>, <400×400dpi>, <600×600dpi>,
<100×100dpi>, <150×150dpi>, <200×100dpi>
If <PDF> or <TIFF (B&W)> is selected as the le
format, <200×200dpi>, <300×300dpi>,
<400×400dpi>, <600×600dpi>, <150×150dpi>,
or <200×100dpi> can be selected.
If <PDF (COMPACT)> is selected as the le
format, only <300×300dpi> can be selected.
If <JPEG> is selected as the le format,
<200×200dpi>, <300×300dpi>, <100×100dpi>,
or <150×150dpi> can be selected.
–
–
–
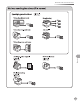
8
Press [ ] or [ ] to select the original
type, then press [OK].
TEXT/PHOTO
ORIGINAL TYPE
<TEXT/PHOTO>, <TEXT>, <PHOTO>
If you have selected <PDF (COMPACT)> as the
le format in step 6, the original type is
automatically set to <TEXT/PHOTO>. Skip to
step 10.