
Service manual


9
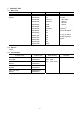
4. SERVICE MODE
Function Procedures Remarks
Service test print
- Model name
- ROM version
- USB serial number
- Waste ink amount
- CD-R sensor correction
See "Service mode operation
procedures" below.
Set a sheet of A4- , letter-, or larger-sized
paper.
For print sample, see APPENDIX 1, SERVICE
TEST PRINT, <Service Test Print Sample>.
EEPROM initialization See "Service mode operation
procedures" below.
The following items are NOT initialized:
- USB serial number
- Destination settings
- Waste ink counter
- CD-R correction value
Waste ink counter reset See "Service mode operation
procedures" below.
If the waste ink amount is 7% or more,
replace the bottom case unit, or the ink
absorbers.
Destination settings See "Service mode operation
procedures" below.
Other than Japan: iP3000
Japan: iP3100
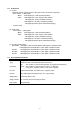
Note: At the end of the service mode, press the Power button. To protect the media sensor from being
dislocated during transportation, the paper lifting plate of the sheet feeder unit will be raised.
<Service mode operation procedures>
1) With the printer power turned off, while pressing the Resume/Cancel button, press and hold the
Power button. (DO NOT release the buttons. The LED lights in green to indicate that a function
is selectable.)
2) While holding the Power button, release the Resume/Cancel button. (DO NOT release the
Power button.)
3) While holding the Power button, press the Resume/Cancel button 2 times, and then release
both the Power and Resume/Cancel buttons. (Each time the Resume/Cancel button is pressed,
the LED lights alternately in orange and green, starting with orange.)
4) When the LED lights in green, press the Resume/Cancel button the specified number of time(s)
according to the function listed in the table below. (Each time the Resume/Cancel button is
pressed, the LED lights alternately in orange and green, starting with orange.)
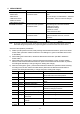
Times LED Function Remarks
0 times Green Power off When the print head is not installed, the carriage
returns and locks in the home position.
1 time Orange Service test print See APPENDIX 1, SERVICE TEST PRINT.
2 times Green EEPROM information print See APPENDIX 2, EEPROM INFORMATION
PRINT.
3 times Orange EEPROM initialization
4 times Green Waste ink counter resetting
5 times Orange Destination settings Proceed to the step 5), and follow the
Destination settings procedures.
6 times Green Print head deep cleaning
7 times Green CD-R test print Not used in servicing.
8 times Orange CD-R print position correction
(horizontal)
Not used in servicing.
9 times Green CD-R print position correction
(vertical)
Not used in servicing.
10 times
or more
Return to the menu selection