Getting Started ENGLISH CEL-SV7CA210
Package Contents Before use, make sure the following items are included in the package. If anything is missing, contact your camera retailer. Camera Battery Pack NB-11LH*1 Battery Charger CB-2LFE Wrist Strap*2 *1 Do not peel off the adhesive covering from a battery pack. *2 For attachment instructions, refer to the Camera User Guide that can be downloaded from the Canon website. • Printed matter is also included. • A memory card is not included. Compatible Memory Cards No memory card is included.
Manuals and Software You can download manuals and software from the following URL. http://www.canon.com/icpd/ • With a computer connected to the Internet, access the above URL. • Access the site for your country or region. • Adobe Reader is required to view the manuals. • You can also download software from the URL above. For instructions on downloading and installing the software, refer to the Camera User Guide available for download. • You may be requested to enter the Serial number (Body no.
Initial Preparations 3 Charge the battery pack. Plug the power cord into the charger, then plug the other end into a power outlet. The charging lamp turns orange, and charging begins. When charging is finished, the lamp turns green, and you can remove the battery pack. For details on charging time and the number of shots or recording time available with a fully charged battery pack, refer to “Specifications” in the downloadable Camera User Guide. (2) 4 Open the cover.
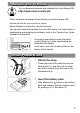
Initial Preparations (1) (2) 6 Check the card’s write-protect switch and insert the memory card. Recording is not possible on memory cards with a write-protect switch when the switch is in the locked position. Move the switch in the direction of the arrow (1). Insert the memory card with the terminals (2) facing as shown until it clicks into place. When removing the card, push the memory card in until it clicks, and then slowly release it. 7 Close the cover.
Initial Preparations 9 Specify your home time zone. Press the [ ][ ] buttons to choose your home time zone. Press the [ ] button when finished. After a confirmation message, the setting screen is no longer displayed. To turn off the camera, press the ON/OFF button. 10 Set the display language. Press the [ ] button. Press and hold the [ ] button, and then immediately press the [ ] button. Press the [ ][ ][ ][ ] buttons to choose a language, and then press the [ ] button.
Trying the Camera Out Shooting For fully automatic selection of the optimal settings for specific scenes, simply let the camera determine the subject and shooting conditions. 1 Turn on the power and enter [ ] mode. Press the ON/OFF button. Set the mode switch to [ ]. Press the [ ] button, press the [ ][ ] ], and then press buttons to choose [ the [ ] button again. Press the [ ][ ] buttons to choose ], and then press the [ ] button. [ 2 Compose the shot.
Trying the Camera Out Recording Movies Press the movie button to start recording, and press it again to stop. Viewing 1 Enter Playback mode. Press the [ ] button. 2 Choose images. To view the previous or next image, press the [ ][ ] buttons. Movies are identified by a [ ] icon. To play movies, go to step 3. 3 Play movies. Press the [ ] button, press the [ ][ ] buttons to choose [ ], and then press the [ ] button again. Playback now begins, and after the movie ] is displayed.
CANON EUROPA N.V. Bovenkerkerweg 59, 1185 XB Amstelveen, The Netherlands CANON INC. 30-2, Shimomaruko 3-chome, Ohta-ku, Tokyo 146-8501, Japan © CANON INC.