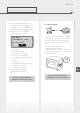
Getting Started Getting Started Introducción 간단 설치 가이드 การเริม ่ ต้นใชง้ าน Bắt Đầu Langkah Permulaan Quick Setup NEXT PAGE Quick Operation Please read "Important Safety Instructions" before operating this product. After you finish reading this guide, store it in a safe place for future reference. The information in this document is subject to change without notice. canon.com/oip-manual P.
Quick Setup Getting Started Please read "Important Safety Instructions" before operating this product. P.34 After you finish reading this guide, store it in a safe place for future reference. The information in this document is subject to change without notice. Introducción Lea las "Instrucciones de seguridad importantes" antes de usar este producto. P.40 Cuando termine de leer esta guía, guárdela en un lugar seguro para futuras consultas.
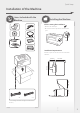
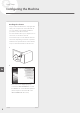
Quick Setup Installation of the Machine I Items Included with the Machine M IInstalling the Machine Before starting the installation • Remove all of the tape. • Do not remove the tape that covers the USB port. tape Installation Requirements Provide a space of 100 mm or more around the machine.
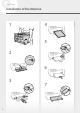
Quick Setup Installation of the Machine 1 4 5 2 6 3 4 7
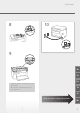
Quick Setup 8 1 2 10 2 1 9 En Es Ko • Place the output cover whenever you use the machine. • Do not place or drop heavy objects on the output cover. Th Vi Next, proceed to configure the machine.
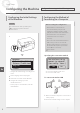
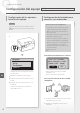
Quick Setup Configuring the Machine Configuring the Initial Settings of the Machine NOTE Parts and functions of the operation panel P.30 "Start the Operation from the Operation Panel" 1. Configure the settings in the following order. Configuring the Method of Connecting to a Computer Before starting the configuration • If the machine is connected to an unsecured network, your personal information might be leaked to a third party. Please be aware and careful of this.
Quick Setup For details "Setting Up Using the Setup Guide" in the User's Guide 3. Take note of the SSID and network key. To connect via USB • Check the label on the router. User's Guide • The setting operation is easier if the router is provided with a WPS mark. User's Guide 4. Set the access point and network key according to the screen below. For more information, refer to the manual. OK 1. Select . 2. Select . 3. Select
Quick Setup Configuring the Machine Installing the software • The procedure described here is only applicable when your computer runs on the Windows OS. For more details on the software installation procedure, see the driver's manual. • For the installation when your computer runs on the macOS, see the driver's manual. • Your machine may not come with the driver for the macOS, depending on the time of purchase. New drivers are uploaded to the Canon website, and you can download and use the latest one. 1.
Memo 9
Configuración rápida Configuración del equipo Configuración de las opciones iniciales del equipo N O TA Componentes y funciones del panel de control Pág.36 “Inicie la operación desde el panel de control” 1. Configure las opciones en el orden siguiente. Configuración del método para conectar a un ordenador Antes de iniciar la configuración • Si el equipo está conectado a una red no segura, su información personal podría filtrarse a terceros. Procure proteger sus datos personales.
Configuración rápida Para obtener más información, consulte “Configurar usando la guía de configuración” en la Guía de usuario 3. Anote el SSID y la clave de red. Para conectar a través de USB • Compruebe la etiqueta ubicada sobre el router. Guía de usuario • La operación de configuración será más fácil si el router dispone de una marca WPS. Guía de usuario 4. Configure el punto de acceso y la clave de red de acuerdo con la siguiente pantalla. Para obtener más información, consulte el manual.
Configuración rápida Configuración del equipo Instalación del software • El procedimiento descrito aquí solamente es aplicable si su ordenador utiliza el sistema operativo Windows. Para obtener más información sobre el procedimiento de instalación del software, consulte el manual del controlador. • Para la instalación en un ordenador con sistema operativo macOS, consulte el manual del controlador.
Notas 13
빠른 설치 기기 구성 기기의 초기 설정 구성 참고 조작 패널의 부품 및 기능 42페이지 "조작 패널에서 작동 시작" 1. 다음 순서로 설정을 구성하십시오. 컴퓨터 연결 방법 구성 구성을 시작하기 전에 • 기기가 보안되지 않은 네트워크에 연결될 경우 개인 정보가 제3자에게 유출될 수 있습니다. 이 점을 유념하십시오. • 기기에는 라우터가 제공되지 않습니다. 필요한 경우 라우터를 준비하십시오. • 무선 LAN 라우터가 없는 환경에서도 액세스 포인트 모드를 사용하여 모바일 장치에서 기기로 무선 연결을 직접 설정할 수 있습니다(직접 연결). 사용자 안내서 연결 방법 지정 Language German Italian Japanese Korean • 화면에 따라 초기 설정을 구성합니다. 2. 언어 및 국가/지역을 설정합니다. 3. 시간대 및 현재 날짜/시간을 설정합니다. 4.
빠른 설치 자세한 내용 사용자 안내서의 "설치 설명서를 사용한 설치" 3. SSID 및 네트워크 키를 기록합니다. USB를 통해 연결하려면 사용자 • 라우터에서 라벨을 확인합니다. 안내서 • 라우터에 WPS 마크가 있는 경우 설정 작업을 더 쉽게 수행할 수 있습니다. 사용자 안내서 4. 아래 화면에 따라 액세스 포인트와 네트워크 키를 설정합니다. 㣄㉬䚐G㉘㥉Gⵝⷉ㡴 ㉘⮹㉐⪰G䞉㢬䚨 㨰㐡㐐㝘U 䞉㢬 1. <확인>을 선택합니다. • 드라이버를 설치하기 전에 USB 케이블을 연결하지 마십시오. 연결한 경우에는 컴퓨터에서 USB 케이블을 분리하고 대화 상자를 닫은 후 다음 절차를 1단계부터 수행하십시오. 1. 드라이버와 소프트웨어를 설치합니다. 16페이지 "소프트웨어 설치" • USB 케이블을 기기에 연결하기 위한 화면이 표시되면 USB 포트의 테이프를 제거합니다. 2. 을 선택합니다. 3. <액세스 포인트 선택>을 선택합니다. 4. 액세스 포인트(SSID)를 선택합니다. 5.
빠른 설치 기기 구성 소프트웨어 설치 • 여기에서 설명하는 절차는 컴퓨터가 Windows OS로 실행되는 경우에만 적용할 수 있습니다. 소프트웨어 설치 절차에 대한 자세한 내용은 드라이버 설명서를 참조하십시오. • 컴퓨터가 macOS로 실행되는 경우 설치 방법은 드라이버 설명서를 참조하십시오. • 구매 시기에 따라 기기에 macOS용 드라이버가 제공되지 않을 수 있습니다. 새로운 드라이버가 Canon 웹 사이트에 업로드되므로 최신 드라이버를 다운로드하여 사용할 수 있습니다. 1. 2. Ko 화면이 올바르게 표시되지 않으면 CD-ROM/DVD-ROM을 다시 삽입하거나 Windows 플랫폼에서 "D:₩ MInst.exe"를 검색합니다(이 설명에서는 CD-ROM/DVD-ROM 드라이브 이름을 "D:"로 가정함).
Memo 17
ตัง้ ค่าแบบเร็ว การกําหนดค่าเครือ ่ งพิมพ์ การกําหนดค่าการตงค่ ั้ าเริม ่ ต้น ของเครือ ่ งพิมพ์ ห ม า ย เ ห ตุ ้ ส่วนและหน ้าทีข ชิน ่ องแผงควบคุม หน ้าที่ 48 "เริม ่ ใช ้งานจากแผงควบคุม" 1.
ตัง้ ค่าแบบเร็ว สําหรับรายละเอียด "การตัง้ ค่าโดยใช ้คูม ่ อ ื การตัง้ ค่า" ในคูม ่ อ ื การใช ้งาน 3. บันทึกคียข์ อง SSID และเครือข่าย คูม ่ อ ื การใช ้ • ตรวจสอบป้ ายฉลากบนเราเตอร์ งาน • การดําเนินการการตัง้ ค่าจะง่ายขึน ้ หากเราเตอร์ คูม ่ อ ื การใช ้งาน มีเครือ ่ งหมาย WPS ื่ มต่อผ่าน USB การเชอ 4. ตัง้ ค่ากุญแจรหัสของจุดแอคเซสพอยท์และ เครือข่ายตามทีป ่ รากฏอยูท ่ ห ี่ น ้าจอด ้านล่าง ѱюіччѬзє ҕѬ Ѡ Ѫ дѥішѤкҖ зҕѥ /$1 ѳіҖѝѥѕѯёѪѠ ҕ дѦўьчзҕѥ дѥішѤкҖ зҕѥ шдјк 1. เลือก <ตกลง> 2.
ตัง้ ค่าแบบเร็ว การกําหนดค่าเครือ ่ งพิมพ์ การติดตงซอฟต์ ั้ แวร์ • ขัน ้ ตอนทีอ ่ ธิบายไว ้นี้ จะใช ้ได ้ในกรณีท ี่ คอมพิวเตอร์ของคุณทํางานอยูบ ่ นระบบปฏิบต ั ก ิ าร Windows เท่านัน ้ สําหรับรายละเอียดเพิม ่ เติม ของขัน ้ ตอนการติดตัง้ ซอฟต์แวร์ โปรดดูทค ี่ ม ู่ อ ื การใช ้งานไดรเวอร์ • สําหรับการติดตัง้ ซอฟต์แวร์ เมือ ่ เครือ ่ ง คอมพิวเตอร์ของคุณทํางานอยูบ ่ นระบบปฏิบต ั ก ิ าร macOS โปรดดูทค ี่ ม ู่ อ ื การใช ้งานไดรเวอร์ • เครือ ่ งพิมพ์ของคุณอาจจะไม่มไี ดรเวอร์สําหรับ ระบบปฏิบต ั ก ิ าร macOS ให ้มาด
บ ันทึกย่อ 21
Cài đặt nhanh Cấu hình cho Máy Cấu hình Cài đặt ban đầu của Máy LƯU Ý Các bộ phận và chức năng của bảng vận hành Tr.54 "Bắt đầu Vận hành từ Bảng Vận hành" 1. Cấu hình cài đặt theo thứ tự sau. Cấu hình Phương thức Kết nối với Máy tính Trước khi bắt đầu cấu hình • Nếu máy kết nối đến mạng không an toàn, thông tin cá nhân của bạn có thể bị tiết lộ cho bên thứ ba. Vui lòng chú ý và thận trọng về điều này. • Máy không có bộ định tuyến kèm theo. Vui lòng chuẩn bị một bộ, nếu cần.
Cài đặt nhanh Để biết chi tiết "Cài đặt Sử dụng Hướng dẫn cài đặt" trong Hướng dẫn người dùng 3. Ghi lại SSID và khoá mạng. Kết nối qua USB • Kiểm tra nhãn trên bộ định tuyến. Hướng dẫn người dùng • Vận hành cài đặt sẽ dễ dàng hơn nếu bộ định tuyến có dấu WPS. Hướng dẫn người dùng 4. Cài đặt điểm truy cập và khoá mạng theo màn hình dưới đây. ĈӇ ELӃW WKrP WK{QJ WLQ WKDP NKҧR KѭӟQJ GүQ Vӱ GөQJ OK • Không kết nối cáp USB trước khi cài đặt trình điều khiển.
Cài đặt nhanh Cấu hình cho Máy Cài đặt phần mềm • Quy trình được mô tả ở đây chỉ có thể áp dụng khi máy tính của bạn chạy trên hệ điều hành Windows. Để biết thêm chi tiết về quy trình cài đặt phần mềm, vui lòng xem hướng dẫn sử dụng trình điều khiển. • Để cài đặt khi máy tính chạy macOS, vui lòng xem hướng dẫn sử dụng trình điều khiển. • Tùy vào thời điểm mua mà máy của bạn có thể không có trình điều khiển kèm theo dành cho macOS.
Ghi chú 25
Persediaan Pantas Mengkonfigurasi Mesin Mengkonfigurasi Tetapan Awal Mesin P E R H AT I A N Bahagian dan fungsi panel operasi H.60 "Mulakan Operasi daripada Panel Operasi" 1. Konfigurasikan tetapan dalam urutan berikut. Mengkonfigurasi Kaedah Penyambungan kepada Komputer Sebelum memulakan konfigurasi • Jika mesin disambungkan kepada rangkaian yang tidak selamat, maklumat peribadi anda mungkin terdedah kepada pihak ketiga. Sila berwaspada dan berhatihati mengenainya.
Persediaan Pantas Untuk butiran "Menyediakan Menggunakan Panduan Persediaan" dalam Panduan Pengguna 3. Ambil perhatian terhadap SSID dan kunci Untuk menyambungkan melalui USB rangkaian. • Periksa label pada penghala. Panduan Pengguna • Operasi tetapan lebih mudah jika penghala disediakan dengan tanda WPS. Panduan Pengguna 4. Tetapkan titik capaian dan kunci rangkaian mengikut skrin di bawah. Untuk maklumat lanjut, rujuk pada manual. OK • Jangan sambung kabel USB sebelum memasang pemacu.
Persediaan Pantas Mengkonfigurasi Mesin Memasang perisian • Prosedur yang diterangkan di sini hanya berkaitan apabila komputer anda menggunakan Windows OS. Untuk butiran lanjut mengenai prosedur pemasangan perisian, lihat manual pemacu. • Untuk pemasangan apabila komputer anda menggunakan macOS, lihat manual pemacu. • Mesin anda mungkin tidak disediakan dengan pemacu untuk macOS, bergantung pada masa pembelian.
Quick Operation Quick Operation En Funcionamiento rápido Es 빠른 조작 Ko การใชง้ านแบบเร็ว Th Vận hành nhanh Vi Operasi Pantas Ms 29
Quick Operation Start the Operation from the Operation Panel Machine Operation Panel Power indicator ▲▼◄► Power switch Display (screen) (Back key) NOTE The display is not equipped with a backlight; use the machine in a well-lit location. Navigating the Menu Item selection or moving the cursor among the menu items Select an item with [▲] or [▼]. Press or [►] to proceed to the next hierarchy. Press or [◄] to return to the previous hierarchy. En Press .
Quick Operation Printing 1. Open the document to print, and select the print function of the application. 2. Select the printer driver for the machine, and select [Preferences] or [Properties]. 3. Specify the paper size. 4. Specify the paper source and paper type. 5. Specify the print settings, as necessary. 6. Select [OK]. 7. Select [Print] or [OK].
Quick Operation For details Loading Paper "Loading Paper" in the User's Guide Loading in the Drawer 1 2 Open the drawer. 4 5 En 32 3 Keep the paper stack within the load limit guides. Put the cover on the drawer.
Quick Operation If a Problem Has Occurred The Machine Does Not Seem to Work Check the following. • Is the power turned ON? • Is the machine out of sleep mode? For details "Maintenance" and "Troubleshooting" in the User's Guide Paper Jams Have Occurred Clear the paper jams, according to the on-screen instructions. Remove jammed paper. If both the display and power indicator are not lit, press the power switch.
Appendix Important Safety Instructions This manual describes only warnings and cautions for the installation and the power supply. Be sure to read "Important Safety Instructions" described in the User's Guide also. WARNING Indicates a warning concerning operations that may lead to death or injury to persons if not performed correctly. To use the machine safely, always pay attention to these warnings.
Notice About This Manual Product Name Safety regulations require the product's name to be registered. In some regions where this product is sold, the following name(s) in parentheses ( ) may be registered instead. Trademarks Mac is a trademark of Apple Inc. Microsoft, Windows, Windows Vista, Windows Server, Internet Explorer, Excel, and PowerPoint are either registered trademarks or trademarks of Microsoft Corporation in the United States and/or other countries.
Funcionamiento rápido Inicie la operación desde el panel de control Equipo Panel de control Indicador Alimentación ▲▼◄► Interruptor de alimentación Visor (pantalla) (Tecla Atrás) N O TA La pantalla no está equipada con retroiluminación; utilice el equipo en un lugar bien iluminado. Navegación por el menú Selección de elementos o desplazamiento del cursor por los elementos del menú Seleccione un elemento con [▲] o [▼]. Pulse o [►] para pasar a la siguiente jerarquía.
Funcionamiento rápido Impresión 1. Abra el documento que desee imprimir y seleccione la función de impresión de la aplicación. 2. Seleccione el controlador de impresora del equipo y seleccione [Preferencias] o [Propiedades]. 3. Especifique el tamaño del papel. 4. Especifique el origen y el tipo del papel. 5. Especifique las opciones de impresión según sus necesidades. 6. Seleccione [Aceptar]. 7. Seleccione [Imprimir] o [Aceptar].
Funcionamiento rápido Para obtener más información, consulte Cargar papel “Cargar papel” en la Guía de usuario Carga en el casete 1 2 Abra el casete. 4 5 3 Es 38 Mantenga la pila de papel dentro de las guías de límite de carga. Ponga la tapa en el casete.
Funcionamiento rápido Si se ha producido un problema El equipo no parece funcionar Compruebe lo siguiente. • ¿El equipo está encendido? • ¿El equipo está fuera del modo de reposo? Para obtener más información, consulte “Mantenimiento” y “Solución de problemas” en la Guía de usuario Se han producido atascos de papel Elimine los atascos de papel de acuerdo con las instrucciones que aparecen en la pantalla. Quite papel atascado.
Apéndice Instrucciones de seguridad importantes En este manual se describen únicamente las advertencias y precauciones para la instalación y el suministro eléctrico. Asegúrese de leer asimismo las “Instrucciones de seguridad importantes” que se describen en la Guía de usuario. ADVERTENCIA Indica una advertencia relativa a operaciones que pueden ocasionar la muerte o lesiones personales si no se ejecutan correctamente. Para utilizar el equipo de forma segura, preste atención siempre a estas advertencias.
Símbolos relacionados con la seguridad Wireless LAN Regulatory Information Interruptor de alimentación: posición “ON” imageCLASS LBP113w includes approved Wireless LAN Module (Model name: Type1KA). Interruptor de alimentación: posición “OFF” Regulatory information for users in Singapore Interruptor de alimentación: posición “STAND-BY” Interruptor push-push “ON” “OFF” Terminal de tierra de protección Tensión peligrosa en el interior. No abra ninguna tapa que no se indique.
빠른 조작 조작 패널에서 작동 시작 기기 작동 패널 전원 표시등 ▲▼◄► 전원 스위치 디스플레이(화면) (이전 화면 키) 참고 디스플레이에는 백라이트가 없습니다. 따라서 밝은 곳에서 기기를 사용하십시오. 메뉴 탐색 항목 선택 또는 메뉴 항목 간 커서 이동 [▲] 또는 [▼]를 사용하여 항목을 선택합니다. 또는 [►]를 눌러 다음 계층 구조로 또는 [◄]를 눌러 이전 계층 진행합니다. 구조로 돌아갑니다. 설정 확인 를 누릅니다. 하지만 디스플레이에 <확정>이 나타나면 <확정>을 선택한 다음 를 누릅니다. 입력 화면에서 작동 숫자 값 변경 숫자 값을 변경하기 위한 화면에서 값을 늘리려면 [▲]를 누르고 값을 줄이려면 [▼]를 누릅니다. Ko 42 슬라이더를 사용하여 설정 변경 슬라이더가 표시된 화면에서 [◄] 또는 [►]를 눌러 설정을 변경합니다.
빠른 조작 인쇄 1. 인쇄할 문서를 열고 응용 프로그램의 인쇄 기능을 선택합니다. 2. 기기의 프린터 드라이버를 선택하고 [기본 설정] 또는 [속성]을 선택합니다. 3. 용지 크기를 지정합니다. 4. 용지 공급원과 용지 종류를 지정합니다. 5. 필요에 따라 인쇄 설정을 지정합니다. 6. [확인]을 선택합니다. 7. [인쇄] 또는 [확인]을 선택합니다.
빠른 조작 자세한 내용 용지 적재 사용자 안내서의 "용지 적재" 카세트에 용지 적재 1 2 카세트를 엽니다. 4 5 3 Ko 44 용지 더미가 적재 제한 가이드 안에 유지되도록 합니다. 카세트 덮개를 덮습니다.
빠른 조작 문제가 발생한 경우 기기가 작동하지 않음 다음을 확인하십시오. • 전원이 켜져 있습니까? • 기기가 절전 모드에서 전환되었습니까? 자세한 내용 사용자 안내서의 "유지보수" 및 "문제 해결" 용지 걸림 발생 화면 지침에 따라 용지 걸림을 해결합니다. ᶬ⫤㟝㫴⪰G㥐ᶤ䚝⏼␘U 디스플레이와 전원 표시등에 모두 불이 들어오지 않는 경우 전원 스위치를 누릅니다. 4/8 소모품 교체 화면 지침에 따라 토너 카트리지를 교체합니다. • 전원 코드가 올바르게 연결되어 있습니까? 䋔∼G㾨䏬⫠㫴G㥐ᶤ 2/5 교체 소모품의 모델 번호 • Canon Toner Cartridge 047 • Canon Drum Cartridge 049 Ko 문제가 지속되면 사용자 안내서를 참조하십시오.
부록 중요 안전 지침 본 설명서는 설치 및 전원 공급 장치에 대한 경고 및 주의사항만을 다룹니다. 사용자 안내서에 기술된 "중요 안전 지침" 또한 반드시 읽으십시오. ᆧᇊ 잘못 취급했을 경우에 생명을 잃거나 부상을 입을 우려가 있는 작업에 대한 경고사항이 설명되어 있습니다. 본 기기를 안전하게 사용하기 위하여 반드시 경고사항을 준수하십시오. ⷦⱂ 잘못 취급했을 경우에 부상을 입을 우려가 있는 주의사항을 나타냅니다. 본 기기를 안전하게 사용하기 위하여 반드시 주의사항을 준수하십시오. ⦻✾ 조작상의 요구사항 및 제한사항을 나타냅니다. 기기를 올바르게 조작하고 기기 손상 또는 재산 손실을 방지하기 위하여 이 항목을 주의 깊게 읽으십시오. 설치 본 기기를 안전하고 손쉽게 사용하려면 다음 예방 조치를 주의 깊게 읽고 적합한 장소에 기기를 설치하십시오. ᆧᇊ 화재나 감전의 위험이 있는 장소에 설치하지 마십시오.
소모품 ᆧᇊ 사용한 토너 카트리지를 불 속에 마십시오. 또한 토너 카트리지나 화기 근처에 보관하지 마십시오. 용지에 불이 붙어 화상을 입거나 발생할 수 있습니다. 제3자 소프트웨어 넣지 용지를 토너나 화재가 주의 사항 제품명 안전 규정에 따라 제품의 명칭을 등록해야 합니다. 본 제품이 판매되는 일부 지역에서는 다음 괄호 () 안의 명칭이 대신 등록될 수 있습니다. imageCLASS LBP113w(F173000) 무선 LAN 규제 정보 • 이 장치는 이동전화, Wi-Fi 또는 블루투스 장치 등 무선통신장치와 매우 근접한 장소에서 작동할 경우 오동작을 일으킬 가능성이 있습니다 • 해당 무선설비는 운용 중 전파혼신 가능성이 있음. • 해당 무선설비는 전파혼신 가능성이 있으므로 인명안전과 관련된 서비스는 할 수 없습니다. • imageCLASS LBP113w 에는 승인된 무선 LAN 모듈이 포함되어 있습니다.
้ การใชงานแบบเร็ ว เริม ่ ใชง้ านจากแผงควบคุม เครือ ่ งพิมพ์ แผงควบคุม ไฟแสดง สถานะ เปิ ดปิ ด ▲▼◄► สวิตช์เปิ ดปิ ด จอแสดงผล (ปุ่ ม Back) ห ม า ย เ ห ตุ จอแสดงผลไม่ได ้ติดตัง้ ไฟพืน ้ หลัง โปรดใช ้เครือ ่ งพิมพ์ในทีท ่ ม ี่ แ ี สงสว่างเพียงพอ การนําทางไปย ังเมนู เลือกรายการหรือเลือ ่ นเคอร์เซอร์ไปตามรายการ เมนูตา่ ง ๆ เลือกรายการด ้วย [▲] หรือ [▼] ้ หรือ [►] เพือ ่ ดําเนินการต่อไปยังลําดับชัน กดปุ่ ม ้ หรือ [◄] เพือ ่ กลับมายังลําดับชัน ถัดไป กดปุ่ ม ก่อนหน ้า การตงค่ ั้ าเพือ ่ ยืนย ัน กดปุ่ ม อย่
้ การใชงานแบบเร็ ว การพิมพ์ ั การพิมพ์ของแอปพลิเค 1. เปิ ดเอกสารเพือ ่ สัง่ พิมพ์ และเลือกฟั งก์ชน ชัน 2. เลือกไดรเวอร์ของเครือ ่ งพิมพ์สําหรับเครือ ่ งพิมพ์ และเลือก [กําหนดลักษณะ] หรือ [คุณสมบัต]ิ 3. ระบุขนาดหน ้ากระดาษ 4. ระบุแหล่งทีม ่ าของกระดาษและชนิดของกระดาษ 5. ระบุการตัง้ ค่าการพิมพ์ หากจําเป็ น 6. เลือก [ตกลง] 7.
้ การใชงานแบบเร็ ว สําหรับรายละเอียด การโหลดกระดาษ "การโหลดกระดาษ" ในคูม ่ อ ื การใช ้งาน การโหลดกระดาษในถาด กระดาษ 1 2 เปิ ดถาดกระดาษ 4 5 3 Th 50 คอยดูให ้จํานวนกระดาษ อยูภ ่ ายในขีดจํากัดการ โหลดทีแ ่ นะนํ า เปิ ดฝาครอบบนถาดกระดาษ
้ การใชงานแบบเร็ ว ้ หากมีปญ ั หาเกิดขึน เครือ ่ งพิมพ์เหมือนจะไม่ทา ํ งาน ตรวจสอบรายการต่อไปนี้ • เปิ ดเครือ ่ งอยูห ่ รือไม่ • เครือ ่ งพิมพ์ไม่ได ้อยูใ่ นโหมดพักชัว่ คราวใช่หรือ ไม่ สําหรับรายละเอียด "การบํารุงรักษา" และ "การแกไขปั ญหา" ในคูม ่ อ ื การใช ้งาน เกิดอาการกระดาษติดอยู่ ภายใน ทําการดึงกระดาษทีต ่ ด ิ อยูใ่ นเครือ ่ งออก ตามคํา แนะนํ าทีป ่ รากฏอยูบ ่ นหน ้าจอ ьѦдіѣчѥќъѨш ҕ ч ѧ зҖѥкѠѠд หากทัง้ หน ้าจอแสดงผลและไฟแสดงสถานะ เปิ ด ปิ ดไม่ตด ิ ให ้กดปุ่ มสวิตช์เปิ ดปิ ด 4/8 ิ้ เปลือง ทําการเ
ภาคผนวก คําแนะนําด้านความ ํ ค ัญ ปลอดภ ัยทีส ่ า คูม ่ อ ื นีจ ้ ะอธิบายเฉพาะคําเตือนและข ้อควรระวัง สําหรับการติดตัง้ และแหล่งจ่ายไฟ โปรดอย่าลืม อ่าน "คําแนะนํ าด ้านความปลอดภัยทีส ่ ําคัญ" ทีไ่ ด ้ อธิบายไว ้ในคูม ่ อ ื การใช ้งานด ้วยเป็ นทีเ่ รียบร ้อย แล ้ว คำเตือน บ่งบอกถึงการแจ ้งเตือนเกีย ่ วกับการทํางานที่ ่ ารเสียชีวต อาจจะนํ าไปสูก ิ หรือการบาดเจ็บต่อ บุคคล หากไม่ได ้มีการดําเนินการอย่างถูกต ้อง เพือ ่ การใช ้งานเครือ ่ งพิมพ์อย่างปลอดภัยให ้ ใส่ใจกับการแจ ้งเตือนเหล่านีด ้ ้วย ข้อควรระวัง บ่งบอ
ิ้ เปลือง ว ัสดุสน คำเตือน ห ้ามทิง้ ตลับผงหมึกทีใ่ ช ้แล ้วลงไปในเปลวไฟ รวม ถึงห ้ามทําการเก็บตลับผงหมึกหรือกระดาษไว ้ใน สถานทีท ่ เี่ ปิ ดโล่งอยูใ่ กล ้กับเปลวไฟ การทําเช่นนี้ อาจจะทําให ้ผงหมึกหรือกระดาษติดไฟขึน ้ มา และ ก่อให ้เกิดการไหม ้หรือเพลิงไหม ้ได ้ ั ข้อควรสงเกต ่ ผลิตภ ัณฑ์ ชือ ข ้อกําหนดด ้านความปลอดภัยทีต ่ ้องมีการจด ่ ผลิตภัณฑ์ ทะเบียนชือ ิ ค ้านีม ในบางภูมภ ิ าคทีส ่ น ้ ก ี ารวางขายในท ้องตลาด ่ ดังต่อไปนีใ้ นวงเล็บ ( ) อาจจะมีการจดทะเบียน ชือ แทน คลาสของภาพถ่าย LBP113w (F173000) ข้อกํา
Vận hành nhanh Bắt đầu Vận hành từ Bảng Vận hành Máy Bảng Vận hành Đèn chỉ báo Nguồn ▲▼◄► Công tắc nguồn Hiển thị (màn hình) (Phím Back) LƯU Ý Màn hình không được trang bị đèn nền. Vui lòng sử dụng máy ở nơi ánh sáng tốt. Chuyển hướng trong Menu Chọn mục hoặc di chuyển con trỏ giữa các mục trong menu Chọn một mục bằng [▲] hoặc [▼]. Nhấn hoặc [►] để đi tới bậc kế tiếp. Nhấn [◄] để quay lại bậc trước. Cài đặt xác nhận Nhấn . Tuy nhiên, khi <Áp Dụng> xuất hiện trên màn hình, chọn <Áp Dụng> rồi nhấn .
Vận hành nhanh In 1. Mở tài liệu cần in và chọn chức năng in trong ứng dụng. 2. Chọn trình điều khiển máy in cho máy và chọn [Preferences] (Sở thích) hoặc [Properties] (Thuộc tính). 3. Đặt khổ giấy. 4. Đặt nguồn giấy và loại giấy. 5. Đặt các cài đặt in, nếu cần. 6. Chọn [OK]. 7. Chọn [Print] (In) hoặc [OK].
Vận hành nhanh Để biết chi tiết Nạp giấy "Nạp giấy" trong Hướng dẫn người dùng Nạp giấy vào Ngăn giấy 1 2 Mở ngăn giấy. 4 5 3 Vi 56 Đảm bảo chồng giấy nằm trong giới hạn nạp giấy. Đậy nắp ngăn giấy.
Vận hành nhanh Nếu có sự cố xảy ra Máy dường như không hoạt động Hãy kiểm tra những điều sau. • Nguồn đã BẬT chưa? • Máy đã thoát khỏi chế độ ngủ hay chưa? Để biết chi tiết "Bảo dưỡng" và "Xử lý Sự cố" trong Hướng dẫn người dùng Đã xảy ra lỗi kẹt giấy Loại bỏ kẹt giấy theo chỉ dẫn trên màn hình. /ҩ\ JLҩ\ Eӏ NҽW Nếu cả màn hình và đèn chỉ báo nguồn không sáng, hãy nhấn công tắc nguồn. 4/8 Thay thế các sản phẩm tiêu hao Thay thế các sản phẩm tiêu hao theo chỉ dẫn trên màn hình.
Phụ lục Các chỉ dẫn An toàn Quan trọng Hướng dẫn này chỉ mô tả các cảnh báo và thận trọng dành cho lắp đặt và nguồn điện cung cấp. Hãy đảm bảo rằng bạn cũng đã đọc "Các chỉ dẫn An toàn Quan trọng" được mô tả trong Hướng dẫn người dùng. CẢNH BÁO Cho biết cảnh báo về các thao tác có thể dẫn đến tử vong hoặc chấn thương nếu không thực hiện đúng cách. Để sử dụng máy một cách an toàn, hãy luôn chú ý đến những cảnh báo này.
Chú ý Phần mềm Bên thứ ba Tên Sản phẩm Các quy định về an toàn yêu cầu phải đăng ký tên sản phẩm. Tại một số khu vực có bán sản phẩm này, (các) tên sau đây ở trong ngoặc ( ) có thể được dùng để đăng ký thay thế. Sản phẩm Canon này (gọi là "SẢN PHẨM") bao gồm các mô-đun phần mềm bên thứ ba. Việc sử dụng và phân phối các mô-đun phần mềm này, bao gồm bất kỳ cập nhật nào của các mô-đun phần mềm đó (gọi chung là "PHẦN MỀM"), phải tuân thủ theo các điều kiện cấp phép từ (1) đến (9) dưới đây.
Operasi Pantas Mulakan Operasi daripada Panel Operasi Mesin Panel Operasi Penunjuk kuasa ▲▼◄► Suis kuasa Paparan (skrin) (Kekunci Back) P E R H AT I A N Paparan tidak dilengkapi dengan cahaya belakang; gunakan mesin di lokasi yang bercahaya terang. Menavigasi Menu Pemilihan item atau menggerakkan kursor antara item-item menu Pilih item dengan [▲] atau [▼]. Tekan atau [►] untuk meneruskan ke hierarki seterusnya. Tekan atau [◄] untuk kembali ke hierarki sebelumnya. Pengesahan tetapan Tekan .
Operasi Pantas Mencetak 1. Buka dokumen yang ingin dicetak dan pilih fungsi cetak bagi aplikasi. 2. Pilih pemacu pencetak untuk mesin dan pilih [Preferences] (Keutamaan) atau [Properties] (Sifat). 3. Tentukan saiz kertas. 4. Tentukan sumber kertas dan jenis kertas. 5. Tentukan tetapan cetakan, seperti yang diperlukan. 6. Pilih [OK]. 7. Pilih [Print] (Cetak) atau [OK].
Operasi Pantas Untuk butiran Memuatkan Kertas "Memuatkan Kertas" dalam Panduan Pengguna Memuatkan di dalam Laci 1 2 Buka laci. 4 5 3 Ms 62 Pastikan tindanan kertas tidak melebihi panduan had pemuatan. Letakkan penutup pada laci.
Operasi Pantas Jika Masalah Berlaku Mesin Nampaknya Tidak Berfungsi Periksa yang berikut. • Adakah kuasa DIHIDUPKAN? • Adakah mesin tidak berada dalam mod tidur? Untuk butiran "Penyelenggaraan" dan "Penyelesaian Masalah" dalam Panduan Pengguna Berlaku Kertas Tersekat Keluarkan kertas tersekat mengikut arahan pada skrin. Kluar krts yg trsekat. Jika paparan dan juga penunjuk kuasa tidak menyala, tekan suis kuasa. 4/8 Menggantikan Barang Guna Habis Gantikan barang guna habis mengikut arahan pada skrin.
Lampiran Arahan Keselamatan Penting Manual ini menerangkan hanya amaran dan awas untuk pemasangan dan bekalan kuasa. Pastikan anda juga membaca "Arahan Keselamatan Penting" yang diterangkan dalam Panduan Pengguna. AMARAN Menunjukkan amaran mengenai operasi yang boleh menyebabkan seseorang mati atau tercedera jika tidak dilakukan dengan betul. Untuk menggunakan mesin dengan selamat, selalu berikan perhatian kepada amaran ini.
Simbol Berkaitan Keselamatan Suis kuasa: Kedudukan "DIHIDUPKAN" Suis kuasa: Kedudukan "DIMATIKAN" Suis kuasa: Kedudukan "TUNGGU SEDIA" Suis tekan "DIHIDUPKAN" "DIMATIKAN" Terminal pembumian pelindung Voltan berbahaya di dalam. Jangan buka penutup kecuali diarahkan. AWAS: Permukaan panas. Jangan sentuh. Peralatan kelas II Bahagian bergerak: Jauhkan bahagian tubuh daripada bahagian bergerak AWAS: Kejutan elektrik boleh berlaku. Cabut semua palam kuasa daripada saluran keluar kuasa.
Memo 66
Memo 67
CANON INC. 30-2, Shimomaruko 3-chome, Ohta-ku, Tokyo 146-8501, Japan CANON CHINA CO. LTD. 2F Jinbao Building No.89, Jinbao Street, Dongcheng District, Beijing 100005, PRC CANON MARKETING JAPAN INC. 16-6, Konan 2-chome, Minato-ku, Tokyo 108-8011, Japan CANON SINGAPORE PTE LTD 1 Fusionopolis Place, #15-10, Galaxis, Singapore 138522 CANON U.S.A., INC. One Canon Park, Melville, NY 11747, U.S.A.