PUB.
Important Usage Instructions Important Usage Instructions COPYRIGHT WARNING: Unauthorized recording of copyrighted materials may infringe on the rights of copyright owners and be contrary to copyright laws. To reduce the risk of electric shock, do not expose this product to dripping or splashing. The Mains plug is used as the disconnect device. The Mains plug shall remain readily operable to disconnect the plug in case of an accident.
Important Usage Instructions Precautions About the Battery Pack DANGER! Treat the battery pack with care. • Keep it away from fire (or it might explode). • Do not expose the battery pack to temperature higher than 60 °C. Do not leave it near a heater or inside a car in hot weather. • Do not try to disassemble or modify it. • Do not drop it or subject it to shocks. • Do not get it wet.
Important Usage Instructions Trademark Acknowledgements C Y P O • SD, SDHC and SDXC Logos are trademarks of SD-3C, LLC. • Microsoft and Windows are trademarks or registered trademarks of Microsoft Corporation in the United States and/or other countries. • App Store, iPad, iPhone, iTunes and Mac OS are trademarks of Apple Inc., registered in the U.S. and other countries.
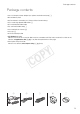
Package contents Package contents • CA-570 Compact Power Adapter (incl. power cord and ferrite core) [1] • BP-820 Battery Pack • WL-D89 Wireless Controller (incl.
Table of Contents Table of Contents 05 Package contents 07 Onscreen Icons and Displays 11 Charging the Battery Pack 12 Basic Preparations 13 Using a Memory Card 14 Setting the Date/Time and Language 16 Shooting Video and Taking Photos 18 Playing Back Movies and Viewing Photos 20 Playback on a TV Screen 21 Saving Your Recordings 22 Abridged Specifications About the Camcorder’s Wi-Fi Functions Y P O You can enjoy a variety of Wi-Fi functions with your camcorder.
Onscreen Icons and Displays introduction Onscreen Icons and Displays Recording movies mode 8 qA sA d 9A aA A f A g A h A j A g A k 1 2 3 4 5 6 7 d S f A lS qS aS sS S g Y P O 1 Control button [FUNC.]: Open the FUNC. panel (; 30) 2 Smart AUTO* (A 17) * Available only in mode.
Onscreen Icons and Displays A Zebra pattern (; 64) l q Conversion lens (Wide attachment shown) (; 145) S a Recording command (; 149) S s Face detection frame (; 54) S d Level marker: Display onscreen markers to check your composition and make sure horizontal or S vertical lines do not appear crooked in your recordings. (; 145) f Tracking frame: Touch a moving subject on the screen to keep it clearly in focus at all times.
Onscreen Icons and Displays Recording movies mode D d mode 8 9 s Ah A f A 1 S h S j S k S l 4 D q D a D s 8 g A 1 j A f D g D h D j D F d F f S k 3 4 F g F h k D D l F a q F F s S Recording program (; 62, 64, 69) h j Exposure compensation: Correct the exposure manually for a picture darker/brighter than the one S obtained using the automatic exposure set by the camcorder.
Onscreen Icons and Displays Playing movies (during playback) 9 A f 8 F k F j F l G q F Playback control buttons (A 19) j k Scene number F l Date/Time (; 32) F q Volume controls (; 96) G Viewing photos G a 1 Y P O G s G d C F l G f G g G Control button [MENU]: Open the setup menus (; 31, 143) a s Current photo / Total number of photos G d File number (; 147) G f Control button [f] - Return to the photo index screen (; 105) G g Control button [h] - Photo jump (; 105) G 10
Charging the Battery Pack step 1 Charging the Battery Pack The camcorder can be powered with a battery pack or directly using the compact power adapter. When you use the compact power adapter, the power of the battery pack will not be consumed. Charge the battery pack before use. 1 Attach the ferrite core to the compact power adapter cable. 1 1 Attach the ferrite core about 6 cm from the plug end (the plug to be connected to the camcorder).
Basic Preparations IMPORTANT • The battery pack will be charged only when the camcorder is off. • Do not connect to the camcorder’s DC IN terminal or to the compact power adapter any electrical equipment that is not expressly recommended for use with this camcorder. • Do not connect the supplied compact power adapter to voltage converters or special power sources such as those on aircraft, DC-AC inverters, etc. NOTES • We recommend charging the battery pack in temperatures between 10 °C and 30 °C.
Using a Memory Card 2 2 3 3 4 4 Fasten the grip belt. Adjust it so you can reach the zoom rocker with your index finger, and Y with your thumb. Open the OLED panel and adjust the angle. 1 Rotate it up to 90 degrees down (for example, to record with your hand extended above a crowd). 2 Rotate it up to 180 degrees toward the lens (for example, to record video of yourself). 3 If it is difficult to use the OLED screen, you can use the viewfinder, which can be tilted 45 degrees upward.
Setting the Date/Time and Language 3 Insert the memory card into one of the memory card slots and close the double memory card slot cover. 1 Push the memory card into the memory card slot. 2 Securely close the cover. Do not force it closed if the memory card is not correctly inserted. click! The label of the memory card facing the lens IMPORTANT • Memory cards have front and back sides that are not interchangeable.
Setting the Date/Time and Language 2 2 Change the date/time. 1 Touch a field you want to change. 2 Touch [Î] or [Í] to change the field. 3 3 4 4 Select your preferred date/time format. 1 Touch one of the control buttons. 2 Touch to use 24-hour clock. Touch [OK]. 5 Y P O Select the language used for menus and onscreen displays. You can select one of 27 languages to display the camcorder’s menus and onscreen displays. Select the language of your preference using the menu.
Shooting Video and Taking Photos basic recording Shooting Video and Taking Photos In mode you can easily record movies and photos. You do not need to worry about any settings or menu options - the camcorder will select the most appropriate settings automatically. Flashes in red while shooting video and while a scene or photo is being recorded on the memory. 2 [PHOTO] 1 START/STOP button 1 Start recording movies. Y P O Press to start recording.
Shooting Video and Taking Photos [FUNC.] > [MENU] > > [Movie Format] > Desired movie format You can also set the recording mode (video and audio quality). For AVCHD movies, you can select up to 28 Mbps, with two recording modes featuring linear PCM audio. For MP4 movies, you can record up to 35 Mbps. [FUNC.] > [MENU] > > [Recording Mode] > Desired recording mode See Selecting the Movie Format (AVCHD/MP4) (; 36) for details. See Selecting the Video Quality (; 44) for approximate recording times.
Playing Back Movies and Viewing Photos When you have finished recording Confirm that the indicator goes out Make sure the camcorder has finished writing the scenes or photos on the memory before turning it off. 1 Check that the indicator is off. 2 Close the OLED panel. 3 Close the lens barrier. basic playback Y P O Playing Back Movies and Viewing Photos Your recordings are conveniently organized in different index screens for AVCHD movies, MP4 movies and photos.
Playing Back Movies and Viewing Photos 2 Change the index screen, if necessary. Movies: Touch the index screen button ([6 ·]) to open the index selection screen. Next, touch the tab that indicates the memory card with the desired scene (6 or 7) and then touch the control button of the desired index screen. 3 Look for the scene or photo you want to play back. 3 Drag your finger left or right for the next/previous index page. 4 Y P O Touch the desired scene or photo to play back.
Playback on a TV Screen Using Wi-Fi to View Recordings You can wirelessly upload recordings to an iOS device, view recordings from the Web browser of your smartphone or tablet, and more. See Wi-Fi Functions (; 117) for details. IMPORTANT • You may not be able to play back with another device the movies you recorded on the memory card with this camcorder. In such case, play back the movies on the memory card using this camcorder.
Saving Your Recordings ! HDMI connection: All digital, high-definition connection; output only. See Connection Diagram (; 102) for details about additional settings. (HDMI miniconnector) HTC-100/S High Speed HDMI Cable (supplied) (standard HDMI connector) " Composite video connection: Analog, standard-definition connection; output only. See Connection Diagram (; 102) for details about additional settings.
Abridged Specifications ImageBrowser EX - For MP4 movies and photos. This software allows you to save and manage MP4 movies and photos. Refer to Saving MP4 Movies and Photos Using ImageBrowser EX (; 109) for details about installing the software. specifications Abridged Specifications The specifications given here are an abridged version of the full specifications of the camcorder. Be sure to read the full version of the instruction manual for the complete information.
Canon Europa N.V. Bovenkerkerweg 59, 1185 XB Amstelveen, The Netherlands www.canon-europa.com Canon UK Ltd CCI Service Centre, Unit 130 Centennial Park, Borehamwood, Hertfordshire, WD6 3SE, United Kingdom Telephone 0844-369-0100 Canon Australia Pty Ltd Tel: 13-13-83 (within Australia only) (61) 02-9805-2555 www.canon.com.au Canon New Zealand Ltd Y P O Tel: 0800-222-666 (within New Zealand only) (64) 09-489-0300 www.canon.co.nz Canon Singapore Pte.