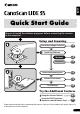
English Quick Start Guide Be sure to install the software programs before connecting the scanner to the computer! Setup and Scanning p. 3 Windows p. 4 Macintosh p. 5 Unlock the Scanning Unit p. 6 Connect the Scanner p. 7 Try Scanning p. 8 Check the Package Contents Install the Software Try the Additional Features Using the Scanner Buttons p.11 Using the USB 2.0 Interface expansion cards (Windows Only) p. 12 Please read this guide before operating this scanner.
Guide to the Manuals Guide to the Manuals Open the Package Quick Start Guide (this guide) This guide describes a series of processes, from opening the package to using the scanner. READ THIS GUIDE FIRST! Scanning Guide (HTML format manual) HTML Refer to this guide when you have finished setting up the scanner according to the procedures in the Quick Start Guide. It describes how to utilize the scanner with the bundled software, and how to solve problems when they occur.
Check the Package Contents English Check the Package Contents Scanner and Accessories CanoScan LiDE 35 USB Interface Cable Stand (P. 7) Documents and Software Programs • Quick Start Guide (this guide) • Additional Documents • CanoScan Setup Utility CD-ROM • The two figures in the brackets below indicate the respective sizes of the Windows/ Macintosh versions of the software.
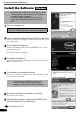
Install the Software (Windows) Install the Software Windows (Windows) • With Windows XP/2000, you should log on with an administrator user name when you install or uninstall software programs. • If you are using a computer which does not equip USB 2.0 interface by standard, refer to P. 12. 1 Turn the computer on. If the "Found New Hardware Wizard" or "Add New Hardware Wizard" appears, click [Cancel]. 2 Place the CanoScan Setup Utility CD-ROM in the drive.
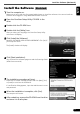
Install the Software (Macintosh) Macintosh (Macintosh) English Install the Software 1 Turn the computer on. Make sure to log in with the first created administrator to install the software. You cannot install the software when logged in using added administrator accounts. 2 Place the CanoScan Setup Utility CD-ROM in the drive. 3 Double-click the CD-ROM icon. 4 Double-click the [SetUp] icon. After you select your language, the CanoScan Setup Utility main menu will display.
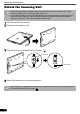
Unlock the Scanning Unit Unlock the Scanning Unit • Unlock the scanning unit before connecting the scanner to the computer. If it is left locked, a malfunction or other problem may occur. • Do not tilt the scanner more than 90 degrees from horizontal when releasing the lock. • When locking the scanner, do not lift up the back and tilt the front (scanner button location) downward. You may be unable to set the lock. 1 Peel the seals off the scanner. 2 Gently turn the scanner over.
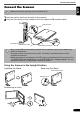
Connect the Scanner English Connect the Scanner • Make sure that the scanning unit is unlocked. (P. 6) 1 Peel the caution seal from the back of the scanner. 2 Connect the scanner to the computer with the supplied USB interface cable. USB Connector Wide Flat Connector USB Interface Cable Small Square Connector • Only use the USB interface cable provided with the scanner. Use of other cables may lead to a malfunction. • The scanner does not have a power switch.
Try Scanning Try Scanning The following steps explain how to scan with ArcSoft PhotoStudio. 1 Place a photo or a picture on the glass by aligning its top edge with the alignment mark, and close the document cover. Bottom Top Alignment Mark Windows 2 Select [Start], [Programs] or [All Programs], [ArcSoft PhotoStudio 5.5] and [PhotoStudio 5.5]. Macintosh 2 Double-click the [Applications] folder followed by the [PhotoStudio] folder and the [PhotoStudio] icon. PhotoStudio will start.
Try Scanning 3 Click the [File] menu and choose [Select Source]. English Select your scanner model name and click the [Select] button for Windows or the [OK] button for Macintosh. • After you set this setting the first time, you do not need to set it from the second time onward with the same scanner. • You will need to reset this setting if you select a different scanner or a digital camera. 4 Click the Acquire icon and select [Acquire]. or click the [File] menu ScanGear CS will start.
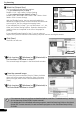
Try Scanning 8 Select the [Output Size]. You can select from the following options. • If you selected [Print] in Step 7: Flexible / 4"x6" / A4 / Letter / Custom Settings • If you selected [Image display] in Step 7: Flexible / 640 x 480 / 800 x 600 / 1024 x 768 / 1600 x 1200 / 2048 x 1536 / Custom Settings With the [Flexible] option, the scan area enclosed by the dotted line (cropping frame) will be scanned at the same scale as the original. You can change the cropping frame.
Using the Scanner Buttons You can use the four convenient buttons on the front of the scanner to scan and perform related tasks easily with a single touch of the button. Place an item on the scanner before pressing a button. • To use these buttons, ScanGear CS, CanoScan Toolbox, ArcSoft PhotoStudio and Acrobat Reader should be installed from the CanoScan Setup Utility CD-ROM. COPY Button To print (copy) the scanned image with a printer: 1 Press the [COPY] button. The scanner will scan the item.
Using the USB 2.0 Interface expansion cards (Windows Only) Using the USB 2.0 Interface expansion cards (Windows Only) To Switch to USB 2.0 If your computer is equipped with USB 1.1, you can switch to the USB 2.0 environment for faster scanning by purchasing and installing one of the USB 2.0 expansion cards available on the market. Please note that Macintosh computer with USB 2.0 Hi-Speed interface expansion card is not supported.
Specifications Scanner Type Scanning Element Light Source Optical Resolution Selectable Resolution Scanning Bit Depth Scanning Speed*1 (Photo or Document) Preview Speed*2 Color Grayscale Color Grayscale, B&W Interface Maximum Document Size Scanner Buttons Temperature Operating Range Humidity Power Requirements Power Consumption Maximum Exterior Dimensions Weight CanoScan LiDE 35 Flatbed CIS (Contact Image Sensor) 3-color (RGB) LED 1200 x 2400 dpi 25 - 9600 dpi 16 bit input / 16 bit or 8 bit output for ea
System Information System Information This form should be used to record the operating environment for the purchased scanner. If any problems occur with the scanner, you will need this information when you contact our Customer Support Help Desk. Be sure to record the information and store it in a safe location. • This information is also required to request a repair under warranty. Make sure you record the information and store it in a safe location.