CAUTION: READ THIS MANUAL CAREFULLY BEFORE OPERATING YOUR NEW CANNON® DOWNRIGGER. RETAIN FOR FUTURE REFERENCE. MAG 10HS MAG 10TS NOTE: Do not return your CANNON® Downrigger to your retailer. Your retailer is not authorized to repair or replace this unit. You may obtain service by: • calling CANNON® at 1-800-227-6433; • MAG 5HS returning your downrigger to the Factory Service Center; • sending or taking your downrigger to any CANNON® Authorized Service Center on enclosed list.
Introduction to downriggers Introduction to Controlled Depth Fishing Undoubtedly there are many fishermen familiar with the methods and use of controlled depth fishing. During the mid 1960's the state of Michigan introduced Pacific salmon into the Great lakes in an attempt to revitalize its sport fishing industry. From this successful transplant, new fishing techniques and equipment were developed.
Mounting Accessories Deck Plates are necessary when extra strength must be added to the base material of the boat and for attaching the downrigger to other mounting accessories. Gimbal Mounts are designed to fit mediumsized flush mounted rod holders built into the gunwale of many larger fishing boats and cruisers. Only sturdy, high quality rod holders should be used for this temporary mounting system. Gimbal mounts are available in 9” or 12” post lengths.
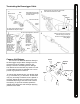
MOUNTING & SETUP Side Rail Mounting Side/Rail mounts can be mounted to a welded T-section. It can also be used at the two rail section butt joint. In both installations it is recommended to use a non-slip material, such as rubber or a thin wood sheet, between metal surfaces. You can also use these for mounting to a very narrow side gunwale. There is a plate provided for back-up with bolts and washers. If the gunwale compartment is foamed in, then wellnuts should be used.
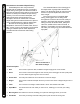
Decks up to 7/16" thick Where access to the underside of the deck is not available, the mounting base can be mounted using wellnuts. Use the base as a template to mark locations and drill four 1/2" holes. Mount the base using four 1/4-20 x 4" truss head screws and four wellnuts. Tighten the screws so the wellnuts are firmly compressed as pictured. Decks thicker than 7/16" For decks thicker than 7/16", or where the underside of the deck is accessible, mount the base with screws, nuts, and washers.
MOUNTING & SETUP Mounting the Downrigger on the Base Slide body over the lip of the base, with boom outboard or facing the stern. Lift Lock Knob to hold threaded shaft clear of base until body completely covers base. Turn Lock Knob clockwise to tighten the downrigger to the base. Tip: Periodically check base to ensure integrity. The base should be replaced at least every 5 years.
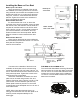
Rubber Cushion Cable Unwind about 2 feet of cable and thread the cable through the rubber cushion. Examine the top of the terminator and note the order shown in the detail to run cable. CABLE IN CABLE IN Attach to terminator. CABLE OUT Snap & Swivel TERMINATOR & LINE RELEASE Terminating the Downrigger Cable Tip: A set of pliers with wire cutters is recommended for this part of setup. TIP: Use only straight cable, not kinked. Lead cable into HOLE A. Pull six inches of cable through.
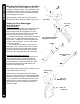
ATTACHING THE ROD HOLDER Attaching the Rod Holder The positive lock rod holder incorporates a locking disk that allows the rod holder to be aligned in 15 degree increments. Slide the rod holder tube into the clamp to the desired position within the recommended area (see below). Be sure the angled shoulders are facing up. Place the locking disk into the mating recess of the frame. Slip the clamp arms in place where the obround tab on the disk fits into the slot on the clamp.
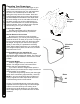
Your Boat's Electrical Condition It is important to make sure that your boat is properly set up before installing your Mag 10HS \ Mag 10TS \ Mag 5HS with Positive Ion Control. Whenever a boat is in water, various submerged parts interact to create weak electrical currents. These weak electrical currents must be controlled to extend the life of the boat's metal parts and ensure a good fish catching environment. Check the zinc sacrificial anodes on your boat and on the outboard/outdrive.
OPERATING YOUR DOWNRIGGER Operating Your Downrigger After mounting the Cannon downrigger to your boat, release some line from your rod and reel so that the lure is anywhere from 5 to 100 feet behind the boat. This is called drop back. Attach the fishing line firmly into the line release. Press and hold the toggle switch down to lower the weight to the desired depth as indicated on the depth meter. Place the fishing rod in the rod holder and reel up the slack so that your rod has a slight bend in it.
THE SHORT STOP SYSTEM Adjusting the Depth Meter The Cannon Depth Meter provides non-slip accuracy, plus easy resetting. To reset, just slide the meter away from the reel until the gears are disengaged. Spin meter gear to change setting. NOTE: Actual fishing depth may vary from depth shown on meter due to trolling speed and weight of cannon ball.
POSITIVE ION CONTROL The Positive Ion Control System Your boat has an electrical charge around the hull in water. If a boat is properly bonded and properly zinced, that charge should be slightly positive when measured from ground to the downrigger cable. Positive Ion Control (PIC) is the use of electricity to control that charge and its fluctuation so that it is always maintained at a specified set voltage.
Trouble Shooting 8-Lb. Weight at 2, 4, and 6 MPH Actual Depth of Weight (ft.) 2 MPH 4 MPH 6 MPH Amount of Cable in Water (ft.) 10-Lb. Weight at 2, 4, and 6 MPH 2 MPH ActualDepth of Weight (ft.) 4 MPH 6 MPH Amount of Cable in Water (ft.) 12-Lb. Weight at 2, 4, and 6 MPH 2 MPH Actual Depth of Weight (ft.) 4 MPH 6 MPH Amount of Cable in Water (ft.) PROBLEM: Up or down will not work. SOLUTION: Check the battery cable polarity then check the battery voltage.
TROLLING TIPS Ten Good Trolling Tips 1) Test your lures over the boat side before sending them down and back. Do this to make sure the lure wiggles and wobbles properly without going belly up or wandering off. Some lures can be adjusted, fine tuned actually, to impart maximum action. For example, a slight bend in the tail of a spoon or twist of the hook eye in the nose of a plug can make a noticeable difference in how the lure performs.
Johnson Outdoors Inc. warrants to the original purchaser that if the accompanying product (see exclusions below) proves to be defective in material or workmanship within the following warranty periods, Johnson Outdoors Inc.
ENVIRONMENTAL COMPLIANCE STATEMENT: It is the intention of Johnson Outdoors Inc. to be a responsible corporate citizen, operating in compliance with known and applicable environmental regulations, and a good neighbor in the communities where we make or sell our products. WEEE Directive: EU Directive 2002/96/EC “Waste of Electrical and Electronic Equipment Directive (WEEE)” impacts most distributors, sellers, and manufacturers of consumer electronics in the European Union.